
Owners Manual
Page 1
TUNER C14120 'REM" F FICT - harman/kardon HIGH FIDELITY CASSETTE DECK TUNER owner's manual PUSH TFIERt F r•i:! EJECT "i PUSH ON/OFF PULL N CH120 IIIGH FIDELITY CASSETTE DECK. TUNING • harm,In/kardon
TUNER C14120 'REM" F FICT - harman/kardon HIGH FIDELITY CASSETTE DECK TUNER owner's manual PUSH TFIERt F r•i:! EJECT "i PUSH ON/OFF PULL N CH120 IIIGH FIDELITY CASSETTE DECK. TUNING • harm,In/kardon
Owners Manual
Page 2
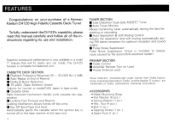
... CH120's capability,please read this manual carefully and follow all of the instructions regarding its use and installation. CASSETTE DECK SECTION ■ Playback Frequency Response 20 - 20,000 Hz (±3dB) ■ Auto Replay at the tape end. 1 TUNER SECTION ■ Low Distortion Dual-Gate MOSFET Tuner ■ Auto Tuner Monitor Allows monitoring tuner automatically during the fast forwarding or rewinding. ■ Auto Separation & Soft Muting Control Adjusts...
... CH120's capability,please read this manual carefully and follow all of the instructions regarding its use and installation. CASSETTE DECK SECTION ■ Playback Frequency Response 20 - 20,000 Hz (±3dB) ■ Auto Replay at the tape end. 1 TUNER SECTION ■ Low Distortion Dual-Gate MOSFET Tuner ■ Auto Tuner Monitor Allows monitoring tuner automatically during the fast forwarding or rewinding. ■ Auto Separation & Soft Muting Control Adjusts...
Owners Manual
Page 3
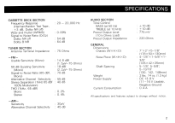
... dB TUNER SECTION Antenna Terminal Impedance : 75 Ohms -FM- SPECIFICATIONS CASSETTE DECK SECTION Frequency Response (Harman/Kardon Test Tape, - ±3 dB, Dolby NR off) Wow and Flutter (WRMS) Signal to change without notice. 2 Usable Sensitivity (Mono) : 14.8 dBf (1 .5pV-75 Ohms) 50 dB Quieting Sensitivity : 18 dBf (Mono) (2.2#V-75 Ohms) Signal to Noise Ratio (65 dBf, : 70 dB Mono) Alternative Channel Selectivity : 55 dB Stereo...
... dB TUNER SECTION Antenna Terminal Impedance : 75 Ohms -FM- SPECIFICATIONS CASSETTE DECK SECTION Frequency Response (Harman/Kardon Test Tape, - ±3 dB, Dolby NR off) Wow and Flutter (WRMS) Signal to change without notice. 2 Usable Sensitivity (Mono) : 14.8 dBf (1 .5pV-75 Ohms) 50 dB Quieting Sensitivity : 18 dBf (Mono) (2.2#V-75 Ohms) Signal to Noise Ratio (65 dBf, : 70 dB Mono) Alternative Channel Selectivity : 55 dB Stereo...
Owners Manual
Page 4
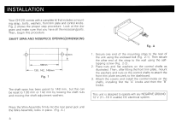
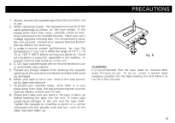
...operate with a complete kit that you have all the necessarylparts. Press the Wire Assembly firmly into the rear panel jack unti l the Wire Assembly locks in place. (Fig. A. ) 3 Then, begin this can be reset to the wal l using the enclosed bolt (Fig. 2-1). Fig. Attach the covers and instal l the control knobs on the control.... 3. INSTALLATION Your CH120 comes with any NEGATIVE GROUND 12 V (11 16 V usable) DC electrical system. Secure one end of the mounting strap to the rear of the strap to 130 mm or 142 mm by loosing the shaft nuts and moving the shaft adjustment washers.
...operate with a complete kit that you have all the necessarylparts. Press the Wire Assembly firmly into the rear panel jack unti l the Wire Assembly locks in place. (Fig. A. ) 3 Then, begin this can be reset to the wal l using the enclosed bolt (Fig. 2-1). Fig. Attach the covers and instal l the control knobs on the control.... 3. INSTALLATION Your CH120 comes with any NEGATIVE GROUND 12 V (11 16 V usable) DC electrical system. Secure one end of the mounting strap to the rear of the strap to 130 mm or 142 mm by loosing the shaft nuts and moving the shaft adjustment washers.

Owners Manual
Page 5
Nuts Covers A Knobs B Knobs Fig, 2 NOTE : Secure the ground lead of the unit by using a screw (*) already attached to the chassis of the -car. Be sure that this chassis point is a good electrical ground, as it may otherwise cause engine noise in the audio signals. 4 Nuts Flat Washers Ground Lead Shaft Adjustment Washer Chassis Dashboard Front Trim Plate Flat Washers Hex. Metal Mounting Strap Bolt Spring Washer Flat Washer Fig. 2-1 Flat Washer Tapping Screw Hex. Fig. 2-2 r-
Nuts Covers A Knobs B Knobs Fig, 2 NOTE : Secure the ground lead of the unit by using a screw (*) already attached to the chassis of the -car. Be sure that this chassis point is a good electrical ground, as it may otherwise cause engine noise in the audio signals. 4 Nuts Flat Washers Ground Lead Shaft Adjustment Washer Chassis Dashboard Front Trim Plate Flat Washers Hex. Metal Mounting Strap Bolt Spring Washer Flat Washer Fig. 2-1 Flat Washer Tapping Screw Hex. Fig. 2-2 r-

Owners Manual
Page 6
... Fuse holder Red Blue Yellow White Red White Red DD J Rear Left (To amplifier) Rear Right (To amplifier) Front Left (To amplifier) Front Right (To amplifier) To + Battery (ignition switch) To power antenna Remote lead (To amplifier) To antenna Fig. 3 +BATTERY The +Battery lead is at "ACC" position. Power antenna control does not work with a semi-automatic or manually operated antenna. It should be connected to the car chassis. GROUND This is the negative power input. REMOTE Connect the amplifier remote turn-on...
... Fuse holder Red Blue Yellow White Red White Red DD J Rear Left (To amplifier) Rear Right (To amplifier) Front Left (To amplifier) Front Right (To amplifier) To + Battery (ignition switch) To power antenna Remote lead (To amplifier) To antenna Fig. 3 +BATTERY The +Battery lead is at "ACC" position. Power antenna control does not work with a semi-automatic or manually operated antenna. It should be connected to the car chassis. GROUND This is the negative power input. REMOTE Connect the amplifier remote turn-on...

Owners Manual
Page 8
... knob controls the sound level. Turn it . F. (Fast Forward) Button 7. FM STEREO Indicator 10. DOLBY NR Switch Push this trimmer for the optimum AM reception. Antenna Trimmer Adjust this switch to decrease the rear level . 8. VOLUME Control/ON-OFF Switch (push)/BALANCE Control (pull) Push this knob. This also controls the balance of the left and right channels when pulling out on the Tuner. EJECT Button 4. REW (Rewind) Button 6. FADER Control This control adjusts the...
... knob controls the sound level. Turn it . F. (Fast Forward) Button 7. FM STEREO Indicator 10. DOLBY NR Switch Push this trimmer for the optimum AM reception. Antenna Trimmer Adjust this switch to decrease the rear level . 8. VOLUME Control/ON-OFF Switch (push)/BALANCE Control (pull) Push this knob. This also controls the balance of the left and right channels when pulling out on the Tuner. EJECT Button 4. REW (Rewind) Button 6. FADER Control This control adjusts the...

Owners Manual
Page 9
... start playing again. mode. Lightly depress the other button (FF or REW) to stop tape play or F. With the cassette tape opening to the Tuner mode (when the tuner has been switched on ). 6. Adjust the VOLUME, BASS , TREBLE , BALANCE and FADER controls to Tuner mode (when the tuner is switched on ) during play , depress the EJECT button. Depress the F. F. F. The unit is then turned ON even if the tuner is playing. Push the DOLBY NR switch...
... start playing again. mode. Lightly depress the other button (FF or REW) to stop tape play or F. With the cassette tape opening to the Tuner mode (when the tuner has been switched on ). 6. Adjust the VOLUME, BASS , TREBLE , BALANCE and FADER controls to Tuner mode (when the tuner is switched on ) during play , depress the EJECT button. Depress the F. F. F. The unit is then turned ON even if the tuner is playing. Push the DOLBY NR switch...

Owners Manual
Page 10
...--CO--TUNING hannan/kardon Fig. 5 Antenna Trimmer 9 Remove the tape by turning the TUNING control very slowly. 3. When the Mono switch is not depressed, the stereo indicator will not operate if a tape is being received. 4. Tune in a weak station adjacent to this frequency by depressing the EJECT button. Turn the tuner on by turning the Tuning control. Adjust the VOLUME, BASS , TREBLE , BALANCE and FADER controls to FM position. 2. Other...
...--CO--TUNING hannan/kardon Fig. 5 Antenna Trimmer 9 Remove the tape by turning the TUNING control very slowly. 3. When the Mono switch is not depressed, the stereo indicator will not operate if a tape is being received. 4. Tune in a weak station adjacent to this frequency by depressing the EJECT button. Turn the tuner on by turning the Tuning control. Adjust the VOLUME, BASS , TREBLE , BALANCE and FADER controls to FM position. 2. Other...
Owners Manual
Page 11
... l the slack has been taken up before turning your car's voltage regulator checked also. When replacing fuse(s), the replacement must be of use , store in the unit. 4. PRECAUTIONS 1 . Always remove the cassettetape from dust, dirt and strong magnetic sources such as electric motors and TV sets. 8. To protect your nearest Harman Kardon Service Station for shorted circuitry. When your tape is...
... l the slack has been taken up before turning your car's voltage regulator checked also. When replacing fuse(s), the replacement must be of use , store in the unit. 4. PRECAUTIONS 1 . Always remove the cassettetape from dust, dirt and strong magnetic sources such as electric motors and TV sets. 8. To protect your nearest Harman Kardon Service Station for shorted circuitry. When your tape is...
Owners Manual
Page 12
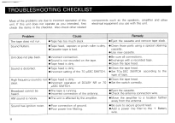
...; Incorrect setting of the 70 pSEC SWITCH. • Set 70p SEC SWITCH according to the type of DOLBY NR or 70 •Set the switch correctly. ,uSEC SWITCH. If this unit does not 'operate as the speakers, amplifier and other related components such as you use with a recorded tape. • Clean the tape head. Sound has ignition noise. • Poor connection of the antenna. •...
...; Incorrect setting of the 70 pSEC SWITCH. • Set 70p SEC SWITCH according to the type of DOLBY NR or 70 •Set the switch correctly. ,uSEC SWITCH. If this unit does not 'operate as the speakers, amplifier and other related components such as you use with a recorded tape. • Clean the tape head. Sound has ignition noise. • Poor connection of the antenna. •...


