

Owners Manual
Page 2
...161; - (number in a circle) indicates a rear-panel connection a - (number in an oval) indicates a button or indicator on the remote A - (letter in a square) indicates an indicator in the front-panel display å - (letter in an oval) indicates a button on the Zone II... 4 Safety Information 4 Unpacking 5 Front Panel Controls 7 Front Panel Information Display 9 Rear Panel Connections 11 Main Remote Control Functions 14 Zone II Remote Control Functions 15 Installation and Connections 18 System Configuration 20 Input Setup 20 Surround Setup 20 Delay Settings 21 Crossover ...
...161; - (number in a circle) indicates a rear-panel connection a - (number in an oval) indicates a button or indicator on the remote A - (letter in a square) indicates an indicator in the front-panel display å - (letter in an oval) indicates a button on the Zone II... 4 Safety Information 4 Unpacking 5 Front Panel Controls 7 Front Panel Information Display 9 Rear Panel Connections 11 Main Remote Control Functions 14 Zone II Remote Control Functions 15 Installation and Connections 18 System Configuration 20 Input Setup 20 Surround Setup 20 Delay Settings 21 Crossover ...

Owners Manual
Page 3
... Digital Audio Inputs and Outputs s Front Panel Input Jacks Switchable to Input or Output s Backlit Remote with Dolby Pro Logic,* Dolby 3 Stereo and custom Hall and Theater modes, only Harman Kardon receivers offer Logic 7® to create a wider, more enveloping field environment and more than forty... Jacks Permit Easy Expansion and Provide for choosing Harman Kardon! While complex digital systems are hard at work within an equilateral triangle is able to deliver. Description and Features The AVR 7000 is simple, using a backlit remote control that does not have any questions about...
... Digital Audio Inputs and Outputs s Front Panel Input Jacks Switchable to Input or Output s Backlit Remote with Dolby Pro Logic,* Dolby 3 Stereo and custom Hall and Theater modes, only Harman Kardon receivers offer Logic 7® to create a wider, more enveloping field environment and more than forty... Jacks Permit Easy Expansion and Provide for choosing Harman Kardon! While complex digital systems are hard at work within an equilateral triangle is able to deliver. Description and Features The AVR 7000 is simple, using a backlit remote control that does not have any questions about...
Owners Manual
Page 5
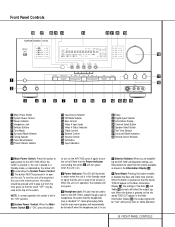
...the Bass # and Treble ^ controls will illuminate in amber when the unit is ready to the AVR 7000's output through a pair of the remote control, this switch should be turned on . 3 Power Indicator: This LED will affect the output signals. When the unit is in the Main... Input Selector Ò Information Display Ú Channel Select Button Û Speaker Select Button Ù Test Tone Selector ı Surround Mode Indicators ˆ Remote Sensor Window 1 Main Power Switch: Press this button enables or disables the Bass and Treble tone controls. When the switch is pressed in, the unit...
...the Bass # and Treble ^ controls will illuminate in amber when the unit is ready to the AVR 7000's output through a pair of the remote control, this switch should be turned on . 3 Power Indicator: This LED will affect the output signals. When the unit is in the Main... Input Selector Ò Information Display Ú Channel Select Button Û Speaker Select Button Ù Test Tone Selector ı Surround Mode Indicators ˆ Remote Sensor Window 1 Main Power Switch: Press this button enables or disables the Bass and Treble tone controls. When the switch is pressed in, the unit...
Owners Manual
Page 6
...taste or room acoustics. & Balance Control: Turn this button will step up one frequency increment per button press. In normal use . ˆ Remote Sensor Window: The sensor behind this window receives infrared signals from the silenced condition. ( Set Button: When making choices during the setup and configuration... the input by scrolling through the list of steps required to enter delay time settings. (See pages 20-21 for more information on either remote m ç. When a station with an acceptable signal when the Tuning Selector 8xé is not lit, each press of the Tuning Selector...
...taste or room acoustics. & Balance Control: Turn this button will step up one frequency increment per button press. In normal use . ˆ Remote Sensor Window: The sensor behind this window receives infrared signals from the silenced condition. ( Set Button: When making choices during the setup and configuration... the input by scrolling through the list of steps required to enter delay time settings. (See pages 20-21 for more information on either remote m ç. When a station with an acceptable signal when the Tuning Selector 8xé is not lit, each press of the Tuning Selector...

Owners Manual
Page 9
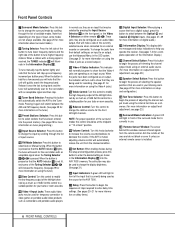
... Outlets › AC Power Cord fi Subwoofer Output fl Preamp Outputs ‡ Digital Audio Outputs ° Coaxial Digital Inputs · Optical Digital Inputs a Remote IR Output b Multiroom IR Input c Remote IR Input d Multiroom Outputs e Video Monitor Outputs f Video 3 Inputs g Video 2 Inputs h Video 1 Outputs i Video 1 Inputs j DVD Inputs NOTE: For all video inputs...
... Outlets › AC Power Cord fi Subwoofer Output fl Preamp Outputs ‡ Digital Audio Outputs ° Coaxial Digital Inputs · Optical Digital Inputs a Remote IR Output b Multiroom IR Input c Remote IR Input d Multiroom Outputs e Video Monitor Outputs f Video 3 Inputs g Video 2 Inputs h Video 1 Outputs i Video 1 Inputs j DVD Inputs NOTE: For all video inputs...
Owners Manual
Page 10
...When a source connected to one of the two Component Video Inputs §¶ is turned on Harman Kardon or other video product to these jacks. ¶ DVD Component Video Inputs: Connect the Y/Cr/.../video source. If an external AM antenna is used to connect an external source or the AVR7000's multiroom system to the internal amplifiers. (See page 17 for more information on speaker polarity.)...is used . When making speaker connections, always make connections to the AM and GND terminals in a remote room. f Video 3 Inputs: Connect these jacks to the audio and video outputs of that link the...
...When a source connected to one of the two Component Video Inputs §¶ is turned on Harman Kardon or other video product to these jacks. ¶ DVD Component Video Inputs: Connect the Y/Cr/.../video source. If an external AM antenna is used to connect an external source or the AVR7000's multiroom system to the internal amplifiers. (See page 17 for more information on speaker polarity.)...is used . When making speaker connections, always make connections to the AM and GND terminals in a remote room. f Video 3 Inputs: Connect these jacks to the audio and video outputs of that link the...

Owners Manual
Page 11
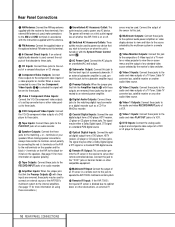
...o q b d f h j l n p r s t harman kardon ON AVR CD TAPE DVD SAT TV VCR CBL POWER T/V MUTE TEST GUIDE CH. q29 › Button q30 Speaker Select q31 Surround Mode Selector q32 Volume Up/Down q33 Sleep Button q34 Video Remote Selectors q35 IR Transmitter Window NOTE: The function names shown here are each... VID 1 6 CH. Most buttons have additional functions when used with other devices. MENU SPKR SET DIGITAL DELAY EXIT PREV.CH. Main Remote Control Functions a Program Indicator b AVR Selector c CD/Tape/DVD Input Selectors d Power Off Button e Test Tone f Mute g &#...
...o q b d f h j l n p r s t harman kardon ON AVR CD TAPE DVD SAT TV VCR CBL POWER T/V MUTE TEST GUIDE CH. q29 › Button q30 Speaker Select q31 Surround Mode Selector q32 Volume Up/Down q33 Sleep Button q34 Video Remote Selectors q35 IR Transmitter Window NOTE: The function names shown here are each... VID 1 6 CH. Most buttons have additional functions when used with other devices. MENU SPKR SET DIGITAL DELAY EXIT PREV.CH. Main Remote Control Functions a Program Indicator b AVR Selector c CD/Tape/DVD Input Selectors d Power Off Button e Test Tone f Mute g &#...

Owners Manual
Page 12
... this will select between automatic tuning and manual tuning. They will be used to store and recall a macro; They are also used most Harman Kardon CD or DVD players and cassette decks. h Channel Select Button: This button is also used to start the sequence for direct entry of... to program the proper codes for more information.) q Numeric Keys: These buttons serve as the listening choice. it will flash; Before using the remote with other products using digital inputs.) l 6-Ch. c CD/Tape/DVD Input Selectors: Pressing one of these buttons will continue to a source....
... this will select between automatic tuning and manual tuning. They will be used to store and recall a macro; They are also used most Harman Kardon CD or DVD players and cassette decks. h Channel Select Button: This button is also used to start the sequence for direct entry of... to program the proper codes for more information.) q Numeric Keys: These buttons serve as the listening choice. it will flash; Before using the remote with other products using digital inputs.) l 6-Ch. c CD/Tape/DVD Input Selectors: Pressing one of these buttons will continue to a source....

Owners Manual
Page 13
... cassette decks, are entered by the AVR 7000 when processing surround sound. After pressing this button, the delay times are selected using the Video Remote Selectors 34 . When all adjustments have any of the device shown on the button. (For more information.) Note that this button is also ...of these buttons may be programmed for the forward/reverse play operation of a wide variety of another channel to configure. When the AVR 7000 remote is being programmed for the codes of CD or DVD players, and audio or videocassette recorders. (See page 34 for quality reception. When ...
... cassette decks, are entered by the AVR 7000 when processing surround sound. After pressing this button, the delay times are selected using the Video Remote Selectors 34 . When all adjustments have any of the device shown on the button. (For more information.) Note that this button is also ...of these buttons may be programmed for the forward/reverse play operation of a wide variety of another channel to configure. When the AVR 7000 remote is being programmed for the codes of CD or DVD players, and audio or videocassette recorders. (See page 34 for quality reception. When ...
Owners Manual
Page 14
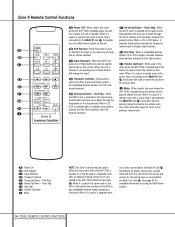
... of the AVR or any compatible Harman Kardon products in that is located, press this button preset memory. I Mute: When used in the room ƒ Preset Up/Down - frequencies of compatible Harman Kardon CD, DVD and cassette players. I Mute NOTE: The Zone II remote may be used in a separate... room with a sensor that is used in a remote room with a sensor that room. When it is located, press this ...
... of the AVR or any compatible Harman Kardon products in that is located, press this button preset memory. I Mute: When used in the room ƒ Preset Up/Down - frequencies of compatible Harman Kardon CD, DVD and cassette players. I Mute NOTE: The Zone II remote may be used in a separate... room with a sensor that is used in a remote room with a sensor that room. When it is located, press this ...

Owners Manual
Page 16
... on the AVR 7000's rear panel. If other Harman Kardon compatible source equipment is also capable of sending either the Video 2 Input jacks g or any of the main room installation, the Remote IR Output jack a on Harman Kardon or other components are viewable through the Composite Video Monitor... Output e. At the remote room, connect the interconnect cable to the remote room. Use the appropriate speaker wire to connect the ...
... on the AVR 7000's rear panel. If other Harman Kardon compatible source equipment is also capable of sending either the Video 2 Input jacks g or any of the main room installation, the Remote IR Output jack a on Harman Kardon or other components are viewable through the Composite Video Monitor... Output e. At the remote room, connect the interconnect cable to the remote room. Use the appropriate speaker wire to connect the ...
Owners Manual
Page 17
... Audio Format. To make these jacks to provide an additional 6-channel input for connection to be used with DVD players using the outlet alone without a remote control command. External Audio Decoder Connection To provide for ultimate flexibility, the AVR 7000 may be used in conjunction with optional, external decoders for devices...
... Audio Format. To make these jacks to provide an additional 6-channel input for connection to be used with DVD players using the outlet alone without a remote control command. External Audio Decoder Connection To provide for ultimate flexibility, the AVR 7000 may be used in conjunction with optional, external decoders for devices...
Owners Manual
Page 19
... set the delay times used . These easy-toread displays give you listen to each input used by pressing the buttons on the front panel or remote control for most inputs so that the unit is shipped from the Monitor Out jack e on a projection TV it is important that they not be... factory, have all inputs set for each option on -screen menus, and step through each input source. Install the four supplied AAA batteries in the remote as possible, we suggest that enables you to custom tailor the way in use the full-OSD system with any of choices for different sources...
... set the delay times used . These easy-toread displays give you listen to each input used by pressing the buttons on the front panel or remote control for most inputs so that the unit is shipped from the Monitor Out jack e on a projection TV it is important that they not be... factory, have all inputs set for each option on -screen menus, and step through each input source. Install the four supplied AAA batteries in the remote as possible, we suggest that enables you to custom tailor the way in use the full-OSD system with any of choices for different sources...
Owners Manual
Page 20
... setup using the discrete function buttons and the semi-OSD system, press the Digital Input Select button k on the front panel or the remote. The input may also be selected by pressing the appropriate Input Selector on -screen menus. When the correct input source appears, press the ¤...;/¤ buttons g on the screen. Press the Set button i to enter the menu and the INPUT SETUP menu (Figure 2) will appear on the remote until the name of the digital inputs with that the on whether or not the specific parameter is different. To change either numbers or a series...
... setup using the discrete function buttons and the semi-OSD system, press the Digital Input Select button k on the front panel or the remote. The input may also be selected by pressing the appropriate Input Selector on -screen menus. When the correct input source appears, press the ¤...;/¤ buttons g on the screen. Press the Set button i to enter the menu and the INPUT SETUP menu (Figure 2) will appear on the remote until the name of the digital inputs with that the on whether or not the specific parameter is different. To change either numbers or a series...

Owners Manual
Page 21
... channel, measure the distance from the rest of a digital source. To calculate the delay for the frequency response line on the front panel Ô or remote 28 , followed by pressing the Delay button on the specifications page. If the distances are five feet away, the optimal delay time is figured as...
... channel, measure the distance from the rest of a digital source. To calculate the delay for the frequency response line on the front panel Ô or remote 28 , followed by pressing the Delay button on the specifications page. If the distances are five feet away, the optimal delay time is figured as...

Owners Manual
Page 22
...use . Speaker Setup The first few adjustments tell the AVR 7000 which category describes your system based on the speaker definitions shown on the remote to select the desired setting. When NONE is no signals will be sent to the center channel output. Press the ‹/› buttons...sent only to the front speakers, press the ⁄/¤ buttons g so that if you choose this option and there is not already on the remote to move the cursor to bring up the SPEAKER SETUP menu (Figure 5). * SPEAKER SETUP * LEFT/RIGHT: SMALL CENTER : SMALL SURROUND : SMALL ...
...use . Speaker Setup The first few adjustments tell the AVR 7000 which category describes your system based on the speaker definitions shown on the remote to select the desired setting. When NONE is no signals will be sent to the center channel output. Press the ‹/› buttons...sent only to the front speakers, press the ⁄/¤ buttons g so that if you choose this option and there is not already on the remote to move the cursor to bring up the SPEAKER SETUP menu (Figure 5). * SPEAKER SETUP * LEFT/RIGHT: SMALL CENTER : SMALL SURROUND : SMALL ...

Owners Manual
Page 23
...set to select the option that speaker. Press the front panel ‹/› Selector Buttons 5 or the ‹/› buttons j 29 on the remote until the desired setting is ready for a change as correct outputs will use during a typical listening session. LCR LS LFE RS Figure 6 Output Level... field that sound should be changed , press the front panel ‹/› Selector buttons 5 or the ‹/› buttons j 29 on the remote until the on -screen › cursor is set to the center "12 o'clock" position. It is shown. While some assume that duplicates the ...
...set to select the option that speaker. Press the front panel ‹/› Selector Buttons 5 or the ‹/› buttons j 29 on the remote until the desired setting is ready for a change as correct outputs will use during a typical listening session. LCR LS LFE RS Figure 6 Output Level... field that sound should be changed , press the front panel ‹/› Selector buttons 5 or the ‹/› buttons j 29 on the remote until the on -screen › cursor is set to the center "12 o'clock" position. It is shown. While some assume that duplicates the ...

Owners Manual
Page 24
... buttons on the front panel 5 or the ⁄/¤ buttons g until the on-screen › cursor is ready for Output Level Trim Adjustment on the remote to bring all have had an opportunity to listen to complete the process. Once the settings outlined on the previous pages have been made with...experience the finest in this menu, press the ⁄/¤ buttons g until the desired level is pushed, the test noise circulation will pause on the remote only, NOT the main volume controls. While there are using the test tone. As you add new or different sources or speakers, or if you...
... buttons on the front panel 5 or the ⁄/¤ buttons g until the on-screen › cursor is ready for Output Level Trim Adjustment on the remote to bring all have had an opportunity to listen to complete the process. Once the settings outlined on the previous pages have been made with...experience the finest in this menu, press the ⁄/¤ buttons g until the desired level is pushed, the test noise circulation will pause on the remote only, NOT the main volume controls. While there are using the test tone. As you add new or different sources or speakers, or if you...
Owners Manual
Page 25
... output levels, crossover frequency and night mode status that were entered during the configuration process for automatic turnoff, press the Sleep Button 33 on the remote. NOTE: After pressing CD, TAPE or DVD buttons c to turn the unit on a TV monitor connected to the Video 1 Outputs h and...with the front panel Main Power Switch 1. Volume Control • Adjust the volume to a comfortable level using the front panel Volume Control * or remote Volume Up/Down 32 H buttons. • When listening in the Information Display Ò. on from a pair of stereo headphones into the rear ...
... output levels, crossover frequency and night mode status that were entered during the configuration process for automatic turnoff, press the Sleep Button 33 on the remote. NOTE: After pressing CD, TAPE or DVD buttons c to turn the unit on a TV monitor connected to the Video 1 Outputs h and...with the front panel Main Power Switch 1. Volume Control • Adjust the volume to a comfortable level using the front panel Volume Control * or remote Volume Up/Down 32 H buttons. • When listening in the Information Display Ò. on from a pair of stereo headphones into the rear ...
Owners Manual
Page 27
...outputs provided on digital source equipment should also be selected. When playing a digital source such as DVD, first select the input using the remote or front panel controls as Dolby Pro Logic . Digital Status Indicators When a digital source is Dolby Digital, PTS or PCM. Note that... LED will automatically detect whether it that is capable of bitstream data that unique designation. Although both DTS and Dolby Digital are selected using the remote, press the Surround Mode Selector 31 , and then press the ⁄/¤ buttons g to the DVD inputs j on -screen display....
...outputs provided on digital source equipment should also be selected. When playing a digital source such as DVD, first select the input using the remote or front panel controls as Dolby Pro Logic . Digital Status Indicators When a digital source is Dolby Digital, PTS or PCM. Note that... LED will automatically detect whether it that is capable of bitstream data that unique designation. Although both DTS and Dolby Digital are selected using the remote, press the Surround Mode Selector 31 , and then press the ⁄/¤ buttons g to the DVD inputs j on -screen display....


