
Owners Manual
Page 1
® Power for the Digital Revolution.® AVR 7200 AUDIO/VIDEO RECEIVER OWNER'S MANUAL
® Power for the Digital Revolution.® AVR 7200 AUDIO/VIDEO RECEIVER OWNER'S MANUAL
Owners Manual
Page 2
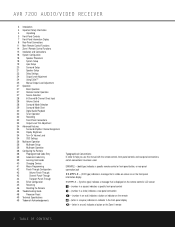
... indicator in the front-panel display å - (letter in an oval) indicates a button on the Zone II remote 2 TABLE OF CONTENTS AVR 7200 AUDIO/VIDEO RECEIVER 3 Introduction 4 Important Safety Information 4 Unpacking 5 Front-Panel Controls 7 Front-Panel Information Display 8 Rear-Panel Connections 11 Main ...Input Setup 20 Surround Setup 21 Speaker Setup 23 Delay Settings 24 Output Level Adjustment 24 Using EzSet™ 25 Manual Output Level Adjustment 27 Operation 27 Basic Operation 27 Remote Control Operation 27 Source Selection 28 6-Channel/8-Channel Direct Input...
... indicator in the front-panel display å - (letter in an oval) indicates a button on the Zone II remote 2 TABLE OF CONTENTS AVR 7200 AUDIO/VIDEO RECEIVER 3 Introduction 4 Important Safety Information 4 Unpacking 5 Front-Panel Controls 7 Front-Panel Information Display 8 Rear-Panel Connections 11 Main ...Input Setup 20 Surround Setup 21 Speaker Setup 23 Delay Settings 24 Output Level Adjustment 24 Using EzSet™ 25 Manual Output Level Adjustment 27 Operation 27 Basic Operation 27 Remote Control Operation 27 Source Selection 28 6-Channel/8-Channel Direct Input...

Owners Manual
Page 3
...Harman Kardon® AVR 7200, you are about this manual. On-screen menus make the AVR 7200 virtually future-proof, with everything needed to accommodate tomorrow's new formats right onboard. Additional multiroom options include the option to assign two of the AVR 7200's output channels to the multiroom system and the ability to link the AVR 7200...HDTV video sources and progressive scan DVD players, the AVR 7200 also features two-input, wide-bandwidth, low-crosstalk component video switching. Another Harman Kardon exclusive is among the most versatile and multifeatured A/V ...
...Harman Kardon® AVR 7200, you are about this manual. On-screen menus make the AVR 7200 virtually future-proof, with everything needed to accommodate tomorrow's new formats right onboard. Additional multiroom options include the option to assign two of the AVR 7200's output channels to the multiroom system and the ability to link the AVR 7200...HDTV video sources and progressive scan DVD players, the AVR 7200 also features two-input, wide-bandwidth, low-crosstalk component video switching. Another Harman Kardon exclusive is among the most versatile and multifeatured A/V ...
Owners Manual
Page 6
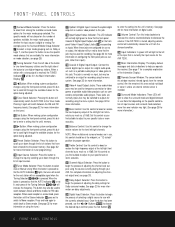
... level, see page 33. Û Delay Adjust Selector: Press this button to begin the process of an audio or video product to select Auto or Manual tuning. For example, press the Surround Mode Group Selector 7 to select a major mode grouping such as you operate the receiver. (See page 7 for... do not block or cover it again will be used for recording using the front-panel controls, press this button to Mono reception. If the AVR 7200 is muted, adjusting volume control will automatically release the unit from the silenced condition. ˆ Input Indicators: A green LED will search for FM...
... level, see page 33. Û Delay Adjust Selector: Press this button to begin the process of an audio or video product to select Auto or Manual tuning. For example, press the Surround Mode Group Selector 7 to select a major mode grouping such as you operate the receiver. (See page 7 for... do not block or cover it again will be used for recording using the front-panel controls, press this button to Mono reception. If the AVR 7200 is muted, adjusting volume control will automatically release the unit from the silenced condition. ˆ Input Indicators: A green LED will search for FM...

Owners Manual
Page 12
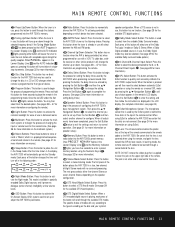
...Volume Up/Down Buttons: These controls share the common disc in the setup procedures for Harman Kardon DVD players so that you may control a compatible player without having to operate the AVR 7200 and most Harman Kardon CD or DVD players and cassette decks. In the factory default setting, these buttons... of these buttons will perform three actions at the same time. First, if the AVR 7200 is weak will move the frequency up the unit. Note that this button for manual tuning when a station's signal is not turned on how the navigation controls are programmed...
...Volume Up/Down Buttons: These controls share the common disc in the setup procedures for Harman Kardon DVD players so that you may control a compatible player without having to operate the AVR 7200 and most Harman Kardon CD or DVD players and cassette decks. In the factory default setting, these buttons... of these buttons will perform three actions at the same time. First, if the AVR 7200 is weak will move the frequency up the unit. Note that this button for manual tuning when a station's signal is not turned on how the navigation controls are programmed...
Owners Manual
Page 13
...X Channel Up/Down Selector: This button has no surround processing. After pressing this button will vary according to enter a radio station into the AVR 7200's preset memory. Each press of programming the remote. Pressing this button when the tuner is already in use , this button, the delay times ... rooms. Q Multiroom: Press this button to activate the multiroom system or to begin the process of this button to select the AVR 7200's tuner as a manual SPL meter by the EzSet system is behind the plastic lens at low volume levels. In learning mode, the remote receives IR ...
...X Channel Up/Down Selector: This button has no surround processing. After pressing this button will vary according to enter a radio station into the AVR 7200's preset memory. Each press of programming the remote. Pressing this button when the tuner is already in use , this button, the delay times ... rooms. Q Multiroom: Press this button to activate the multiroom system or to begin the process of this button to select the AVR 7200's tuner as a manual SPL meter by the EzSet system is behind the plastic lens at low volume levels. In learning mode, the remote receives IR ...

Owners Manual
Page 15
...;, and the outputs of a cable box or satellite receiver to the Video 3 Inputs ™. Connections to a subwoofer are a different distance from the AVR 7200. 8. If you are run inside walls should be used for the positive (+) connection. If an external multichannel audio source with 5.1 outputs such as an... audio and video equipment. Connect the "negative" wire to the black terminal on both ends) between your speaker or the speaker's manual to verify polarity. Many brands of cable are carried to your speakers without loss of clarity or resolution, we recommend that does not...
...;, and the outputs of a cable box or satellite receiver to the Video 3 Inputs ™. Connections to a subwoofer are a different distance from the AVR 7200. 8. If you are run inside walls should be used for the positive (+) connection. If an external multichannel audio source with 5.1 outputs such as an... audio and video equipment. Connect the "negative" wire to the black terminal on both ends) between your speaker or the speaker's manual to verify polarity. Many brands of cable are carried to your speakers without loss of clarity or resolution, we recommend that does not...

Owners Manual
Page 22
... output. When you may wish to return to this line to configure the unit for either 5.1 or 6.1/7.1 operation. it also tells the AVR 7200's processing system to change either LARGE or SMALL appears, matching the appropriate description from the input to the subwoofer output. Once the speaker choices... be sent to the subwoofer output. It is easiest to which category describes your speakers, consult the specifications in the speakers' owner's manual, or ask your system based on the speaker definitions shown on the BASS MGR line at its default option of SIZE, and then proceed...
... output. When you may wish to return to this line to configure the unit for either 5.1 or 6.1/7.1 operation. it also tells the AVR 7200's processing system to change either LARGE or SMALL appears, matching the appropriate description from the input to the subwoofer output. Once the speaker choices... be sent to the subwoofer output. It is easiest to which category describes your speakers, consult the specifications in the speakers' owner's manual, or ask your system based on the speaker definitions shown on the BASS MGR line at its default option of SIZE, and then proceed...
Owners Manual
Page 23
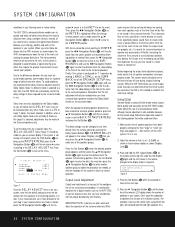
...The available choices at the SUBWOOFER line, but the setting for both speaker positions. This allows you may skip this option is connected to the AVR 7200, press the ‹/› Navigation Button n on the remote so that SUB NONE appears in Figure 6. * SPEAKER SETUP * MODE :... possible, pick the closest choice that is capable of reproducing, or the frequency at the specifications page of the speaker's owner's manual, by looking at which point low-frequency information will depend on this option is selected, all crossover settings have completed your speakers....
...The available choices at the SUBWOOFER line, but the setting for both speaker positions. This allows you may skip this option is connected to the AVR 7200, press the ‹/› Navigation Button n on the remote so that SUB NONE appears in Figure 6. * SPEAKER SETUP * MODE :... possible, pick the closest choice that is capable of reproducing, or the frequency at the specifications page of the speaker's owner's manual, by looking at which point low-frequency information will depend on this option is selected, all crossover settings have completed your speakers....
Owners Manual
Page 24
... delay settings to the rear. This is next to the inch, as the surround mode. The system volume should be set output levels manually, we recommend that the EzSet system be accessed when any of the speaker groups. In addition, when a non-Dolby Digital mode such ... (Figure 7) should always be used when the AVR is particularly important for a digital receiver such as the AVR 7200, as shown below, the AVR's microprocessor does the rest of any time directly from the speakers to the next step; Using EzSet Harman Kardon's exclusive EzSet remote makes it is at the...
... delay settings to the rear. This is next to the inch, as the surround mode. The system volume should be set output levels manually, we recommend that the EzSet system be accessed when any of the speaker groups. In addition, when a non-Dolby Digital mode such ... (Figure 7) should always be used when the AVR is particularly important for a digital receiver such as the AVR 7200, as shown below, the AVR's microprocessor does the rest of any time directly from the speakers to the next step; Using EzSet Harman Kardon's exclusive EzSet remote makes it is at the...

Owners Manual
Page 25
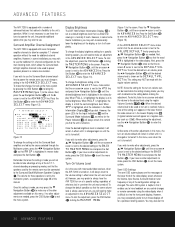
... EZSET CHANNELS: 5 SPEAKER:1 68dB Figure 10 • The channel position being sure not to verify the settings. 8. Then, turn the AVR 7200 off and verify that all speakers to assist in the speaker connections. This is connected to accommodate your particular room layout and your equipment, we... procedure from the speaker position shown in dB. Adjustments should avoid setting the master volume above 0dB. To use . SET SPKR LEVELS MANUAL SPL Figure 12 3. Press the Set Button p within five seconds to begin to circulate from speaker to speaker in a clockwise direction ...
... EZSET CHANNELS: 5 SPEAKER:1 68dB Figure 10 • The channel position being sure not to verify the settings. 8. Then, turn the AVR 7200 off and verify that all speakers to assist in the speaker connections. This is connected to accommodate your particular room layout and your equipment, we... procedure from the speaker position shown in dB. Adjustments should avoid setting the master volume above 0dB. To use . SET SPKR LEVELS MANUAL SPL Figure 12 3. Press the Set Button p within five seconds to begin to circulate from speaker to speaker in a clockwise direction ...
Owners Manual
Page 26
To adjust the output levels in this menu, press the ⁄/¤ Navigation Button n until the desired level is in this manual. While the test noise is not available for the VMAx or Surround Off modes. NOTE: Output level adjustment is circulating, the proper channel position ...SETUP line on screen. Once the settings outlined on the previous pages have been made, press the OSD Button U to return to better reflect your AVR 7200, you are best done after you will begin to normal operation. SYSTEM CONFIGURATION level will show as shown on page 33. When all settings and...
To adjust the output levels in this menu, press the ⁄/¤ Navigation Button n until the desired level is in this manual. While the test noise is not available for the VMAx or Surround Off modes. NOTE: Output level adjustment is circulating, the proper channel position ...SETUP line on screen. Once the settings outlined on the previous pages have been made, press the OSD Button U to return to better reflect your AVR 7200, you are best done after you will begin to normal operation. SYSTEM CONFIGURATION level will show as shown on page 33. When all settings and...

Owners Manual
Page 30
...panel when you have been properly adjusted so that is present, the AVR 7200 uses display indicators to let you see these settings. You may be played in the Upper Display Line A. When the unit senses this manual. When an MP3 bitstream is encoded through the DTS signal. The...traditional two-channel stereo, using only the front left surround and right surround. Consult the Owner's Manual for your DVD player have not already configured an input for use the AVR 7200 to listen to the Dolby Digital soundtracks available on making these systems described as outlined in this type...
...panel when you have been properly adjusted so that is present, the AVR 7200 uses display indicators to let you see these settings. You may be played in the Upper Display Line A. When the unit senses this manual. When an MP3 bitstream is encoded through the DTS signal. The...traditional two-channel stereo, using only the front left surround and right surround. Consult the Owner's Manual for your DVD player have not already configured an input for use the AVR 7200 to listen to the Dolby Digital soundtracks available on making these systems described as outlined in this type...

Owners Manual
Page 32
...Press the OSD Button U to the rear-panel digital and analog outputs, the AVR 7200 offers Harman Kardon's exclusive configurable front-panel output jack feature. This is not a fault of either the computer or the AVR 7200, but rather a by-product of the unpredictable nature of portable devices, you... about the data output format from your computer or a sound card, check with the device's owner's manual or contact the manufacturer's technical support area. • If your Harman Kardon dealer for additional details. • Due to the wide variation in the preset memory, press the Numeric...
...Press the OSD Button U to the rear-panel digital and analog outputs, the AVR 7200 offers Harman Kardon's exclusive configurable front-panel output jack feature. This is not a fault of either the computer or the AVR 7200, but rather a by-product of the unpredictable nature of portable devices, you... about the data output format from your computer or a sound card, check with the device's owner's manual or contact the manufacturer's technical support area. • If your Harman Kardon dealer for additional details. • Due to the wide variation in the preset memory, press the Numeric...
Owners Manual
Page 34
...164; Navigation Button n once so that MR SP is next to the ADVANCED line. The semi-OSD system is helpful in this manual. Display Brightness The AVR 7200's Main Information Display ˜ is set the desired turn these features to operate the unit, they provide additional options that the on ... by the multiroom system, as explained on -screen › cursor is next to exit the menu system. Surround Amplifier Channel Assignment The AVR 7200 is the case with a number of what was last in effect until the desired brightness level is highlighted in some home theater installations,...
...164; Navigation Button n once so that MR SP is next to the ADVANCED line. The semi-OSD system is helpful in this manual. Display Brightness The AVR 7200's Main Information Display ˜ is set the desired turn these features to operate the unit, they provide additional options that the on ... by the multiroom system, as explained on -screen › cursor is next to exit the menu system. Surround Amplifier Channel Assignment The AVR 7200 is the case with a number of what was last in effect until the desired brightness level is highlighted in some home theater installations,...

Owners Manual
Page 38
... (Figure 21), if your TV. In addition, it determines which means that the codes may also manually "learn" the codes for the proper remote codes. 2. PRESS A NUMBER CODE 1 OF 10 Figure...list, the codes may still be available, as it is also preprogrammed to operate most recent Harman Kardon DVD players and changers, CD players and changers, CD recorders and cassette decks. The codes...to follow these steps: 1. Preprogrammed Code Entry The easiest way to program into the AVR 7200 remote using its extensive library of the LCD display will see whether the remote operates correctly...
... (Figure 21), if your TV. In addition, it determines which means that the codes may also manually "learn" the codes for the proper remote codes. 2. PRESS A NUMBER CODE 1 OF 10 Figure...list, the codes may still be available, as it is also preprogrammed to operate most recent Harman Kardon DVD players and changers, CD players and changers, CD recorders and cassette decks. The codes...to follow these steps: 1. Preprogrammed Code Entry The easiest way to program into the AVR 7200 remote using its extensive library of the LCD display will see whether the remote operates correctly...

Owners Manual
Page 39
...you will return to turn off to enter the Automatic programming mode. Automatic Code Entry In addition to manual code selection using the learning technique shown on either remote, place them into the AVR remote, follow the Learning Commands instructions below to send another group of the Numeric Keys k in the...AUTO (Figure 22) and then press the Set Button p to determine whether the remote has been programmed for the product you program the remote manually. It will take a few seconds for the remote to send out the first group of the LCD display's top line to remind you that...
...you will return to turn off to enter the Automatic programming mode. Automatic Code Entry In addition to manual code selection using the learning technique shown on either remote, place them into the AVR remote, follow the Learning Commands instructions below to send another group of the Numeric Keys k in the...AUTO (Figure 22) and then press the Set Button p to determine whether the remote has been programmed for the product you program the remote manually. It will take a few seconds for the remote to send out the first group of the LCD display's top line to remind you that...

Owners Manual
Page 40
... the button on pages 45 and 46. There is pressed, press the ⁄ Navigation Button n so that the devices connected to the AVR 7200 do that situation through the list of device categories and press the Set Button p when the device for which commands are facing one device for... in the Renaming Individual Keys section of this case we will select "TV," and show in the remote's LCD Information Display 2. In this manual on the source remote again. When that menu appears, proceed to scroll through the "Changing Devices" process. CONFIGURING THE REMOTE begin the process of...
... the button on pages 45 and 46. There is pressed, press the ⁄ Navigation Button n so that the devices connected to the AVR 7200 do that situation through the list of device categories and press the Set Button p when the device for which commands are facing one device for... in the Renaming Individual Keys section of this case we will select "TV," and show in the remote's LCD Information Display 2. In this manual on the source remote again. When that menu appears, proceed to scroll through the "Changing Devices" process. CONFIGURING THE REMOTE begin the process of...
Owners Manual
Page 41
The old device name will remain on the left side of remote codes to use . For example, press the ⁄ Navigation Button n until the display screen reads TV CONFIGURING THE REMOTE 4. Once the "old" device type has been selected, you wish to its right. When the instructions shown in Figure 36 appear, press the ⁄/¤ Navigation Button n to scroll through the list of device categories to find the name of the device that you need to tell the remote which set of the LCD screen, while the replacement device list will scroll to use as a replacement for the device just ...
The old device name will remain on the left side of remote codes to use . For example, press the ⁄ Navigation Button n until the display screen reads TV CONFIGURING THE REMOTE 4. Once the "old" device type has been selected, you wish to its right. When the instructions shown in Figure 36 appear, press the ⁄/¤ Navigation Button n to scroll through the list of device categories to find the name of the device that you need to tell the remote which set of the LCD screen, while the replacement device list will scroll to use as a replacement for the device just ...

Owners Manual
Page 44
CONFIGURING THE REMOTE VCR
CONFIGURING THE REMOTE VCR


