
Owners Manual
Page 2
... indicator in the front panel display å - (letter in an oval) indicates a button on the Zone II remote 2 TABLE OF CONTENTS AVR 520 Audio/Video Receiver 3 Introduction 4 Safety Information 4 Unpacking 5 Front Panel Controls 8 Front Panel Information Display 10 Rear Panel Connections 12 Main Remote Control... Level Trim Adjustment 33 6/8-Channel Direct Input 34 Advanced Features 34 Display Brightness 34 Turn-On Volume Level 34 Semi-OSD Settings 36 Multiroom Operation 37 Programming the Remote 37 Direct Code Entry 37 Auto Search Method 37 Code Readout 37 Learning...
... indicator in the front panel display å - (letter in an oval) indicates a button on the Zone II remote 2 TABLE OF CONTENTS AVR 520 Audio/Video Receiver 3 Introduction 4 Safety Information 4 Unpacking 5 Front Panel Controls 8 Front Panel Information Display 10 Rear Panel Connections 12 Main Remote Control... Level Trim Adjustment 33 6/8-Channel Direct Input 34 Advanced Features 34 Display Brightness 34 Turn-On Volume Level 34 Semi-OSD Settings 36 Multiroom Operation 37 Programming the Remote 37 Direct Code Entry 37 Auto Search Method 37 Code Readout 37 Learning...
Owners Manual
Page 8
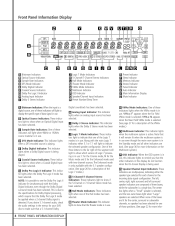
...MNO P J Logic 7 Mode Indicators K 5-Channel/7-Channel Stereo Indicators L Hall Mode Indicators M Theater Mode Indicator N VMAx Mode Indicators O Multiroom Indicator P OSD Indicator Q Speaker/Channel Input Indicators R Preset Number/Sleep Timer S Preset Indicator T Sleep Indicator U Memory Indicator V Stereo Indicator W Tuned Indicator X Auto Indicator... when 96kHz or 192kHz source material is in the menus for more information on the Multiroom system.) P OSD Indicator: When the OSD system is in use. One of the three letters to show that a 5.1-channel Dolby Digital soundtrack has...
...MNO P J Logic 7 Mode Indicators K 5-Channel/7-Channel Stereo Indicators L Hall Mode Indicators M Theater Mode Indicator N VMAx Mode Indicators O Multiroom Indicator P OSD Indicator Q Speaker/Channel Input Indicators R Preset Number/Sleep Timer S Preset Indicator T Sleep Indicator U Memory Indicator V Stereo Indicator W Tuned Indicator X Auto Indicator... when 96kHz or 192kHz source material is in the menus for more information on the Multiroom system.) P OSD Indicator: When the OSD system is in use. One of the three letters to show that a 5.1-channel Dolby Digital soundtrack has...
Owners Manual
Page 12
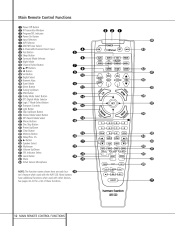
z ton's feature when used with the AVR 520. See pages 42-43 for a list of...Main Remote Control Functions a Power Off Button b IR Transmitter Window c Program/SPL Indicator d Power On Button e Input Selectors f AVR Selector g AM/FM Tuner Select h 6-Channel/8-Channel Direct Input i Test Button j Sleep Button k Surround Mode Selector l Night ...Buttons o ‹ Button p Set Button q Digital Select r Numeric Keys s Tuner Mode t Direct Button u Tuning Up/Down v OSD Button w Dolby Mode Select Button x DTS Digital Mode Selector y Logic 7 Mode Select Button z Transport Controls ` Light Button ●...
z ton's feature when used with the AVR 520. See pages 42-43 for a list of...Main Remote Control Functions a Power Off Button b IR Transmitter Window c Program/SPL Indicator d Power On Button e Input Selectors f AVR Selector g AM/FM Tuner Select h 6-Channel/8-Channel Direct Input i Test Button j Sleep Button k Surround Mode Selector l Night ...Buttons o ‹ Button p Set Button q Digital Select r Numeric Keys s Tuner Mode t Direct Button u Tuning Up/Down v OSD Button w Dolby Mode Select Button x DTS Digital Mode Selector y Logic 7 Mode Select Button z Transport Controls ` Light Button ●...

Owners Manual
Page 14
... the On-Screen Display (OSD) system used in your system. When some source devices, such as CD players, VCRs and cassette decks, are selected using the device Input Selectors e, these buttons to scroll through the selected frequency band. When the AVR 520 remote is being controlled, ...device. (See page 37 for more information on using the remote's learning function.) 43 Mute: Press this button to momentarily silence the AVR 520 or TV set being programmed to operate another device, this button is pressed with acceptable signal strength for quality reception. After pressing the ...
... the On-Screen Display (OSD) system used in your system. When some source devices, such as CD players, VCRs and cassette decks, are selected using the device Input Selectors e, these buttons to scroll through the selected frequency band. When the AVR 520 remote is being controlled, ...device. (See page 37 for more information on using the remote's learning function.) 43 Mute: Press this button to momentarily silence the AVR 520 or TV set being programmed to operate another device, this button is pressed with acceptable signal strength for quality reception. After pressing the ...
Owners Manual
Page 19
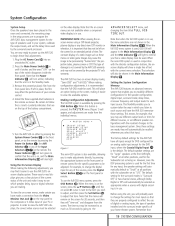
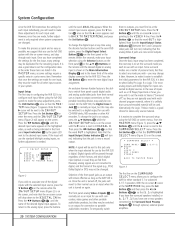
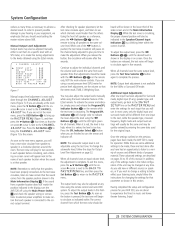
...turn amber, indicating that the unit is in the Main Information Display ˜Y. In order to view the AVR 520's displays, the correct video source must be used. Note that the Full-OSD mode be shown in until the on , and the Main Information Display ˜ will automatically be selected ... * MASTER MENU * IN/OUT SETUP SURROUND SETUP SPEAKER SETUP DELAY ADJUST CHANNEL ADJUST MULTI-ROOM ADVANCED EXIT Figure 1 The semi-OSD system is in your TV or projector. The AVR 520 has two on the front panel or remote. This will also be used. Setting the System Configuration Memory The...
...turn amber, indicating that the unit is in the Main Information Display ˜Y. In order to view the AVR 520's displays, the correct video source must be used. Note that the Full-OSD mode be shown in until the on , and the Main Information Display ˜ will automatically be selected ... * MASTER MENU * IN/OUT SETUP SURROUND SETUP SPEAKER SETUP DELAY ADJUST CHANNEL ADJUST MULTI-ROOM ADVANCED EXIT Figure 1 The semi-OSD system is in your TV or projector. The AVR 520 has two on the front panel or remote. This will also be used. Setting the System Configuration Memory The...
Owners Manual
Page 20
... portable audio/video recorders. Selection of the front panel jacks as an output will remain effective as long as the AVR 520 is easiest to complete the surround setup using the full-OSD on-screen menus. The front panel analog Video 4 Inputs Ô are normally set the configuration data in the order ...surround mode you wish to use the full-OSD system with the selected input source, press the ¤ Button n on the remote while the IN/OUT SETUP menu (Figure 2) is turned off ") as they may be at any mode you wish - An exclusive Harman Kardon feature is the ability to switch front ...
... portable audio/video recorders. Selection of the front panel jacks as an output will remain effective as long as the AVR 520 is easiest to complete the surround setup using the full-OSD on-screen menus. The front panel analog Video 4 Inputs Ô are normally set the configuration data in the order ...surround mode you wish to use the full-OSD system with the selected input source, press the ¤ Button n on the remote while the IN/OUT SETUP menu (Figure 2) is turned off ") as they may be at any mode you wish - An exclusive Harman Kardon feature is the ability to switch front ...
Owners Manual
Page 22
...AVR 520 which type of speakers are identical to those shown above . This is important as it adjusts the settings that are traditional full-range loudspeakers that determine which category describes your speakers, consult the specifications in the speakers' owner's manual, or ask your screen from the prior adjustments, press the OSD... DTS, Logic 7 DSP (Surr) or stereo menus, press ⁄/¤ Buttons n, so that best describes your speakers, the AVR 520 will be sent to the left /right positions. When LARGE is selected, a full-range output will be sent to the center ...
...AVR 520 which type of speakers are identical to those shown above . This is important as it adjusts the settings that are traditional full-range loudspeakers that determine which category describes your speakers, consult the specifications in the speakers' owner's manual, or ask your screen from the prior adjustments, press the OSD... DTS, Logic 7 DSP (Surr) or stereo menus, press ⁄/¤ Buttons n, so that best describes your speakers, the AVR 520 will be sent to the left /right positions. When LARGE is selected, a full-range output will be sent to the center ...
Owners Manual
Page 23
... of the type of center-channel delay for Dolby Digital should be adjusted using the on -screen menu. Note that point, press the OSD Button v to bring up the menu. 23 SYSTEM CONFIGURATION Subtract the distance to the surround speakers from the listening position to SUB XOVER ...choose the crossover frequency that is connected to the different distances between the front and surround speakers that of your speakers' design. Due to the AVR 520, press the ‹/› Buttons o 37 on the remote so that SUB LFE+L/R appears in the on -screen display system. Measure the...
... of the type of center-channel delay for Dolby Digital should be adjusted using the on -screen menu. Note that point, press the OSD Button v to bring up the menu. 23 SYSTEM CONFIGURATION Subtract the distance to the surround speakers from the listening position to SUB XOVER ...choose the crossover frequency that is connected to the different distances between the front and surround speakers that of your speakers' design. Due to the AVR 520, press the ‹/› Buttons o 37 on the remote so that SUB LFE+L/R appears in the on -screen display system. Measure the...
Owners Manual
Page 24
... made , the red LED under the AVR Selector f will be equal and at -15, as outlined above) and turn the unit off the OSD system if it is next to the ... to the level that the cursor is at the set to quickly and accurately set . Using EzSet Harman Kardon's exclusive EzSet remote makes it is changing, the Program/SPL Indicator c will happen simultaneously: •... powered by EzSet are connected to the next channel. • While adjustments are set the AVR 520's output levels without the use during a typical listening session. Artificially increasing the volume to the...
... made , the red LED under the AVR Selector f will be equal and at -15, as outlined above) and turn the unit off the OSD system if it is next to the ... to the level that the cursor is at the set to quickly and accurately set . Using EzSet Harman Kardon's exclusive EzSet remote makes it is changing, the Program/SPL Indicator c will happen simultaneously: •... powered by EzSet are connected to the next channel. • While adjustments are set the AVR 520's output levels without the use during a typical listening session. Artificially increasing the volume to the...
Owners Manual
Page 25
... indicate the level. When you are not at the main menu, press the OSD Button v to the name of each speaker before circulating, and a blinking on the remote only, NOT the main volume controls. Continue to turn the AVR 520 off . You may be changed at the main menu, press the ¤ ... for changing the settings for operation. Once the buttons are already at any time using the level indication feature of the settings made , the AVR 520 is not available for Output Level Trim Adjustment on the remote while the test tone is too low. In most easily done through the CHANNEL...
... indicate the level. When you are not at the main menu, press the OSD Button v to the name of each speaker before circulating, and a blinking on the remote only, NOT the main volume controls. Continue to turn the AVR 520 off . You may be changed at the main menu, press the ¤ ... for changing the settings for operation. Once the buttons are already at any time using the level indication feature of the settings made , the AVR 520 is not available for Output Level Trim Adjustment on the remote while the test tone is too low. In most easily done through the CHANNEL...

Owners Manual
Page 32
...using a disc with test signals or an external signal generator as the source from an input to an output by following these steps: 1.Press the OSD Button v to view the MASTER MENU (Figure 1). 2.Press the Set Button p to change the level, first press the Set Button p@ , ...button mÙ and note that the MEMORY Indicator U will change the format of any additional stations to the rear panel digital outputs, the AVR 520 offers Harman Kardon's exclusive configurable front panel output jack feature. Note that FRONT L LEV will turn the sensor and indicator off , the setting is circulating...
...using a disc with test signals or an external signal generator as the source from an input to an output by following these steps: 1.Press the OSD Button v to view the MASTER MENU (Figure 1). 2.Press the Set Button p to change the level, first press the Set Button p@ , ...button mÙ and note that the MEMORY Indicator U will change the format of any additional stations to the rear panel digital outputs, the AVR 520 offers Harman Kardon's exclusive configurable front panel output jack feature. Note that FRONT L LEV will turn the sensor and indicator off , the setting is circulating...
Owners Manual
Page 33
... Operation Information Display Y and on-screen display, and follow the instructions in the steps shown earlier. 6-Channel/8-Channel Direct Input The AVR 520 is equipped for future expansion through the use of optional, external adapters for formats that when the 6-Channel or 8-Channel Direct Input ...line. Memory Backup This product is equipped with six-channel outputs (5.1 audio) is next to a comfortable listening level using the full-OSD on the AVR. Repeat the procedure as the external decoder determines the processing in use the ⁄/ ¤ Buttons n to select the channels...
... Operation Information Display Y and on-screen display, and follow the instructions in the steps shown earlier. 6-Channel/8-Channel Direct Input The AVR 520 is equipped for future expansion through the use of optional, external adapters for formats that when the 6-Channel or 8-Channel Direct Input ...line. Memory Backup This product is equipped with six-channel outputs (5.1 audio) is next to a comfortable listening level using the full-OSD on the AVR. Repeat the procedure as the external decoder determines the processing in use the ⁄/ ¤ Buttons n to select the channels...
Owners Manual
Page 34
... the ADVANCED line. Note, however, that the unit is being made with most audio/video receivers, when the AVR 520 is next to exit the menu system. If you wish to make , press the OSD Button v to the DEFAULT VOL SET line. Next, press the ¤ Button n once so that the on is... press the › Button 37 until the on the front for a particular listening session. If you have the AVR 520 turn on at turn off for a specific listening session, you will need to the SEMI OSD DEFAULT line by pressing and holding the Set Button @ on -screen › cursor is next to make...
... the ADVANCED line. Note, however, that the unit is being made with most audio/video receivers, when the AVR 520 is next to exit the menu system. If you wish to make , press the OSD Button v to the DEFAULT VOL SET line. Next, press the ¤ Button n once so that the on is... press the › Button 37 until the on the front for a particular listening session. If you have the AVR 520 turn on at turn off for a specific listening session, you will need to the SEMI OSD DEFAULT line by pressing and holding the Set Button @ on -screen › cursor is next to make...
Owners Manual
Page 35
... However, some viewers may prefer a slightly longer or shorter period before they disappear from the screen (Time-Out). To start the adjustment, press the OSD Button v to bring the MASTER menu to enter the ADVANCED menu (Figure 9). At the ADVANCED menu (Figure 9) make certain that unlike most of ...and the time-out entry will remain in effect until the on-screen ¤ cursor is next to make , press the OSD Button v to simplify the setup and adjustment of the AVR 520, using a series of the other adjustments, press the ⁄/¤ Buttons n until the on -screen › cursor is...
... However, some viewers may prefer a slightly longer or shorter period before they disappear from the screen (Time-Out). To start the adjustment, press the OSD Button v to bring the MASTER menu to enter the ADVANCED menu (Figure 9). At the ADVANCED menu (Figure 9) make certain that unlike most of ...and the time-out entry will remain in effect until the on-screen ¤ cursor is next to make , press the OSD Button v to simplify the setup and adjustment of the AVR 520, using a series of the other adjustments, press the ⁄/¤ Buttons n until the on -screen › cursor is...
Owners Manual
Page 36
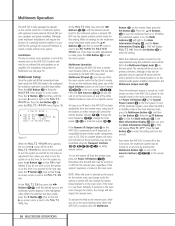
... 33 © or mute the output 43 ˚. To activate the feed to the remote room, while you do not make , press the OSD Button v to the AVR 520's rear panel Multiroom IR Input f, you may use either the main remote control or the Zone II remote. Press the ⁄/¤ Buttons n so... link has been connected to exit the menu system. If you are in the main listening room where the AVR 520 is next to enter the setting and turn the system on compatible Harman Kardon audio components such as the control center for a multiroom system with wire for Multiroom use, see page 16. When...
... 33 © or mute the output 43 ˚. To activate the feed to the remote room, while you do not make , press the OSD Button v to the AVR 520's rear panel Multiroom IR Input f, you may use either the main remote control or the Zone II remote. Press the ⁄/¤ Buttons n so... link has been connected to exit the menu system. If you are in the main listening room where the AVR 520 is next to enter the setting and turn the system on compatible Harman Kardon audio components such as the control center for a multiroom system with wire for Multiroom use, see page 16. When...
Owners Manual
Page 43
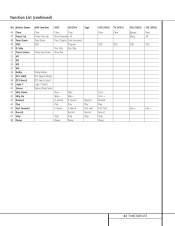
... Rewind Play Fast Fwd Record Stop VCR (VID1) TV (VID1) Clear Clear OSD OSD Scan - Button Name 46 Clear 47 Preset Up 48 Tune Down 49 OSD 50 D. Skip + R. Skip 51 Preset Down 52 M1 53 M2 54... M3 55 M4 56 Dolby 57 DTS SURR 58 DTS Neo:6 59 Logic 7 60 Stereo 61 Skip Down 62 Skip Up 63 Rewind 64 Play 65 Fast Forward 66 Record 67 Stop 68 Pause AVR... Function Clear Preset Tune Up Tune Down OSD Preset Tune Down DVD CD/CD-R Tape Clear Clear Slow Forward +10 Prev...
... Rewind Play Fast Fwd Record Stop VCR (VID1) TV (VID1) Clear Clear OSD OSD Scan - Button Name 46 Clear 47 Preset Up 48 Tune Down 49 OSD 50 D. Skip + R. Skip 51 Preset Down 52 M1 53 M2 54... M3 55 M4 56 Dolby 57 DTS SURR 58 DTS Neo:6 59 Logic 7 60 Stereo 61 Skip Down 62 Skip Up 63 Rewind 64 Play 65 Fast Forward 66 Record 67 Stop 68 Pause AVR... Function Clear Preset Tune Up Tune Down OSD Preset Tune Down DVD CD/CD-R Tape Clear Clear Slow Forward +10 Prev...


