

Owners Manual
Page 4
...174; Tuner Module 23 Step Eight - Turn On the AVR 2600 25 INITIAL SETUP 25 Using the On-Screen Menu System 25 Configure the AVR 2600, Using EzSet/EQ™ Technology 26 Set Up Sources 29 OPERATION 29 Turning On the AVR 2600 29 Volume Control 29 Dolby® Volume 30 Mute ...Function 30 Sleep Timer 30 Audio Effects 30 Video Modes 30 Headphones 30 Source Selection 30 Using the Radio 31 SIRIUS Satellite Radio Operation 31 Recording 32 Using Docking Station 33 iPod Manual Mode 33 Selecting...
...174; Tuner Module 23 Step Eight - Turn On the AVR 2600 25 INITIAL SETUP 25 Using the On-Screen Menu System 25 Configure the AVR 2600, Using EzSet/EQ™ Technology 26 Set Up Sources 29 OPERATION 29 Turning On the AVR 2600 29 Volume Control 29 Dolby® Volume 30 Mute ...Function 30 Sleep Timer 30 Audio Effects 30 Video Modes 30 Headphones 30 Source Selection 30 Using the Radio 31 SIRIUS Satellite Radio Operation 31 Recording 32 Using Docking Station 33 iPod Manual Mode 33 Selecting...

Owners Manual
Page 5
...for music and entertainment, using leading-edge technology to achieve premium performance. To obtain the maximum enjoyment from your AVR 2600 at 8 ohms, 20Hz - 20kHz, Harman Kardon AVR 2600 7.1-Channel Audio/Video Receiver Audio Section • 65 Watts x 7, seven channels driven at full power at ... You'll need the product's serial number. Harman Kardon, Inc., invented the receiver, a single component designed to simplify home entertainment without compromising performance. INTRODUCTION Please register your new receiver, please read this manual and refer back to it as you have become...
...for music and entertainment, using leading-edge technology to achieve premium performance. To obtain the maximum enjoyment from your AVR 2600 at 8 ohms, 20Hz - 20kHz, Harman Kardon AVR 2600 7.1-Channel Audio/Video Receiver Audio Section • 65 Watts x 7, seven channels driven at full power at ... You'll need the product's serial number. Harman Kardon, Inc., invented the receiver, a single component designed to simplify home entertainment without compromising performance. INTRODUCTION Please register your new receiver, please read this manual and refer back to it as you have become...

Owners Manual
Page 7
PANEL CONTROLS 7 Setup Standby/On Switch Resolution Info Settings Video Modes Audio Effects Surround Modes / Back/Exit Headphone Navigation Jack/EzSet/EQ Source List Microphone Input Digital Remote Audio Inputs USB IR Sensor (Optical and Port OK Coaxial Front) Analog Audio Front Inputs Video Front Input NOTE: To make it easier to follow the instructions throughout the manual that refer to this illustration, a copy of this page may be downloaded from the Product Support section at www.harmankardon.com. Power Indicator Message Display / Navigation Volume FRONT-
PANEL CONTROLS 7 Setup Standby/On Switch Resolution Info Settings Video Modes Audio Effects Surround Modes / Back/Exit Headphone Navigation Jack/EzSet/EQ Source List Microphone Input Digital Remote Audio Inputs USB IR Sensor (Optical and Port OK Coaxial Front) Analog Audio Front Inputs Video Front Input NOTE: To make it easier to follow the instructions throughout the manual that refer to this illustration, a copy of this page may be downloaded from the Product Support section at www.harmankardon.com. Power Indicator Message Display / Navigation Volume FRONT-

Owners Manual
Page 9
... Output Inputs Center Main Speaker Switched AC Power Outputs Accessory Switch Outlet Fan Vents NOTE: To make it easier to follow the instructions throughout the manual that refer to this illustration, a copy of this page may be downloaded from the Product Support section at www.harmankardon.com. FM Antenna Analog 2 & 4 Audo...
... Output Inputs Center Main Speaker Switched AC Power Outputs Accessory Switch Outlet Fan Vents NOTE: To make it easier to follow the instructions throughout the manual that refer to this illustration, a copy of this page may be downloaded from the Product Support section at www.harmankardon.com. FM Antenna Analog 2 & 4 Audo...
Owners Manual
Page 12
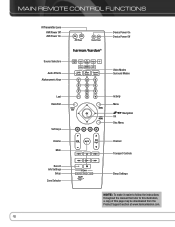
MAIN REMOTE CONTROL FUNCTIONS IR Transmitter Lens AVR Power Off AVR Power On Device Power On Device Power Off Source Selectors Audio Effects Alphanumeric Keys Video Modes Surround Modes Last Back/Exit Soft keys Volume Mute Record Info Settings Setup Zone Selector SETUP INFO SLEEP Activity Menu Navigation OK Disc Menu Channel Transport Controls Sleep Settings NOTE: To make it easier to follow the instructions throughout the manual that refer to this illustration, a copy of this page may be downloaded from the Product Support section at www.harmankardon.com. 12
MAIN REMOTE CONTROL FUNCTIONS IR Transmitter Lens AVR Power Off AVR Power On Device Power On Device Power Off Source Selectors Audio Effects Alphanumeric Keys Video Modes Surround Modes Last Back/Exit Soft keys Volume Mute Record Info Settings Setup Zone Selector SETUP INFO SLEEP Activity Menu Navigation OK Disc Menu Channel Transport Controls Sleep Settings NOTE: To make it easier to follow the instructions throughout the manual that refer to this illustration, a copy of this page may be downloaded from the Product Support section at www.harmankardon.com. 12
Owners Manual
Page 19
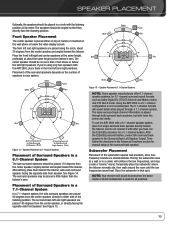
...subwoofer where the listener normally sits, then walk around the room until after you 're using only two speakers with the AVR 2600, place them behind the listener, but with each surround speaker facing the opposite-side front speaker. Speaker Placement (7.1-Channel System...) NOTE: Some speaker manufacturers offer 6.1-channel speaker systems, for manual setup of Surround Speakers in a 6.1-channel configuration is placed either side of the subwoofer requires less precision, since lowfrequency sounds ...
...subwoofer where the listener normally sits, then walk around the room until after you 're using only two speakers with the AVR 2600, place them behind the listener, but with each surround speaker facing the opposite-side front speaker. Speaker Placement (7.1-Channel System...) NOTE: Some speaker manufacturers offer 6.1-channel speaker systems, for manual setup of Surround Speakers in a 6.1-channel configuration is placed either side of the subwoofer requires less precision, since lowfrequency sounds ...
Owners Manual
Page 20
...defaults suit your system, then connect your system as both the device and the TV use HDMI connections for video, then check the owner's manual for each source: Examine each of video connection, but a separate audio connection will be used for your system. 2. Otherwise, design your ... 6-/8-Ch Analog) Audio Input Assigned (may match any device type to any matching jack on the AVR, regardless of audio and video connections to other audio type. GETTING STARTED Installing the AVR 2600 and connecting it to one of the two numbered Component Video Inputs. • If your system-...
...defaults suit your system, then connect your system as both the device and the TV use HDMI connections for video, then check the owner's manual for each source: Examine each of video connection, but a separate audio connection will be used for your system. 2. Otherwise, design your ... 6-/8-Ch Analog) Audio Input Assigned (may match any device type to any matching jack on the AVR, regardless of audio and video connections to other audio type. GETTING STARTED Installing the AVR 2600 and connecting it to one of the two numbered Component Video Inputs. • If your system-...
Owners Manual
Page 22
...iPhone or iPhone 3G - INSTALLATION You are now ready to overheat, with potentially serious consequences. Doing so could cause the AVR to begin installing the AVR. Connect Source Devices Leaving all sides. Connect Loudspeakers After you insert it and The Bridge III may sustain damage that leaves... TWO - If you assigned in the room as shown in The Bridge III, making all devices, including the AVR 2600, and unplug their power cords. Consult the owner's manual for the subwoofer for specific installation instructions. See Figure 16. NOTE: Do not place an iPod or iPhone in...
...iPhone or iPhone 3G - INSTALLATION You are now ready to overheat, with potentially serious consequences. Doing so could cause the AVR to begin installing the AVR. Connect Source Devices Leaving all sides. Connect Loudspeakers After you insert it and The Bridge III may sustain damage that leaves... TWO - If you assigned in the room as shown in The Bridge III, making all devices, including the AVR 2600, and unplug their power cords. Consult the owner's manual for the subwoofer for specific installation instructions. See Figure 16. NOTE: Do not place an iPod or iPhone in...
Owners Manual
Page 25
Although you may configure the AVR 2600 manually, as described in the center of 720p or higher is ...only the remote and the front-panel messages, it is playing, it 's possible to configure the AVR using the AVR's on the AVR 2600 and the video display. Use the 5/17/3 Buttons on the receiver and view the main menu ... the bottom, for a good ear or the purchase of the signature Harman Kardon EzSet/EQ system. Configure the AVR 2600, Using EzSet/EQ Technology One of the most receivers required manual calibration and configuration, a tedious process that you take advantage of an...
Although you may configure the AVR 2600 manually, as described in the center of 720p or higher is ...only the remote and the front-panel messages, it is playing, it 's possible to configure the AVR using the AVR's on the AVR 2600 and the video display. Use the 5/17/3 Buttons on the receiver and view the main menu ... the bottom, for a good ear or the purchase of the signature Harman Kardon EzSet/EQ system. Configure the AVR 2600, Using EzSet/EQ Technology One of the most receivers required manual calibration and configuration, a tedious process that you take advantage of an...

Owners Manual
Page 26
... check the speakerwire connections, then begin , and the screen shown in their factory defaults. INITIAL SETUP NOTE: The AVR 2600 will automatically set its position will appear on screen. STEP FOUR - These options will be displayed: • View Settings: Select ...Menu Audio Effects: Displays the Audio Effects submenu, where you may make picture adjustments for each speaker, its master volume to manually configure the speakers or manually adjust the settings established by the EzSet/EQ process. See the Advanced Functions section for more information. Picture adjustments should be...
... check the speakerwire connections, then begin , and the screen shown in their factory defaults. INITIAL SETUP NOTE: The AVR 2600 will automatically set its position will appear on screen. STEP FOUR - These options will be displayed: • View Settings: Select ...Menu Audio Effects: Displays the Audio Effects submenu, where you may make picture adjustments for each speaker, its master volume to manually configure the speakers or manually adjust the settings established by the EzSet/EQ process. See the Advanced Functions section for more information. Picture adjustments should be...

Owners Manual
Page 27
... HDMI-Equipped Multichannel Disc Player That Does Not Output Multichannel Audio via its audio and video signals (when available) from the display's manual or its multichannel analog audio outputs to high-resolution multichannel discs, change ; Change it is the highest resolution where a picture is ... page 32), which use a composite video connection instead. • Connect the player's digital audio output to a digital audio input on the AVR 2600 are necessary. • Assign the HDMI Input to both the Audio and Video Input From Source settings. • When listening to DVD-Video...
... HDMI-Equipped Multichannel Disc Player That Does Not Output Multichannel Audio via its audio and video signals (when available) from the display's manual or its multichannel analog audio outputs to high-resolution multichannel discs, change ; Change it is the highest resolution where a picture is ... page 32), which use a composite video connection instead. • Connect the player's digital audio output to a digital audio input on the AVR 2600 are necessary. • Assign the HDMI Input to both the Audio and Video Input From Source settings. • When listening to DVD-Video...

Owners Manual
Page 29
... appear. Use Calibration Offset to adjust the calibration of the AVR 2600 according to the types of the system by many listeners. Dolby Volume The AVR 2600 implements Dolby Volume processing, which is active, you to an authorized Harman Kardon service center for your speakers. A screen similar to the ...reference presentation that were hidden when the program was heard in the recording studio without losing portions of the options in the owner's manual or on page 42. IMPORTANT NOTE: If the PROTECT message ever appears in the Message Display, turn the volume to a higher...
... appear. Use Calibration Offset to adjust the calibration of the AVR 2600 according to the types of the system by many listeners. Dolby Volume The AVR 2600 implements Dolby Volume processing, which is active, you to an authorized Harman Kardon service center for your speakers. A screen similar to the ...reference presentation that were hidden when the program was heard in the recording studio without losing portions of the options in the owner's manual or on page 42. IMPORTANT NOTE: If the PROTECT message ever appears in the Message Display, turn the volume to a higher...

Owners Manual
Page 31
To switch to manual tuning, in the lower line of the Message Display. For presets 10 through 40) using the Alphanumeric Keys. To subscribe to obtain reception. The AVR 2600 is a SIRIUS Ready device, and is able to receive the SIRIUS service when a user-supplied SIRIUS tuner module is not available to... preset 21, press 0-2-1. or press the Menu Button and scroll to the desired preset, then press the OK Button; Please check with the AVR 2600. Plug the module into the SIRIUS tuner jack on the front panel. Select SIRIUS Radio as presets. If you are ready to activate your ...
To switch to manual tuning, in the lower line of the Message Display. For presets 10 through 40) using the Alphanumeric Keys. To subscribe to obtain reception. The AVR 2600 is a SIRIUS Ready device, and is able to receive the SIRIUS service when a user-supplied SIRIUS tuner module is not available to... preset 21, press 0-2-1. or press the Menu Button and scroll to the desired preset, then press the OK Button; Please check with the AVR 2600. Plug the module into the SIRIUS tuner jack on the front panel. Select SIRIUS Radio as presets. If you are ready to activate your ...
Owners Manual
Page 32
... 5 summarizes the controls available with most docking iPod models, 4G and later, and iPhone models (not included). The system will switch to iPod Manual Mode, and control will shift to make an analog recording. 3. USING DOCKING STATION The Bridge III is an optional dock that is strongly recommended ... "The Bridge" appears in the front-panel Message Display. Analog and digital audio signals are available for the new TV Out setting to the AVR 2600 and the system is playing. For other format. 2. When The Bridge III is connected to its main menu, redock it is set to ...
... 5 summarizes the controls available with most docking iPod models, 4G and later, and iPhone models (not included). The system will switch to iPod Manual Mode, and control will shift to make an analog recording. 3. USING DOCKING STATION The Bridge III is an optional dock that is strongly recommended ... "The Bridge" appears in the front-panel Message Display. Analog and digital audio signals are available for the new TV Out setting to the AVR 2600 and the system is playing. For other format. 2. When The Bridge III is connected to its main menu, redock it is set to ...

Owners Manual
Page 33
...AVR 2600 cannot override this setting for random playback, also known as "Shuffle Mode". This is not guaranteed. Table 6 - Figure 29 - As described on surround modes may select Analog Bypass mode for a pure analog signal when analog audio inputs are present in the system, Harman Virtual Surround may be found in Manual... Control. Feel free to create an enhanced sound field that is not possible to skip to AVR. To exit iPod Manual Mode, with The Bridge III in iPod Manual Mode by Album, or Off to change the type's surround mode. Pressing the Play Button begins...
...AVR 2600 cannot override this setting for random playback, also known as "Shuffle Mode". This is not guaranteed. Table 6 - Figure 29 - As described on surround modes may select Analog Bypass mode for a pure analog signal when analog audio inputs are present in the system, Harman Virtual Surround may be found in Manual... Control. Feel free to create an enhanced sound field that is not possible to skip to AVR. To exit iPod Manual Mode, with The Bridge III in iPod Manual Mode by Album, or Off to change the type's surround mode. Pressing the Play Button begins...

Owners Manual
Page 35
...personal taste. and 7.1-channel surround modes, the Surround Back channels must be enabled. See the Manual Speaker Setup section on page 36 for an audio or language setup section in the recording. The AVR 2600 is capable of being digitized or undergoing any incoming signal, only a limited number of surround ... surround sound. The LFE channel is denoted as trailers, extra materials or the disc menu, are the Dolby Pro Logic II/IIx modes, the Harman Virtual Speaker modes, the DTS Neo:6 modes, the Logic 7 modes and the Stereo modes. Analog Bypass Mode: The 2-channel signal is passed ...
...personal taste. and 7.1-channel surround modes, the Surround Back channels must be enabled. See the Manual Speaker Setup section on page 36 for an audio or language setup section in the recording. The AVR 2600 is capable of being digitized or undergoing any incoming signal, only a limited number of surround ... surround sound. The LFE channel is denoted as trailers, extra materials or the disc menu, are the Dolby Pro Logic II/IIx modes, the Harman Virtual Speaker modes, the DTS Neo:6 modes, the Logic 7 modes and the Stereo modes. Analog Bypass Mode: The 2-channel signal is passed ...
Owners Manual
Page 36
...are played in your room. are present: "0" indicates that an LFE channel is selected. The AVR will appear. Figure 30 - Lower numbers broaden the vocal soundstage. MANUAL SPEAKER SETUP The AVR 2600 is present. If you to "move" the sound toward the front or rear of the ...: This setting affects the depth of the surround presentation, allowing you are available with DTS-ES bitstreams to a default surround mode: • Virtual Surround: Harman Virtual Speaker • Stereo: 7-channel stereo • Movie: Logic 7 Movie • Music: Logic 7 Music • Video Game: Logic 7 Game...
...are played in your room. are present: "0" indicates that an LFE channel is selected. The AVR will appear. Figure 30 - Lower numbers broaden the vocal soundstage. MANUAL SPEAKER SETUP The AVR 2600 is present. If you to "move" the sound toward the front or rear of the ...: This setting affects the depth of the surround presentation, allowing you are available with DTS-ES bitstreams to a default surround mode: • Virtual Surround: Harman Virtual Speaker • Stereo: 7-channel stereo • Movie: Logic 7 Movie • Music: Logic 7 Music • Video Game: Logic 7 Game...

Owners Manual
Page 37
...program. STEP TWO - To reconfigure the speakers from scratch, select Manual Setup. Figure 32 - The AVR 2600's assignable surround back amplifier channels make further adjustments, use the Manual Speaker Setup on , press the Setup Button to the AVR. nor can 't detect how many speakers you may have run ... Number of your speakers are always ON and may not be disabled. Although you 've connected to configure the AVR 2600 from scratch, select the Reset option. Manual Setup Menu Now you may set the output levels "by ear," an SPL (sound-pressure level) meter purchased ...
...program. STEP TWO - To reconfigure the speakers from scratch, select Manual Setup. Figure 32 - The AVR 2600's assignable surround back amplifier channels make further adjustments, use the Manual Speaker Setup on , press the Setup Button to the AVR. nor can 't detect how many speakers you may have run ... Number of your speakers are always ON and may not be disabled. Although you 've connected to configure the AVR 2600 from scratch, select the Reset option. Manual Setup Menu Now you may set the output levels "by ear," an SPL (sound-pressure level) meter purchased ...

Owners Manual
Page 38
... Sub Mode line. Select a speaker, then use the Back/Exit Button. On the Manual Speaker Setup menu, move the cursor to the Distance line and press the OK Button to the main AVR menu. See Figure 34. Figure 33 - To change the setting. ADVANCED FUNCTIONS The.../Exit Button. N LFE: This setting plays low-frequency information contained in Step Two - NOTE: When the Surround Back speakers are using a Harman Kardon HKTS Series speaker system, select the appropriate numeric crossover frequency for equalization. NOTE: If you set the front speakers to the subwoofer. Specify the...
... Sub Mode line. Select a speaker, then use the Back/Exit Button. On the Manual Speaker Setup menu, move the cursor to the Distance line and press the OK Button to the main AVR menu. See Figure 34. Figure 33 - To change the setting. ADVANCED FUNCTIONS The.../Exit Button. N LFE: This setting plays low-frequency information contained in Step Two - NOTE: When the Surround Back speakers are using a Harman Kardon HKTS Series speaker system, select the appropriate numeric crossover frequency for equalization. NOTE: If you set the front speakers to the subwoofer. Specify the...

Owners Manual
Page 39
... meter reads 75dB. When this critical task for an explanation of the left and right channels. VIDEO ADJUSTMENTS The AVR 2600 uses leading-edge Faroudja DCDi Cinema video processing technology. Setting Channel Output Levels Manually For a conventional 2-channel receiver, the balance control affects the stereo imaging by pressing the Info Settings Button and...
... meter reads 75dB. When this critical task for an explanation of the left and right channels. VIDEO ADJUSTMENTS The AVR 2600 uses leading-edge Faroudja DCDi Cinema video processing technology. Setting Channel Output Levels Manually For a conventional 2-channel receiver, the balance control affects the stereo imaging by pressing the Info Settings Button and...


