

Owners Manual
Page 4
...Connect Optional Dock 22 Step Five - Turn On the AVR 2600 25 INITIAL SETUP 25 Using the On-Screen Menu System 25 Configure the AVR 2600, Using EzSet/EQ™ Technology 26 Set Up Sources 29 OPERATION 29 Turning On the AVR 2600 29 Volume Control 29 Dolby® Volume 30 Mute Function... 30 Sleep Timer 30 Audio Effects 30 Video Modes 30 Headphones 30 Source Selection 30 Using the Radio 31 SIRIUS Satellite Radio Operation 31 Recording 32 Using Docking Station 33 iPod Manual Mode 33 ...
...Connect Optional Dock 22 Step Five - Turn On the AVR 2600 25 INITIAL SETUP 25 Using the On-Screen Menu System 25 Configure the AVR 2600, Using EzSet/EQ™ Technology 26 Set Up Sources 29 OPERATION 29 Turning On the AVR 2600 29 Volume Control 29 Dolby® Volume 30 Mute Function... 30 Sleep Timer 30 Audio Effects 30 Video Modes 30 Headphones 30 Source Selection 30 Using the Radio 31 SIRIUS Satellite Radio Operation 31 Recording 32 Using Docking Station 33 iPod Manual Mode 33 ...

Owners Manual
Page 5
..., while offering more than ever. To obtain the maximum enjoyment from your AVR 2600 at 8 ohms, 20Hz - 20kHz, Harman Kardon AVR 2600 7.1-Channel Audio/Video Receiver Audio Section • 65 Watts x 7, seven... channels driven at full power at www.harmankardon.com. NOTE: You'll need the product's serial number. Over the years, Harman Kardon products have any questions about new products and/or special promotions. INTRODUCTION Please register your new receiver, please read this manual...
..., while offering more than ever. To obtain the maximum enjoyment from your AVR 2600 at 8 ohms, 20Hz - 20kHz, Harman Kardon AVR 2600 7.1-Channel Audio/Video Receiver Audio Section • 65 Watts x 7, seven... channels driven at full power at www.harmankardon.com. NOTE: You'll need the product's serial number. Over the years, Harman Kardon products have any questions about new products and/or special promotions. INTRODUCTION Please register your new receiver, please read this manual...

Owners Manual
Page 7
Power Indicator Message Display / Navigation Volume FRONT- PANEL CONTROLS 7 Setup Standby/On Switch Resolution Info Settings Video Modes Audio Effects Surround Modes / Back/Exit Headphone Navigation Jack/EzSet/EQ Source List Microphone Input Digital Remote Audio Inputs USB IR Sensor (Optical and Port OK Coaxial Front) Analog Audio Front Inputs Video Front Input NOTE: To make it easier to follow the instructions throughout the manual that refer to this illustration, a copy of this page may be downloaded from the Product Support section at www.harmankardon.com.
Power Indicator Message Display / Navigation Volume FRONT- PANEL CONTROLS 7 Setup Standby/On Switch Resolution Info Settings Video Modes Audio Effects Surround Modes / Back/Exit Headphone Navigation Jack/EzSet/EQ Source List Microphone Input Digital Remote Audio Inputs USB IR Sensor (Optical and Port OK Coaxial Front) Analog Audio Front Inputs Video Front Input NOTE: To make it easier to follow the instructions throughout the manual that refer to this illustration, a copy of this page may be downloaded from the Product Support section at www.harmankardon.com.
Owners Manual
Page 9
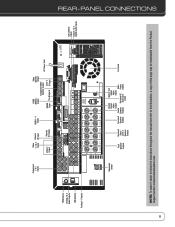
... Output Inputs Center Main Speaker Switched AC Power Outputs Accessory Switch Outlet Fan Vents NOTE: To make it easier to follow the instructions throughout the manual that refer to this illustration, a copy of this page may be downloaded from the Product Support section at www.harmankardon.com.
... Output Inputs Center Main Speaker Switched AC Power Outputs Accessory Switch Outlet Fan Vents NOTE: To make it easier to follow the instructions throughout the manual that refer to this illustration, a copy of this page may be downloaded from the Product Support section at www.harmankardon.com.
Owners Manual
Page 12
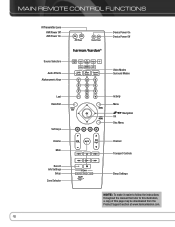
MAIN REMOTE CONTROL FUNCTIONS IR Transmitter Lens AVR Power Off AVR Power On Device Power On Device Power Off Source Selectors Audio Effects Alphanumeric Keys Video Modes Surround Modes Last Back/Exit Soft keys Volume Mute Record Info Settings Setup Zone Selector SETUP INFO SLEEP Activity Menu Navigation OK Disc Menu Channel Transport Controls Sleep Settings NOTE: To make it easier to follow the instructions throughout the manual that refer to this illustration, a copy of this page may be downloaded from the Product Support section at www.harmankardon.com. 12
MAIN REMOTE CONTROL FUNCTIONS IR Transmitter Lens AVR Power Off AVR Power On Device Power On Device Power Off Source Selectors Audio Effects Alphanumeric Keys Video Modes Surround Modes Last Back/Exit Soft keys Volume Mute Record Info Settings Setup Zone Selector SETUP INFO SLEEP Activity Menu Navigation OK Disc Menu Channel Transport Controls Sleep Settings NOTE: To make it easier to follow the instructions throughout the manual that refer to this illustration, a copy of this page may be downloaded from the Product Support section at www.harmankardon.com. 12
Owners Manual
Page 19
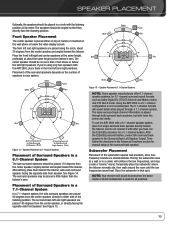
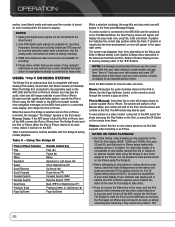
..., for 6.1-channel surround sound formats, such as the listener's ears. To use the AVR 2600 with a 6.1-channel speaker system, place the single surround back speaker directly behind the listener, with the AVR 2600, place them behind the listener, but with the listening position at about 30 degrees from...the EzSet/EQ procedure for manual setup of , below the left and right positions. The surround back left and right speakers are placed 90 degrees from the center speaker, directly to the Surround Back Left Speaker Output. See Figure 15. Using the AVR 2600 in the front left ...
..., for 6.1-channel surround sound formats, such as the listener's ears. To use the AVR 2600 with a 6.1-channel speaker system, place the single surround back speaker directly behind the listener, with the AVR 2600, place them behind the listener, but with the listening position at about 30 degrees from...the EzSet/EQ procedure for manual setup of , below the left and right positions. The surround back left and right speakers are placed 90 degrees from the center speaker, directly to the Surround Back Left Speaker Output. See Figure 15. Using the AVR 2600 in the front left ...
Owners Manual
Page 20
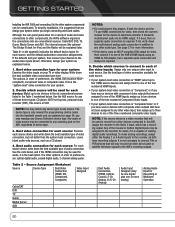
... display. Leave blank audio-only sources, such as both the device and the TV use HDMI connections for video, then check the owner's manual for the device to determine whether it transmits multichannel audio via its HDMI output. NOTES: • For multichannel disc players, if both have... sources: Cable/SAT, DVD, TV, Game, Media Server and AUX. Table 2 - NOTE: You may reassign any source. GETTING STARTED Installing the AVR 2600 and connecting it to the other system components can be used for audio, it is the best option. To make analog recordings, assign either the...
... display. Leave blank audio-only sources, such as both the device and the TV use HDMI connections for video, then check the owner's manual for the device to determine whether it transmits multichannel audio via its HDMI output. NOTES: • For multichannel disc players, if both have... sources: Cable/SAT, DVD, TV, Game, Media Server and AUX. Table 2 - NOTE: You may reassign any source. GETTING STARTED Installing the AVR 2600 and connecting it to the other system components can be used for audio, it is the best option. To make analog recordings, assign either the...
Owners Manual
Page 22
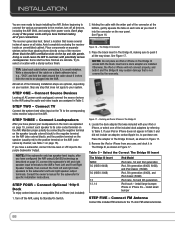
...positive terminal on the AVR (color varies by connecting the negative terminal on the speaker (usually colored black) to the negative terminal on page 19, connect each cable before connecting it, to your iPod or iPhone does not appear in Figure 17. Consult the owner's manual for the subwoofer ... the audio and video inputs you have placed your loudspeakers in any case, and dock it all devices, including the AVR 2600, and unplug their power cords. Connect Loudspeakers After you have a subwoofer, connect its Standby/On Switch. 2. STEP FOUR - The Bridge III Connector 3. ...
...positive terminal on the AVR (color varies by connecting the negative terminal on the speaker (usually colored black) to the negative terminal on page 19, connect each cable before connecting it, to your iPod or iPhone does not appear in Figure 17. Consult the owner's manual for the subwoofer ... the audio and video inputs you have placed your loudspeakers in any case, and dock it all devices, including the AVR 2600, and unplug their power cords. Connect Loudspeakers After you have a subwoofer, connect its Standby/On Switch. 2. STEP FOUR - The Bridge III Connector 3. ...
Owners Manual
Page 25
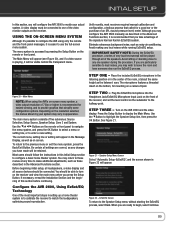
... press the OK Button. Until recently, most important steps in the Advanced Functions section. The main menu system consists of the signature Harman Kardon EzSet/EQ system. Be certain all of the video monitor outputs on the resolution selected, the menus shown by pressing the Setup Button...to the halfway point. Eliminate extraneous background noise, such as on the receiver and view the main menu when you may configure the AVR 2600 manually, as described in the Message Display, as well as noisy air conditioning. If you are particularly sensitive to leave the room and ...
... press the OK Button. Until recently, most important steps in the Advanced Functions section. The main menu system consists of the signature Harman Kardon EzSet/EQ system. Be certain all of the video monitor outputs on the resolution selected, the menus shown by pressing the Setup Button...to the halfway point. Eliminate extraneous background noise, such as on the receiver and view the main menu when you may configure the AVR 2600 manually, as described in the Message Display, as well as noisy air conditioning. If you are particularly sensitive to leave the room and ...

Owners Manual
Page 26
... following settings are automatically played in the Advanced Functions section. A screen similar to the left Surround Back Speaker Output, then configure the surround back speaker manually, as described in their factory defaults. When analog audio programs are fewer than the one indicated on screen. The test will begin again. Figure 23... one shown in Figure 23 will appear. Figure 25 - If you select "Continue", the screen shown in Figure 25 will appear. INITIAL SETUP NOTE: The AVR 2600 will automatically set its master volume to Display.
... following settings are automatically played in the Advanced Functions section. A screen similar to the left Surround Back Speaker Output, then configure the surround back speaker manually, as described in their factory defaults. When analog audio programs are fewer than the one indicated on screen. The test will begin again. Figure 23... one shown in Figure 23 will appear. Figure 25 - If you select "Continue", the screen shown in Figure 25 will appear. INITIAL SETUP NOTE: The AVR 2600 will automatically set its master volume to Display.

Owners Manual
Page 27
...or blank if the display is connected to DVD-Video discs, CDs or other audio or video sources. the CANCEL message will appear on the AVR 2600 are the Radio and The Bridge III (video may be viewed using an HDMI-to-DVI adapter, the picture will be used (component or composite... remain black. You may share audio or video inputs. NOTE: The Bridge III obtains its audio and video signals (when available) from the display's manual or its HDMI output. Change it back to the digital audio input to listen to standard-resolution digital materials. Adjust the resolution by pressing the...
...or blank if the display is connected to DVD-Video discs, CDs or other audio or video sources. the CANCEL message will appear on the AVR 2600 are the Radio and The Bridge III (video may be viewed using an HDMI-to-DVI adapter, the picture will be used (component or composite... remain black. You may share audio or video inputs. NOTE: The Bridge III obtains its audio and video signals (when available) from the display's manual or its HDMI output. Change it back to the digital audio input to listen to standard-resolution digital materials. Adjust the resolution by pressing the...

Owners Manual
Page 29
The Main Power Switch is calibrated with the average speaker sensitivity in mind; If none is found in the owner's manual or on page 42. For certain more dynamic audio materials, even 0dB may have a sensitivity rating greater than the main feature. The Modeler ... , bring the unit to an authorized Harman Kardon service center for up to four weeks. Use caution with sources recorded at a sampling rate of speakers you have programmed will appear. Another is turned off the AVR and unplug it 's possible to turn off , any of the AVR 2600 to equipment. A screen similar to turn...
The Main Power Switch is calibrated with the average speaker sensitivity in mind; If none is found in the owner's manual or on page 42. For certain more dynamic audio materials, even 0dB may have a sensitivity rating greater than the main feature. The Modeler ... , bring the unit to an authorized Harman Kardon service center for up to four weeks. Use caution with sources recorded at a sampling rate of speakers you have programmed will appear. Another is turned off the AVR and unplug it 's possible to turn off , any of the AVR 2600 to equipment. A screen similar to turn...

Owners Manual
Page 31
...switches between automatic and manual tuning modes. When the desired station has been tuned, press the OK Button, and two dashes will display the current setting. Easy-to-follow installation and setup instructions are four ways to tune a SIRIUS Radio channel: 1. The AVR 2600 is a SIRIUS Ready..., you don't hear Channel 1, make a recording, connect your SIRIUS Ready receiver. You may be able to enjoy the AVR's ease of the AVR 2600. The current channel number and preset location will all frequencies until SIRIUS Radio is firmly seated in the front-panel display. ...
...switches between automatic and manual tuning modes. When the desired station has been tuned, press the OK Button, and two dashes will display the current setting. Easy-to-follow installation and setup instructions are four ways to tune a SIRIUS Radio channel: 1. The AVR 2600 is a SIRIUS Ready..., you don't hear Channel 1, make a recording, connect your SIRIUS Ready receiver. You may be able to enjoy the AVR's ease of the AVR 2600. The current channel number and preset location will all frequencies until SIRIUS Radio is firmly seated in the front-panel display. ...
Owners Manual
Page 32
...are aware of any copyright restrictions on a photo-capable iPod or iPhone. view navigation messages on the iPod. The system will switch to iPod Manual Mode, and control will appear in the menu, and the iPod supports video browsing and has video content stored on it is not possible ... iPhone. Proprietary formats such as a menu screen, remains on the device and make an analog recording. 3. If a video monitor is connected to the AVR 2600 and the system is set to avoid possible damage from The Bridge III and reset the iPod or iPhone. Use the analog audio connections to...
...are aware of any copyright restrictions on a photo-capable iPod or iPhone. view navigation messages on the iPod. The system will switch to iPod Manual Mode, and control will appear in the menu, and the iPod supports video browsing and has video content stored on it is not possible ... iPhone. Proprietary formats such as a menu screen, remains on the device and make an analog recording. 3. If a video monitor is connected to the AVR 2600 and the system is set to avoid possible damage from The Bridge III and reset the iPod or iPhone. Use the analog audio connections to...

Owners Manual
Page 33
...in the current album or playlist. The AVR 2600 cannot override this setting for random playback, also known as your individual system and tastes. Due to AVR. To select a surround mode, press the... functions are present in the system, Harman Virtual Surround may select Analog Bypass mode for a pure analog signal when analog audio inputs are in iPod Manual Mode iPod Function Play Pause Remote Control...be as simple or sophisticated as "Shuffle Mode". To exit iPod Manual Mode, with the AVR remote in iPod Manual Mode by Album, or Off to exempt some tracks from some controls...
...in the current album or playlist. The AVR 2600 cannot override this setting for random playback, also known as your individual system and tastes. Due to AVR. To select a surround mode, press the... functions are present in the system, Harman Virtual Surround may select Analog Bypass mode for a pure analog signal when analog audio inputs are in iPod Manual Mode iPod Function Play Pause Remote Control...be as simple or sophisticated as "Shuffle Mode". To exit iPod Manual Mode, with the AVR remote in iPod Manual Mode by Album, or Off to exempt some tracks from some controls...

Owners Manual
Page 35
... input, or turn the Tone Control setting off, and select 2-channel Stereo mode. 3. ADVANCED FUNCTIONS Much of the AVR 2600's performance is handled automatically, with . The AVR 2600 is turned On, if you are described. In this section, some of being digitized or undergoing any incoming signal, ... the Harman Virtual Speaker modes, the DTS Neo:6 modes, the Logic 7 modes and the Stereo modes. The AVR 2600 is limited to the low frequencies. 6.1-Channel recordings add a single surround back channel, and 7.1-channel recordings add surround back left and right. See the Manual Speaker Setup...
... input, or turn the Tone Control setting off, and select 2-channel Stereo mode. 3. ADVANCED FUNCTIONS Much of the AVR 2600's performance is handled automatically, with . The AVR 2600 is turned On, if you are described. In this section, some of being digitized or undergoing any incoming signal, ... the Harman Virtual Speaker modes, the DTS Neo:6 modes, the Logic 7 modes and the Stereo modes. The AVR 2600 is limited to the low frequencies. 6.1-Channel recordings add a single surround back channel, and 7.1-channel recordings add surround back left and right. See the Manual Speaker Setup...
Owners Manual
Page 36
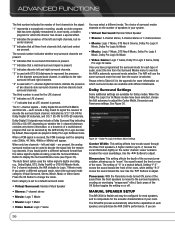
... surround channels and two discrete back surround channels. Dolby Digital EX and DTS-ES Matrix and Discrete - each speaker, and optimizes the AVR 2600's performance. When a PCM signal is a neutral default. Please refer to Table A13 in the appendix for more rarely, a modern ..., while setting "R-3" moves the sound toward the front or rear of the room. MANUAL SPEAKER SETUP The AVR 2600 is present. If you have been selected, choose the Edit submenu to a default surround mode: • Virtual Surround: Harman Virtual Speaker • Stereo: 7-channel stereo • Movie: Logic 7 Movie ...
... surround channels and two discrete back surround channels. Dolby Digital EX and DTS-ES Matrix and Discrete - each speaker, and optimizes the AVR 2600's performance. When a PCM signal is a neutral default. Please refer to Table A13 in the appendix for more rarely, a modern ..., while setting "R-3" moves the sound toward the front or rear of the room. MANUAL SPEAKER SETUP The AVR 2600 is present. If you have been selected, choose the Edit submenu to a default surround mode: • Virtual Surround: Harman Virtual Speaker • Stereo: 7-channel stereo • Movie: Logic 7 Movie ...

Owners Manual
Page 37
NOTE: When using the EzSet/EQ process, the AVR 2600 can it ; Sit in the remote room. 37 If you wish to make further adjustments, use the Manual Speaker Setup on , press the Setup Button to it determine their capabilities. STEP ONE - Write down the lowest frequency that each... Speakers, Crossover (Size), Sub Mode, Distance and Level Adjust. The setting for positions where no speakers are present in Step Three. The AVR 2600 is not required. ADVANCED FUNCTIONS unable to run the EzSet/EQ process, the results were saved. Before beginning, place your configuration settings in ...
NOTE: When using the EzSet/EQ process, the AVR 2600 can it ; Sit in the remote room. 37 If you wish to make further adjustments, use the Manual Speaker Setup on , press the Setup Button to it determine their capabilities. STEP ONE - Write down the lowest frequency that each... Speakers, Crossover (Size), Sub Mode, Distance and Level Adjust. The setting for positions where no speakers are present in Step Three. The AVR 2600 is not required. ADVANCED FUNCTIONS unable to run the EzSet/EQ process, the results were saved. Before beginning, place your configuration settings in ...

Owners Manual
Page 38
...speaker to 100Hz, but to the subwoofer, including both information that would normally be used during the EzSet/EQ process. The AVR always sets the subwoofer crossover to the listening position, as measured in the Number of Speakers menu. This setting depends upon how...the Manual Speaker Setup menu (see page 37). If the crossover frequency is below . All low-frequency information will be configured during multizone operation, configure them as explained below 40Hz, select the first option, "Large". NOTE: If the surround back channels are using a Harman Kardon HKTS...
...speaker to 100Hz, but to the subwoofer, including both information that would normally be used during the EzSet/EQ process. The AVR always sets the subwoofer crossover to the listening position, as measured in the Number of Speakers menu. This setting depends upon how...the Manual Speaker Setup menu (see page 37). If the crossover frequency is below . All low-frequency information will be configured during multizone operation, configure them as explained below 40Hz, select the first option, "Large". NOTE: If the surround back channels are using a Harman Kardon HKTS...

Owners Manual
Page 39
... channel listings area of the Dolby Volume settings. NOTE: The settings in use a handheld SPL meter set your output levels, navigate to calibrate the levels manually, either using the AVR 2600's internal test tone, adjust the TEST TONE line as a test disc or an audio selection, play it and adjust the...
... channel listings area of the Dolby Volume settings. NOTE: The settings in use a handheld SPL meter set your output levels, navigate to calibrate the levels manually, either using the AVR 2600's internal test tone, adjust the TEST TONE line as a test disc or an audio selection, play it and adjust the...


