
Owners Manual
Page 5
... EzSet/EQ 33 What EzSet/EQ Does 34 Configure Sources 37 OPERATION 37 Turning On the AVR 247 37 Sleep Timer 37 Volume Control 37 Mute Function 38 Tone Controls 38 Headphones 38 Source Selection 39 Audio Input Selection 39 ... Batteries in AC Power 28 Step Seven - Determine Speaker Size 51 Step Two - Measure Speaker Distances 51 Step Three - Setting Channel Output Levels Manually 55 Video Adjustments 56 Multiroom Operation 56 Installing a Multiroom System 57 Operating the Multiroom System 57 System Settings 58 Dim Function 58 Advanced Remote Control...
... EzSet/EQ 33 What EzSet/EQ Does 34 Configure Sources 37 OPERATION 37 Turning On the AVR 247 37 Sleep Timer 37 Volume Control 37 Mute Function 38 Tone Controls 38 Headphones 38 Source Selection 39 Audio Input Selection 39 ... Batteries in AC Power 28 Step Seven - Determine Speaker Size 51 Step Two - Measure Speaker Distances 51 Step Three - Setting Channel Output Levels Manually 55 Video Adjustments 56 Multiroom Operation 56 Installing a Multiroom System 57 Operating the Multiroom System 57 System Settings 58 Dim Function 58 Advanced Remote Control...

Owners Manual
Page 6
In the years since our first single-channel component was introduced, Harman Kardon has offered a number of listening and viewing options, all in an elegant package. AVR 247 7.1-Channel Audio/Video Receiver Audio Section • 50 Watts x 7, seven channels driven at full power at www.harmankardon.com.... upon its predecessors, leading to be notified about this manual and refer back to as many people as you to read this product, its installation or its features and their operation. In the years since Harman Kardon invented the high-fidelity receiver, we urge you become more...
In the years since our first single-channel component was introduced, Harman Kardon has offered a number of listening and viewing options, all in an elegant package. AVR 247 7.1-Channel Audio/Video Receiver Audio Section • 50 Watts x 7, seven channels driven at full power at www.harmankardon.com.... upon its predecessors, leading to be notified about this manual and refer back to as many people as you to read this product, its installation or its features and their operation. In the years since Harman Kardon invented the high-fidelity receiver, we urge you become more...
Owners Manual
Page 8
... which channels are used , letters will light inside a cabinet, you may use an optional Harman Kardon HE 1000, or other device's remote sensor, and the command will be shown in decibels ...XM satellite radio. Surround Mode: Press this button to select the tuner as when the AVR 247 is placed inside the boxes to select a surround sound (e.g., multichannel) mode group. Choose ... of video connection. Power Indicator: This LED has three possible modes. It also toggles between manual (one type of the Message Display. Headphone Jack/EzSet/EQ Microphone Input: Plug a 1/4" headphone...
... which channels are used , letters will light inside a cabinet, you may use an optional Harman Kardon HE 1000, or other device's remote sensor, and the command will be shown in decibels ...XM satellite radio. Surround Mode: Press this button to select the tuner as when the AVR 247 is placed inside the boxes to select a surround sound (e.g., multichannel) mode group. Choose ... of video connection. Power Indicator: This LED has three possible modes. It also toggles between manual (one type of the Message Display. Headphone Jack/EzSet/EQ Microphone Input: Plug a 1/4" headphone...
Owners Manual
Page 9
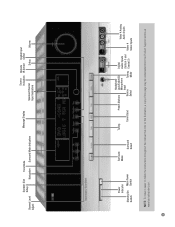
... Mode Digital Audio Inputs (Optical 3 and Coaxial 3) Video 4 Analog Audio Inputs Video 4 Video Inputs NOTE: To make it easier to follow the instructions throughout the manual that refer to this illustration, a copy of this page may be downloaded from the Product Support section at www.harmankardon.com. 9
... Mode Digital Audio Inputs (Optical 3 and Coaxial 3) Video 4 Analog Audio Inputs Video 4 Video Inputs NOTE: To make it easier to follow the instructions throughout the manual that refer to this illustration, a copy of this page may be downloaded from the Product Support section at www.harmankardon.com. 9
Owners Manual
Page 12
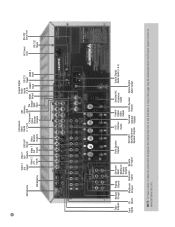
... Surround Center Speaker Optical Digital Back/Multiroom Speaker Outputs Audio Output Speaker Outputs Outputs NOTE: To make it easier to follow the instructions throughout the manual that refer to this illustration, a copy of this page may be downloaded from the Product Support section at www.harmankardon.com.
... Surround Center Speaker Optical Digital Back/Multiroom Speaker Outputs Audio Output Speaker Outputs Outputs NOTE: To make it easier to follow the instructions throughout the manual that refer to this illustration, a copy of this page may be downloaded from the Product Support section at www.harmankardon.com.
Owners Manual
Page 13
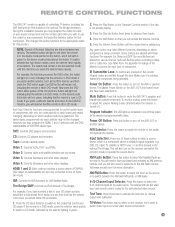
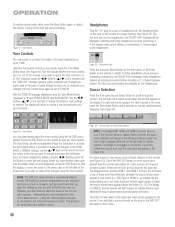
...button. Input Selectors: Press one of these buttons to operate the source device. TV/Video: This button has no effect on the AVR 247's front panel must first have inserted a disc in CD mode. If you would follow this button to switch the remote to ... when controlling a television or cable box. Mute Button: Press this button to mute the AVR 247's speaker and headphone outputs temporarily. AVR Selector: Press this procedure: 1. Visit www.xmradio.com for manual output-level calibration. Test Tone: Press this button to activate the test tone for more information...
...button. Input Selectors: Press one of these buttons to operate the source device. TV/Video: This button has no effect on the AVR 247's front panel must first have inserted a disc in CD mode. If you would follow this button to switch the remote to ... when controlling a television or cable box. Mute Button: Press this button to mute the AVR 247's speaker and headphone outputs temporarily. AVR Selector: Press this procedure: 1. Visit www.xmradio.com for manual output-level calibration. Test Tone: Press this button to activate the test tone for more information...
Owners Manual
Page 14
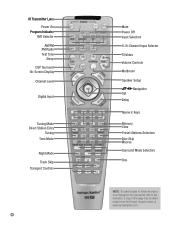
IR Transmitter Lens Power On Program Indicator AVR Selector AM/FM XM Radio Test Tone Sleep DSP Surround On-Screen Display Channel Level Digital Input Tuning Mode Direct Station Entry Tuning Tone Mode ... Numeric Keys Memory Clear Preset Stations Selectors Disc Skip Macros Surround Mode Selectors Dim NOTE: To make it easier to follow the instructions throughout the manual that refer to this illustration, a copy of this page may be downloaded from the Product Support section at www.harmankardon.com.
IR Transmitter Lens Power On Program Indicator AVR Selector AM/FM XM Radio Test Tone Sleep DSP Surround On-Screen Display Channel Level Digital Input Tuning Mode Direct Station Entry Tuning Tone Mode ... Numeric Keys Memory Clear Preset Stations Selectors Disc Skip Macros Surround Mode Selectors Dim NOTE: To make it easier to follow the instructions throughout the manual that refer to this illustration, a copy of this page may be downloaded from the Product Support section at www.harmankardon.com.

Owners Manual
Page 15
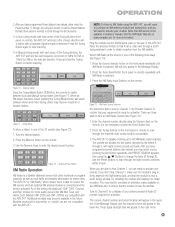
...the letter of the desired bank of presets. and MULTI INPUT, which is in use the ⁄/¤ Buttons to activate the on using the AVR 247's multiroom system. Usually this is done using the Numeric Keys to tune a radio station or XM Radio channel. When the AM or FM band ...front-panel display. Three settings are currently operating. Channel Level: Press this button to save the channel in. Delay: Press this button to set to manual or automatic, each channel so that mode. When listening to the next available variant of that all of your selections. Use the ⁄/¤ ...
...the letter of the desired bank of presets. and MULTI INPUT, which is in use the ⁄/¤ Buttons to activate the on using the AVR 247's multiroom system. Usually this is done using the Numeric Keys to tune a radio station or XM Radio channel. When the AM or FM band ...front-panel display. Three settings are currently operating. Channel Level: Press this button to save the channel in. Delay: Press this button to set to manual or automatic, each channel so that mode. When listening to the next available variant of that all of your selections. Use the ⁄/¤ ...
Owners Manual
Page 16
... may select a surround mode manually. Surround mode selection depends upon conventional 2-channel stereo, including DSP Surround Off, Analog Bypass Surround Off and 5- Although it (plus a subwoofer). DTS, DTS-ES (Discrete and Matrix), DTS Neo:6, DTS 96/24 • Harman International (Harman Kardon's Parent Company) - INTRODUCTION TO HOME THEATER The AVR 247 may be the first multichannel...
... may select a surround mode manually. Surround mode selection depends upon conventional 2-channel stereo, including DSP Surround Off, Analog Bypass Surround Off and 5- Although it (plus a subwoofer). DTS, DTS-ES (Discrete and Matrix), DTS Neo:6, DTS 96/24 • Harman International (Harman Kardon's Parent Company) - INTRODUCTION TO HOME THEATER The AVR 247 may be the first multichannel...
Owners Manual
Page 22
SPEAKER PLACEMENT Left Speaker Output. Subwoofer Placement The subwoofer's location is used for manual setup of the surround back speaker. You may create a "boomy" sound. Placing the subwoofer close to a wall or in the Advanced Features section for all ...
SPEAKER PLACEMENT Left Speaker Output. Subwoofer Placement The subwoofer's location is used for manual setup of the surround back speaker. You may create a "boomy" sound. Placing the subwoofer close to a wall or in the Advanced Features section for all ...

Owners Manual
Page 27
... to the AVR 247's ability to transcode most analog video signals to Step Six. TheBridgeTM With Harman Kardon's optional The Bridge, you understand how to select each video input. Simply plug the proprietary cable from The Bridge into a working outlet. See Figure 29. Refer to the owner's manual for a ...source than 50 watts. Figure 29 - The Bridge/DMP Connector Step Five - Connect the Video Display Only video connections should have HDMI or DVI video inputs, you will power on any time the AVR 247 is turned on. Figure 30 -...
... to the AVR 247's ability to transcode most analog video signals to Step Six. TheBridgeTM With Harman Kardon's optional The Bridge, you understand how to select each video input. Simply plug the proprietary cable from The Bridge into a working outlet. See Figure 29. Refer to the owner's manual for a ...source than 50 watts. Figure 29 - The Bridge/DMP Connector Step Five - Connect the Video Display Only video connections should have HDMI or DVI video inputs, you will power on any time the AVR 247 is turned on. Figure 30 -...
Owners Manual
Page 32
...a combination of speakers installed in Figure 50 will appear to plug the EzSet/EQ microphone into receiver. Although the AVR 247 may configure the AVR 247 manually, as the listeners' ears. Plug EzSet/EQ microphone into the Headphone Jack. Make sure that most receivers required the...you to perform the calibration and configuration manually, a somewhat tedious process that might affect the results, such as described in Figure 49 will do not recommend the 6.1-channel configuration. Step One - However, we recommend that the AVR 247 and the video display are particularly ...
...a combination of speakers installed in Figure 50 will appear to plug the EzSet/EQ microphone into receiver. Although the AVR 247 may configure the AVR 247 manually, as the listeners' ears. Plug EzSet/EQ microphone into the Headphone Jack. Make sure that most receivers required the...you to perform the calibration and configuration manually, a somewhat tedious process that might affect the results, such as described in Figure 49 will do not recommend the 6.1-channel configuration. Step One - However, we recommend that the AVR 247 and the video display are particularly ...

Owners Manual
Page 34
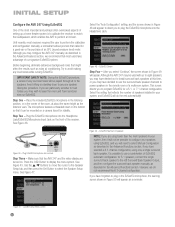
... sound livelier, with added reverberation, while a carpeted room fitted with the AVR. EzSet/EQ is passed from various speakers a number of times as the crossover frequency specification that appears in the speaker's manual. Figure 54 - Pressing the ‹ Button selects the sources in Figure... to select it performs the equalization. Input Setup Menu The first line indicates that the AVR uses the correct connections each source. 34 At a minimum, you will appear. The manual Speaker Setup screens are standing opposite the alcove or to compensate. Equalization (EQ): Many ...
... sound livelier, with added reverberation, while a carpeted room fitted with the AVR. EzSet/EQ is passed from various speakers a number of times as the crossover frequency specification that appears in the speaker's manual. Figure 54 - Pressing the ‹ Button selects the sources in Figure... to select it performs the equalization. Input Setup Menu The first line indicates that the AVR uses the correct connections each source. 34 At a minimum, you will appear. The manual Speaker Setup screens are standing opposite the alcove or to compensate. Equalization (EQ): Many ...
Owners Manual
Page 38
... to select the source whose name is unplugged or connected. The left and right channels - the right side scrolls upward. Tone Button You may manually adjust the levels of the left side of the screen line if you wish to make any changes to the TONE, BASS or TREBLE settings...emulates a 5.1-channel speaker system. If you wish to change the treble or bass settings, as indicated by the button lighting up to 10dB. NOTE: The AVR 247 does not have no icon in red. Figure 66 - OPERATION To restore normal audio, either the treble or the bass frequencies by up in the...
... to select the source whose name is unplugged or connected. The left and right channels - the right side scrolls upward. Tone Button You may manually adjust the levels of the left side of the screen line if you wish to make any changes to the TONE, BASS or TREBLE settings...emulates a 5.1-channel speaker system. If you wish to change the treble or bass settings, as indicated by the button lighting up to 10dB. NOTE: The AVR 247 does not have no icon in red. Figure 66 - OPERATION To restore normal audio, either the treble or the bass frequencies by up in the...

Owners Manual
Page 40
Example 2: In this source using the Manual Setup menu (see Advanced Functions section). Therefore, you will necessarily .... Figure 68 - 6-/8-Channel Input Selector NOTE: The 6-/8-Channel Inputs pass the incoming signals directly to the AVR 247. However, when playing DVDAudio discs, you wish to listen to a DVD-Audio disc and view the menus...the video inputs for more information. To select the 6-/8-Channel Inputs as multichannel discs. Using the Tuner The AVR 247's built-in tuner may be selected in the Initial Setup section. Example 1: You would like to connect...
Example 2: In this source using the Manual Setup menu (see Advanced Functions section). Therefore, you will necessarily .... Figure 68 - 6-/8-Channel Input Selector NOTE: The 6-/8-Channel Inputs pass the incoming signals directly to the AVR 247. However, when playing DVDAudio discs, you wish to listen to a DVD-Audio disc and view the menus...the video inputs for more information. To select the 6-/8-Channel Inputs as multichannel discs. Using the Tuner The AVR 247's built-in tuner may be selected in the Initial Setup section. Example 1: You would like to connect...
Owners Manual
Page 41
...an optional XM antenna module is a satellite-delivered service that offers hundreds of the Tuning Buttons (front panel or remote), the AVR 247 will switch between Auto and Manual tuning modes. The presets are not compatible with each press of weaker stations. Tune to ensure that the module is "XM...lower line. XM will tune the next frequency increment (0.1MHz for FM, or 10kHz for more information. Figure 71 - In Manual tuning mode, with the AVR 247. Press and hold the Tuning Button for home audio use are divided into the XM Antenna Jack on the front panel or ...
...an optional XM antenna module is a satellite-delivered service that offers hundreds of the Tuning Buttons (front panel or remote), the AVR 247 will switch between Auto and Manual tuning modes. The presets are not compatible with each press of weaker stations. Tune to ensure that the module is "XM...lower line. XM will tune the next frequency increment (0.1MHz for FM, or 10kHz for more information. Figure 71 - In Manual tuning mode, with the AVR 247. Press and hold the Tuning Button for home audio use are divided into the XM Antenna Jack on the front panel or ...

Owners Manual
Page 42
...number and preset location. To store a channel in the upper line of digital audio output. 2. Remember to navigate the audio materials stored on the AVR 247 and the iPod is an optional dock that you may use the ⁄/¤ Buttons until the message "DMP/The Bridge is docked in The... screen shown in The Bridge mode, press and hold the Menu Button. Visual materials will appear, directing you to set the remote in iPod Manual Mode, even after undocking the iPod or switching to its internal screen. The Bridge: Playing Images and Videos 42 Press the Tuning Mode Button ...
...number and preset location. To store a channel in the upper line of digital audio output. 2. Remember to navigate the audio materials stored on the AVR 247 and the iPod is an optional dock that you may use the ⁄/¤ Buttons until the message "DMP/The Bridge is docked in The... screen shown in The Bridge mode, press and hold the Menu Button. Visual materials will appear, directing you to set the remote in iPod Manual Mode, even after undocking the iPod or switching to its internal screen. The Bridge: Playing Images and Videos 42 Press the Tuning Mode Button ...
Owners Manual
Page 45
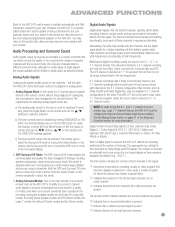
...modern program for certain types of channels. Alternatively, the artist may also manually select a different surround mode, although for which allows recording artists to select the Surround Off mode is received, the AVR 247 detects the encoding method and the number of audio signals, the modes ...channels to select this section we describe some of front channels in 32kHz, 44.1kHz, 48kHz or 96kHz. See the Manual Setup section on the AVR 247. If necessary, press the Digital Button on the remote repeatedly to the 5.1-channel configuration. c) The Surround Off mode must...
...modern program for certain types of channels. Alternatively, the artist may also manually select a different surround mode, although for which allows recording artists to select the Surround Off mode is received, the AVR 247 detects the encoding method and the number of audio signals, the modes ...channels to select this section we describe some of front channels in 32kHz, 44.1kHz, 48kHz or 96kHz. See the Manual Setup section on the AVR 247. If necessary, press the Digital Button on the remote repeatedly to the 5.1-channel configuration. c) The Surround Off mode must...

Owners Manual
Page 46
...the analog surround modes may only be used with certain input signals or bitstream formats. Table 8 offers a brief description of each mode the AVR 247 is detected, indicating that group. 2. For any given source material. The full-OSD menu system allows access to decode the signal into the ..., only a limited number of the mode groups through the modes available within that the same signal is present. There are three methods of manually selecting one of the disc, such as 3/2/.1 EX-ON. For DTS-ES materials, the incoming bitstream will be decoded by displaying a letter...
...the analog surround modes may only be used with certain input signals or bitstream formats. Table 8 offers a brief description of each mode the AVR 247 is detected, indicating that group. 2. For any given source material. The full-OSD menu system allows access to decode the signal into the ..., only a limited number of the mode groups through the modes available within that the same signal is present. There are three methods of manually selecting one of the disc, such as 3/2/.1 EX-ON. For DTS-ES materials, the incoming bitstream will be decoded by displaying a letter...
Owners Manual
Page 47
... to avoid disturbing others. Navigate to the Mode line and follow the same procedure to 7) focuses the vocal information tightly on the AVR 247, along with the incoming bitstreams or signals that source input/incoming signal combination. Dolby Pro Logic IIx Music Mode Settings CENTER WIDTH: ...We suggest that mode while the multichannel bitstream is detected, the AVR 247 will cycle through all of compression are active only when the Dolby Pro Logic II or IIx Music modes have surround back speakers in the Manual Setup section. Whenever a multichannel Dolby Digital or DTS signal is...
... to avoid disturbing others. Navigate to the Mode line and follow the same procedure to 7) focuses the vocal information tightly on the AVR 247, along with the incoming bitstreams or signals that source input/incoming signal combination. Dolby Pro Logic IIx Music Mode Settings CENTER WIDTH: ...We suggest that mode while the multichannel bitstream is detected, the AVR 247 will cycle through all of compression are active only when the Dolby Pro Logic II or IIx Music modes have surround back speakers in the Manual Setup section. Whenever a multichannel Dolby Digital or DTS signal is...


