

Product Information
Page 2
PERFORMANCE, PAGE 3 PHILOSOPHY, PAGE 6 MILESTONES, PAGE 8 DESIGNED TO ENTERTAIN, PAGE 10 A/V RECEIVERS, PAGE 14 iPOD DOCKING STATION, PAGE 16 ACTIVITY-BASED REMOTE, PAGE 18 STEREO RECEIVERS, PAGE 22 DVD & CD PLAYERS, PAGE 26 DIGITAL MEDIA CENTERS, PAGE 28 MULTIROOM PRODUCTS, PAGE 32 INTEGRATED HOME THEATER SYSTEM, PAGE 36 HOME THEATER SPEAKER SYSTEMS, PAGE 38 HOME THEATER SYSTEMS, PAGE 42 SURROUND YOURSELF, PAGE 44 SPECIFICATIONS, PAGE 46 2
PERFORMANCE, PAGE 3 PHILOSOPHY, PAGE 6 MILESTONES, PAGE 8 DESIGNED TO ENTERTAIN, PAGE 10 A/V RECEIVERS, PAGE 14 iPOD DOCKING STATION, PAGE 16 ACTIVITY-BASED REMOTE, PAGE 18 STEREO RECEIVERS, PAGE 22 DVD & CD PLAYERS, PAGE 26 DIGITAL MEDIA CENTERS, PAGE 28 MULTIROOM PRODUCTS, PAGE 32 INTEGRATED HOME THEATER SYSTEM, PAGE 36 HOME THEATER SPEAKER SYSTEMS, PAGE 38 HOME THEATER SYSTEMS, PAGE 42 SURROUND YOURSELF, PAGE 44 SPECIFICATIONS, PAGE 46 2
Product Information
Page 46
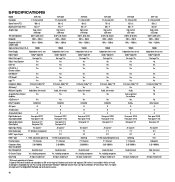
SPECIFICATIONS Model AVR 745 AVR 645 AVR 445 AVR 345 Description 7.2-Channel AVR 7.1-Channel AVR 7.1-Channel AVR 7.1-Channel AVR Stereo Power (FTC) 100 x 2 90 x 2 80 x 2 70 x 2 Multichannel Power (FTC) 85 x 7* 75 x 7* 65 x 7* 55 x 7* Amplifier Type ...EzSet+ 5 5 4 Rear panel 2/2/0 Front panel 1/1/0 Rear panel 1/1 All sources3 7.1 2/1 Switching 7.1 Channels 3 @ 100MHz Quad crossover Yes All inputs except tuner 46 AVR 145 5.1-Channel AVR 50 x 2 40 x 5* High current ±25 amps 0.07% @ 8 ohms 20Hz - 20kHz 10Hz - 130kHz 100dB Independent front & rear Dolby® Digital ...
SPECIFICATIONS Model AVR 745 AVR 645 AVR 445 AVR 345 Description 7.2-Channel AVR 7.1-Channel AVR 7.1-Channel AVR 7.1-Channel AVR Stereo Power (FTC) 100 x 2 90 x 2 80 x 2 70 x 2 Multichannel Power (FTC) 85 x 7* 75 x 7* 65 x 7* 55 x 7* Amplifier Type ...EzSet+ 5 5 4 Rear panel 2/2/0 Front panel 1/1/0 Rear panel 1/1 All sources3 7.1 2/1 Switching 7.1 Channels 3 @ 100MHz Quad crossover Yes All inputs except tuner 46 AVR 145 5.1-Channel AVR 50 x 2 40 x 5* High current ±25 amps 0.07% @ 8 ohms 20Hz - 20kHz 10Hz - 130kHz 100dB Independent front & rear Dolby® Digital ...
Product Information
Page 47
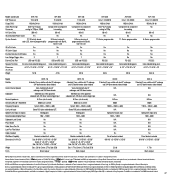
...ThumbDrive is a trademark of Sony Corporation. Cirrus is a trademark of HDMI Licensing LLC. Center: 2.7 lb; Harman Kardon, Harman International, EzSet, (patent no. 5,386,478), EzSet+, Incorporated, registered in the United States and/or other ...Yes No RS-232 Color-coded binding posts 6-1/2" x 17-5/16" x 15" 30 lb AVR 145 Cirrus® CS 49510 192kHz/24-bit No 80 mS No 8-Device programmable No No ...16" x 15" 34 lb AVR 245 Cirrus® CS 49510 192kHz/24-bit Composite/S to change without notice. All features and specifications are registered trademarks of Dolby Laboratories. Australia....
...ThumbDrive is a trademark of Sony Corporation. Cirrus is a trademark of HDMI Licensing LLC. Center: 2.7 lb; Harman Kardon, Harman International, EzSet, (patent no. 5,386,478), EzSet+, Incorporated, registered in the United States and/or other ...Yes No RS-232 Color-coded binding posts 6-1/2" x 17-5/16" x 15" 30 lb AVR 145 Cirrus® CS 49510 192kHz/24-bit No 80 mS No 8-Device programmable No No ...16" x 15" 34 lb AVR 245 Cirrus® CS 49510 192kHz/24-bit Composite/S to change without notice. All features and specifications are registered trademarks of Dolby Laboratories. Australia....

Owners Manual
Page 2
.... Plug in Remote 23 Step Eight - Determine Speaker Size 26 Step Two - Configure Sources 31 OPERATION 31 Turning On the AVR 145 31 Sleep Timer 31 Volume Control 32 Mute Function 32 Tone Controls 32 Headphones 32 Source Selection 33 Audio Input Selection 33 Video...the Remote 44 Processor Reset 44 Memory 45 TROUBLESHOOTING GUIDE 46 TECHNICAL SPECIFICATIONS 46 Trademark Acknowledgements 47 APPENDIX WARNING To prevent fire or shock hazard, do not expose this appliance to the AVR 16 Audio Connections 16 Digital Audio 16 Analog Audio 16 Video Connections...
.... Plug in Remote 23 Step Eight - Determine Speaker Size 26 Step Two - Configure Sources 31 OPERATION 31 Turning On the AVR 145 31 Sleep Timer 31 Volume Control 32 Mute Function 32 Tone Controls 32 Headphones 32 Source Selection 33 Audio Input Selection 33 Video...the Remote 44 Processor Reset 44 Memory 45 TROUBLESHOOTING GUIDE 46 TECHNICAL SPECIFICATIONS 46 Trademark Acknowledgements 47 APPENDIX WARNING To prevent fire or shock hazard, do not expose this appliance to the AVR 16 Audio Connections 16 Digital Audio 16 Analog Audio 16 Video Connections...

Owners Manual
Page 4
...the AC outlet. Cleaning When the unit gets dirty, wipe it with a cord meeting factory specifications. Do not use abrasive cleaners, as a paper clip, wire or staple accidentally falls inside this...by turning the equipment off and on them . • Due to the weight of the AVR 145 and the heat generated by one or more of the following two conditions: (1) this device .... If you may be particularly sensitive to absorbing such marks, due to a variety of factors beyond Harman Kardon's control, including the nature of the finish, cleaning materials used to the following measures: • ...
...the AC outlet. Cleaning When the unit gets dirty, wipe it with a cord meeting factory specifications. Do not use abrasive cleaners, as a paper clip, wire or staple accidentally falls inside this...by turning the equipment off and on them . • Due to the weight of the AVR 145 and the heat generated by one or more of the following two conditions: (1) this device .... If you may be particularly sensitive to absorbing such marks, due to a variety of factors beyond Harman Kardon's control, including the nature of the finish, cleaning materials used to the following measures: • ...

Owners Manual
Page 7
...between the AM and FM bands. Tuner Band: Press this two-line display in the Message Display. Surround Mode: Press this button to select a specific variant of that type of the current source input lights up as a camera or game console. Use the ‹/› Navigation buttons to make ... which will only be turned on using this button to set the output levels for private listening. Source Select: Press this button to select the specific digital audio input (or analog audio input) you used , the LED turns amber and the receiver is ready to be shown in decibels (dB...
...between the AM and FM bands. Tuner Band: Press this two-line display in the Message Display. Surround Mode: Press this button to select a specific variant of that type of the current source input lights up as a camera or game console. Use the ‹/› Navigation buttons to make ... which will only be turned on using this button to set the output levels for private listening. Source Select: Press this button to select the specific digital audio input (or analog audio input) you used , the LED turns amber and the receiver is ready to be shown in decibels (dB...

Owners Manual
Page 11
...up or flashes in The Bridge. For example, if you can access the Volume Controls. 5. Some buttons are labeled with only the codes specific to switch video inputs on the receiver and switch the remote to raise or lower the volume, which shuts off the receiver after you ... put-level calibration. Video 3: Controls televisions and other video displays. Press the Volume Down Button until the volume level is turned off the AVR 145 or another device. For example, the Sleep and DSP Surround Buttons are emitted through this button to select an iPod docked in your source ...
...up or flashes in The Bridge. For example, if you can access the Volume Controls. 5. Some buttons are labeled with only the codes specific to switch video inputs on the receiver and switch the remote to raise or lower the volume, which shuts off the receiver after you ... put-level calibration. Video 3: Controls televisions and other video displays. Press the Volume Down Button until the volume level is turned off the AVR 145 or another device. For example, the Sleep and DSP Surround Buttons are emitted through this button to select an iPod docked in your source ...

Owners Manual
Page 13
Digital Input Select: Press this button to select the specific digital audio input (or analog audio input) you are useful for the current source. It also toggles between manual (one frequency step at a time, or ...
Digital Input Select: Press this button to select the specific digital audio input (or analog audio input) you are useful for the current source. It also toggles between manual (one frequency step at a time, or ...

Owners Manual
Page 25
...with the lowest frequency that each of your speakers. Manual Setup (described here and in Advanced Functions section) 2. Determine Speaker Size The AVR 145 can it ; This message is part of the on-screen display system, and is 100Hz in this part of the system setup, you... display to either the Svideo or composite video monitor output on the OSD system. If necessary, reread the Installation Section before continuing. The specification you're looking for a typical satellite speaker. INITIAL SETUP Before you begin enjoying your new receiver, a few adjustments should have connected all...
...with the lowest frequency that each of your speakers. Manual Setup (described here and in Advanced Functions section) 2. Determine Speaker Size The AVR 145 can it ; This message is part of the on-screen display system, and is 100Hz in this part of the system setup, you... display to either the Svideo or composite video monitor output on the OSD system. If necessary, reread the Installation Section before continuing. The specification you're looking for a typical satellite speaker. INITIAL SETUP Before you begin enjoying your new receiver, a few adjustments should have connected all...

Owners Manual
Page 46
AVR 145 TECHNICAL SPECIFICATIONS Audio Section Stereo Mode Continuous Average Power (FTC) 50 Watts per channel, 20Hz-20kHz, @
AVR 145 TECHNICAL SPECIFICATIONS Audio Section Stereo Mode Continuous Average Power (FTC) 50 Watts per channel, 20Hz-20kHz, @