
User Guide
Page 2
... safety and the safety of personal injury, including the following: • Read all safety messages. Always read and obey all instructions before using Mixer. • Plug into a grounded 3 prong outlet. • Do not remove ground prong. • Do not use an adapter. &#...8226; Do not allow agitator to hit container sides when mixing. • Inspect mixer and agitator daily. • Replace agitators every 90 days. • Do not operate any manner. - Friday www.commercial.hamiltonbeach.com 2 SAVE THESE INSTRUCTIONS - When using electrical appliances, basic safety precautions should...
... safety and the safety of personal injury, including the following: • Read all safety messages. Always read and obey all instructions before using Mixer. • Plug into a grounded 3 prong outlet. • Do not remove ground prong. • Do not use an adapter. &#...8226; Do not allow agitator to hit container sides when mixing. • Inspect mixer and agitator daily. • Replace agitators every 90 days. • Do not operate any manner. - Friday www.commercial.hamiltonbeach.com 2 SAVE THESE INSTRUCTIONS - When using electrical appliances, basic safety precautions should...
User Guide
Page 3
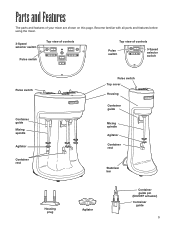
Parts and Features The parts and features of controls Pulse switch 3-Speed selector switch Pulse switch Container guide Mixing spindle Agitator Container rest Housing plug Pulse switch Top cover Housing Container guide Mixing spindle Agitator Container rest Stabilizer bar Agitator Container guide pin (ON/OFF actuator) Container guide 3 Become familiar with all parts and features before using the mixer. 3-Speed selector switch Top view of controls Pulse switch Top view of your mixer are shown on this page.
Parts and Features The parts and features of controls Pulse switch 3-Speed selector switch Pulse switch Container guide Mixing spindle Agitator Container rest Housing plug Pulse switch Top cover Housing Container guide Mixing spindle Agitator Container rest Stabilizer bar Agitator Container guide pin (ON/OFF actuator) Container guide 3 Become familiar with all parts and features before using the mixer. 3-Speed selector switch Top view of controls Pulse switch Top view of your mixer are shown on this page.
User Guide
Page 4
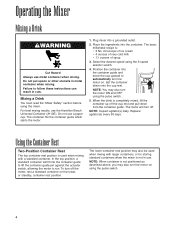
...the pulse switch. 4 When the drink is : • 3 No. 24 scoops of ice cream • 4 ounces of very cold milk • 11⁄2 ounces of syrup 3. Operating the Mixer Mixing a Drink wWARNING Cut Hazard Always use the Hamilton Beach Universal Container (#110E). Failure to... follow these instructions can result in metal container when mixing. Select the desired speed using the mixer. Set the container down from the container...
...the pulse switch. 4 When the drink is : • 3 No. 24 scoops of ice cream • 4 ounces of very cold milk • 11⁄2 ounces of syrup 3. Operating the Mixer Mixing a Drink wWARNING Cut Hazard Always use the Hamilton Beach Universal Container (#110E). Failure to... follow these instructions can result in metal container when mixing. Select the desired speed using the mixer. Set the container down from the container...
User Guide
Page 5
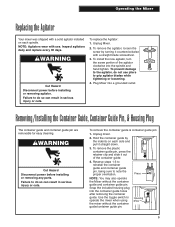
...wear with a solid agitator installed on each spindle. To install the new agitator, turn the screw portion of the container guide. 4. Plug Mixer into the spindle and hand tighten. To remove the container guide & container guide pin: 1. Housing plug 5 Inspect agitators daily and replace ...down. 3. Snap the included housing plug into the container guide holes after removing the container guide. Operating the Mixer Replacing the Agitator Your mixer was shipped with use pliers to grip agitator blades while tightening or loosening. 4. wWARNING Cut Hazard Disconnect power ...
...wear with a solid agitator installed on each spindle. To install the new agitator, turn the screw portion of the container guide. 4. Plug Mixer into the spindle and hand tighten. To remove the container guide & container guide pin: 1. Housing plug 5 Inspect agitators daily and replace ...down. 3. Snap the included housing plug into the container guide holes after removing the container guide. Operating the Mixer Replacing the Agitator Your mixer was shipped with use pliers to grip agitator blades while tightening or loosening. 4. wWARNING Cut Hazard Disconnect power ...
User Guide
Page 6
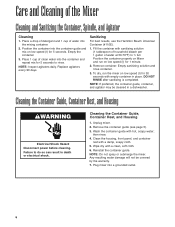
...Hamilton Beach Universal Container (#110E). 1. NOTE: If preferred, the container guide, container, and agitator may be covered by the warranty. 7. Cleaning the Container Guide, Container Rest, and Housing 1. Reinstall the container guide. Care and Cleaning of water into the container guide and mix on low speed (I) for 5 seconds. Remove container. Plug mixer... container. 3. Wash the container guide with a clean, soft cloth. 6. Unplug mixer. 2. Position the container properly on Mixer and run the mixer on low speed (I ) for 1 minute. 2. Clean the housing, front panel...
...Hamilton Beach Universal Container (#110E). 1. NOTE: If preferred, the container guide, container, and agitator may be covered by the warranty. 7. Cleaning the Container Guide, Container Rest, and Housing 1. Reinstall the container guide. Care and Cleaning of water into the container guide and mix on low speed (I) for 5 seconds. Remove container. Plug mixer... container. 3. Wash the container guide with a clean, soft cloth. 6. Unplug mixer. 2. Position the container properly on Mixer and run the mixer on low speed (I ) for 1 minute. 2. Clean the housing, front panel...

User Guide
Page 7
...the cover). Then lower the cover into the back of the housing. Discard the motor assembly in the housing. 6. Friday www.commercial.hamiltonbeach.com To replace the motor, follow the same procedure for illustration purposes. Secure the cover with the front screw boss in ...making sure that the side clips on the plug halves engage. Unplug mixer. 2. Care and Cleaning of the Mixer Motor Replacement Single Spindle Drink Mixer shown for Triple Spindle Drink Mixer. Squeeze the tabs on the front of the mixer. 3. Align the rounded indent on the sides of the housing. Make...
...the cover). Then lower the cover into the back of the housing. Discard the motor assembly in the housing. 6. Friday www.commercial.hamiltonbeach.com To replace the motor, follow the same procedure for illustration purposes. Secure the cover with the front screw boss in ...making sure that the side clips on the plug halves engage. Unplug mixer. 2. Care and Cleaning of the Mixer Motor Replacement Single Spindle Drink Mixer shown for Triple Spindle Drink Mixer. Squeeze the tabs on the front of the mixer. 3. Align the rounded indent on the sides of the housing. Make...

User Guide
Page 8
...Is agitator fastened tightly to be prevented by not holding container in the section "Mixing a Drink". ANY LIABILITY IS EXPRESSLY LIMITED TO AN AMOUNT EQUAL TO THE PURCHASE PRICE PAID, AND... Reasonable proof of date of purchase must be based upon the date of container). Hamilton Beach/Proctor-Silex, Inc. THE FOREGOING WARRANTY IS IN LIEU OF ANY OTHER WARRANTY OR ...warranty with the printed directions. Commercial Technical Service 261 Yadkin Road Southern Pines, NC 28387 8 Wait 30 minutes. Care and Cleaning of the Mixer Troubleshooting Guide PROBLEM Ingredients are ...
...Is agitator fastened tightly to be prevented by not holding container in the section "Mixing a Drink". ANY LIABILITY IS EXPRESSLY LIMITED TO AN AMOUNT EQUAL TO THE PURCHASE PRICE PAID, AND... Reasonable proof of date of purchase must be based upon the date of container). Hamilton Beach/Proctor-Silex, Inc. THE FOREGOING WARRANTY IS IN LIEU OF ANY OTHER WARRANTY OR ...warranty with the printed directions. Commercial Technical Service 261 Yadkin Road Southern Pines, NC 28387 8 Wait 30 minutes. Care and Cleaning of the Mixer Troubleshooting Guide PROBLEM Ingredients are ...


