Operation Manual
Page 2
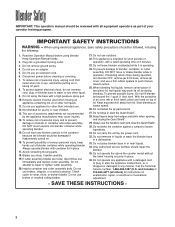
... the following: 1. Do not operate any kitchen utensils in or near children. 13. IMPORTANT SAFETY INSTRUCTIONS WARNING - When using blender. Plug into blender container while operating blender. 15. Do not remove ground prong. 4. Do not use outdoors. 22. Do not store any appliance with a rated ...cracked cutting blades. 21. To reduce risk of personal injury, unplug cord from base, remove jar cover, and use the handle to blender or container and cutter assembly, DO NOT insert utensils into a grounded 3-prong outlet. 3. Avoid contacting moving an appliance containing hot ...
... the following: 1. Do not operate any kitchen utensils in or near children. 13. IMPORTANT SAFETY INSTRUCTIONS WARNING - When using blender. Plug into blender container while operating blender. 15. Do not remove ground prong. 4. Do not use outdoors. 22. Do not store any appliance with a rated ...cracked cutting blades. 21. To reduce risk of personal injury, unplug cord from base, remove jar cover, and use the handle to blender or container and cutter assembly, DO NOT insert utensils into a grounded 3-prong outlet. 3. Avoid contacting moving an appliance containing hot ...

Operation Manual
Page 3
..., and run on HIGH speed for 2 seconds to remove any moisture from the cutter assembly. 5. Cut Hazard Always place lid on the bleach. 1. Friday www.commercial.hamiltonbeach.com Replacement Parts The following safety alert symbols are subject to wear and should be replaced at least yearly. Electrical Shock Hazard Plug into... Part Number 6126-650 98650 QS850 3 We recommend keeping a replacement container and cutter on LOW speed for 2 minutes. 4. Electrical Shock Hazard Disconnect power before cleaning blender base.
..., and run on HIGH speed for 2 seconds to remove any moisture from the cutter assembly. 5. Cut Hazard Always place lid on the bleach. 1. Friday www.commercial.hamiltonbeach.com Replacement Parts The following safety alert symbols are subject to wear and should be replaced at least yearly. Electrical Shock Hazard Plug into... Part Number 6126-650 98650 QS850 3 We recommend keeping a replacement container and cutter on LOW speed for 2 minutes. 4. Electrical Shock Hazard Disconnect power before cleaning blender base.

Operation Manual
Page 4
...base housing. Breakage can occur if the dovetail joints along the bottom edges of upper base housing, please call Technical Service at : www.commercial.hamiltonbeach.com NOTICE: Ensure the Quiet Shield™ is installed correctly. Turn off and unplug unit. 7. Parts and Features The parts and... features for the Summit blenders are not properly interlocked with all parts and features before using your blender. If the Quiet Shield™ is installed improperly, thereby resulting in unit and turn on this page...
...base housing. Breakage can occur if the dovetail joints along the bottom edges of upper base housing, please call Technical Service at : www.commercial.hamiltonbeach.com NOTICE: Ensure the Quiet Shield™ is installed correctly. Turn off and unplug unit. 7. Parts and Features The parts and... features for the Summit blenders are not properly interlocked with all parts and features before using your blender. If the Quiet Shield™ is installed improperly, thereby resulting in unit and turn on this page...
Operation Manual
Page 5
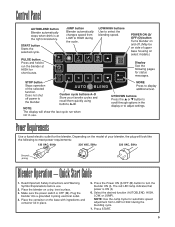
... speed. Select the desired function (AUTOBLEND, HIGH, LOW, or JUMP). Custom cycle buttons A-D Store your blender, the plug will show the last cycle run the blender at the right consistency. Depending on a dry, level surface. 3. Read Important Safety Instructions and Warning Symbol...electrical outlet. 4. Place the container on select models.) Display See the following to display additional text. JUMP button Blender automatically changes speed from LOW to turn the blender ON (I ). 6. The red LED lamp indicates that power is OFF (O). START button Starts the selected cycle....
... speed. Select the desired function (AUTOBLEND, HIGH, LOW, or JUMP). Custom cycle buttons A-D Store your blender, the plug will show the last cycle run the blender at the right consistency. Depending on a dry, level surface. 3. Read Important Safety Instructions and Warning Symbol...electrical outlet. 4. Place the container on select models.) Display See the following to display additional text. JUMP button Blender automatically changes speed from LOW to turn the blender ON (I ). 6. The red LED lamp indicates that power is OFF (O). START button Starts the selected cycle....

Operation Manual
Page 7
Convert Above-Counter Blender For In-Counter Installation 1 2 3 7
Convert Above-Counter Blender For In-Counter Installation 1 2 3 7
Operation Manual
Page 9
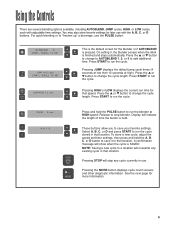
... JUMP displays the default jump cycle times (4 seconds at low then 12 seconds at HIGH speed. Pressing HIGH or LOW displays the current run the blender at high). START Select A, B, C, or D and press START to a location will indicate the length of time the button is SAVED. NOTE: ... held. MORE Pressing the MORE button displays cycle count screens and other diagnostic information. See the next page for that location. On setting 0, the blender senses when the drink START is pressed. Press START to add additional time. Press the ▲ or START ▼ button to change to AUTOBLEND...
... JUMP displays the default jump cycle times (4 seconds at low then 12 seconds at HIGH speed. Pressing HIGH or LOW displays the current run the blender at high). START Select A, B, C, or D and press START to a location will indicate the length of time the button is SAVED. NOTE: ... held. MORE Pressing the MORE button displays cycle count screens and other diagnostic information. See the next page for that location. On setting 0, the blender senses when the drink START is pressed. Press START to add additional time. Press the ▲ or START ▼ button to change to AUTOBLEND...

Operation Manual
Page 10
SPECIAL FUNCTIONS CUSTOMER SERV. SET FACTORY DEFAULTS START TO SELECT Resets all cycle counts. 10 Remove the container from the blender and press START. CYCLE COUNTS CYCLES INTO WARRANTY START TO SELECT CYCLES THIS WEEK START TO SELECT CLEAR WEEKLY CYCLES START TO ...except cycle counts to select. Press the START button to factory presets. INFO START TO SELECT RUN COOLDOWN CYCLE START TO SELECT Displays the Hamilton Beach Commercial technical service number. Press the START button to clear the cycle counts for any given time frame except the number of cycles this year,...
SPECIAL FUNCTIONS CUSTOMER SERV. SET FACTORY DEFAULTS START TO SELECT Resets all cycle counts. 10 Remove the container from the blender and press START. CYCLE COUNTS CYCLES INTO WARRANTY START TO SELECT CYCLES THIS WEEK START TO SELECT CLEAR WEEKLY CYCLES START TO ...except cycle counts to select. Press the START button to factory presets. INFO START TO SELECT RUN COOLDOWN CYCLE START TO SELECT Displays the Hamilton Beach Commercial technical service number. Press the START button to clear the cycle counts for any given time frame except the number of cycles this year,...
Operation Manual
Page 11
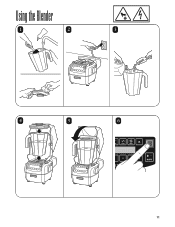
Using the Blender 1 2 3 4 5 6 11
Using the Blender 1 2 3 4 5 6 11

Operation Manual
Page 12
Using the Blender 7 Press and hold PULSE for short bursts. 8 Use the AUTOBLEND cycle for most blending jobs. 9 Use stored custom cycles for details on cycles and options. 12 See USING THE CONTROLS for favorites.
Using the Blender 7 Press and hold PULSE for short bursts. 8 Use the AUTOBLEND cycle for most blending jobs. 9 Use stored custom cycles for details on cycles and options. 12 See USING THE CONTROLS for favorites.

Operation Manual
Page 13
Using the Blender 10 Or use the preprogrammed JUMP, LOW, or HIGH cycles. See USING THE CONTROLS for details on cycles and options. 11 12 13 13 Press ▲ or ▼ to adjust time.
Using the Blender 10 Or use the preprogrammed JUMP, LOW, or HIGH cycles. See USING THE CONTROLS for details on cycles and options. 11 12 13 13 Press ▲ or ▼ to adjust time.
Operation Manual
Page 17
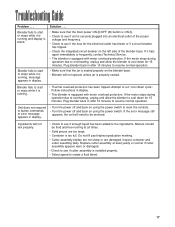
...and free-running , message appears in display. If the motor stops during operation due to overheating, unplug and allow the blender to resume normal operation. Plug blender back in after 15 minutes to cool down cycle". If the error message still appears, the unit will not mix ...down for the electrical outlet has blown or if a circuit breaker has tripped. • Check the integrated circuit breaker on the blender base. • Blender will not operate unless jar is running and display is securely plugged into an electrical outlet of the proper voltage and frequency. •...
...and free-running , message appears in display. If the motor stops during operation due to overheating, unplug and allow the blender to resume normal operation. Plug blender back in after 15 minutes to cool down cycle". If the error message still appears, the unit will not mix ...down for the electrical outlet has blown or if a circuit breaker has tripped. • Check the integrated circuit breaker on the blender base. • Blender will not operate unless jar is running and display is securely plugged into an electrical outlet of the proper voltage and frequency. •...
Operation Manual
Page 18
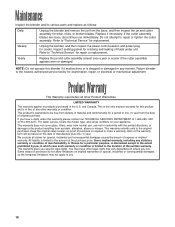
...to the nearest authorized service facility for examination, repair, or electrical or mechanical adjustment. This is the only express warranty for this blender if it malfunctions or is dropped or damaged in any manner. This warranty extends only to repair or tighten the cutter assembly. ...so the foregoing limitations may have other Product Warranties LIMITED WARRANTY This warranty applies to "Technical Service" for cracks. Maintenance Inspect the blender and its various parts and replace as proof of purchase is required to make a warranty claim or the warranty term will be free...
...to the nearest authorized service facility for examination, repair, or electrical or mechanical adjustment. This is the only express warranty for this blender if it malfunctions or is dropped or damaged in any manner. This warranty extends only to repair or tighten the cutter assembly. ...so the foregoing limitations may have other Product Warranties LIMITED WARRANTY This warranty applies to "Technical Service" for cracks. Maintenance Inspect the blender and its various parts and replace as proof of purchase is required to make a warranty claim or the warranty term will be free...


