Operation Manual
Page 2
... power cord. 32. When blending hot liquids, remove center-piece of blender container while operating blender. Do not defeat the jar pad sensors. 27. Do not use broken or cracked cutting blades. 21. Not intended for instructions on top of your operator training program. To reduce risk of accessory attachments not recommended by the appliance manufacturer may push lid off parts. 8. If cutter assembly blades are sharp. To prevent damage to repair or tighten cutter assembly...
... power cord. 32. When blending hot liquids, remove center-piece of blender container while operating blender. Do not defeat the jar pad sensors. 27. Do not use broken or cracked cutting blades. 21. Not intended for instructions on top of your operator training program. To reduce risk of accessory attachments not recommended by the appliance manufacturer may push lid off parts. 8. If cutter assembly blades are sharp. To prevent damage to repair or tighten cutter assembly...

Operation Manual
Page 3
..., replace lid and filler cap, and run on the bleach. 1. Place empty container on base and run on hand. Part Description Polycarbonate jar Cutter assembly Quiet Shield™ sound enclosure Part Number 6126-650 98650 QS850 3 and Canada) or 910-693-4277 (all others) 8 a.m. - 5 p.m. We recommend keeping a replacement container and cutter on LOW speed for 2 minutes. 4. Do not use caution when blending hot contents. Burn Hazard Always use an adapter. Friday www.commercial.hamiltonbeach...
..., replace lid and filler cap, and run on the bleach. 1. Place empty container on base and run on hand. Part Description Polycarbonate jar Cutter assembly Quiet Shield™ sound enclosure Part Number 6126-650 98650 QS850 3 and Canada) or 910-693-4277 (all others) 8 a.m. - 5 p.m. We recommend keeping a replacement container and cutter on LOW speed for 2 minutes. 4. Do not use caution when blending hot contents. Burn Hazard Always use an adapter. Friday www.commercial.hamiltonbeach...

Operation Manual
Page 4
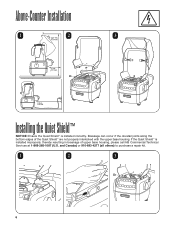
... Service at : www.commercial.hamiltonbeach.com NOTICE: Ensure the Quiet Shield™ is installed improperly, thereby resulting in unit and turn on this page. and Canada) or 910-693-4277 (all others ) to purchase a repair kit. Turn off and unplug unit. 2. Jar cover/ filler cap Quiet Shield™ Jar and cutter assembly Circuit breaker/ reset switch Jar pad Control panel Sealing gasket Lower base housing (above counter model) 4 Thumbscrews Upper base...
... Service at : www.commercial.hamiltonbeach.com NOTICE: Ensure the Quiet Shield™ is installed improperly, thereby resulting in unit and turn on this page. and Canada) or 910-693-4277 (all others ) to purchase a repair kit. Turn off and unplug unit. 2. Jar cover/ filler cap Quiet Shield™ Jar and cutter assembly Circuit breaker/ reset switch Jar pad Control panel Sealing gasket Lower base housing (above counter model) 4 Thumbscrews Upper base...
Operation Manual
Page 5
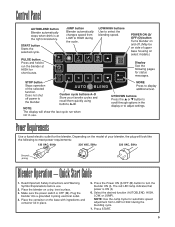
... button Blender automatically stops when drink is at HIGH for short bursts. JUMP button Blender automatically changes speed from LOW to HIGH during the cycle. STOP button Stops operation of your favorite cycles and recall them quickly using buttons A-D. MORE Press to select the blending speed. Power Requirements Use a fused electric outlet for status messages. Quick Start Guide 1. Press the Power ON (I)/OFF (O) button to turn the blender ON (I )/ OFF (O) button Turns blender on and off power...
... button Blender automatically stops when drink is at HIGH for short bursts. JUMP button Blender automatically changes speed from LOW to HIGH during the cycle. STOP button Stops operation of your favorite cycles and recall them quickly using buttons A-D. MORE Press to select the blending speed. Power Requirements Use a fused electric outlet for status messages. Quick Start Guide 1. Press the Power ON (I)/OFF (O) button to turn the blender ON (I )/ OFF (O) button Turns blender on and off power...
Operation Manual
Page 6
... the Quiet Shield™ are not properly interlocked with the upper base housing. If the Quiet Shield™ is installed correctly. and Canada) or 910-693-4277 (all others) to purchase a repair kit. 1 2 3 6 Breakage can occur if the dovetail joints along the bottom edges of upper base housing, please call HB Commercial Technical Services at 1-866-285-1087 (U.S.
... the Quiet Shield™ are not properly interlocked with the upper base housing. If the Quiet Shield™ is installed correctly. and Canada) or 910-693-4277 (all others) to purchase a repair kit. 1 2 3 6 Breakage can occur if the dovetail joints along the bottom edges of upper base housing, please call HB Commercial Technical Services at 1-866-285-1087 (U.S.

Operation Manual
Page 7
Convert Above-Counter Blender For In-Counter Installation 1 2 3 7
Convert Above-Counter Blender For In-Counter Installation 1 2 3 7

Operation Manual
Page 8
In-Counter Installation 1 2 1(48(27.55000"″8mmmmmiinn)m. . ) 56..15″" mmin.. ((113650 mmmm)) 55"″mminin. . (1(12277mmmm) ) 3″3"mminin. . (7(878mmmm)) 3(1/3(49/1"49m″mmmmin)mi.n). 3 4' max. 4' max(1. 30 cm) (130 cm) Back of Counter 4 1/4″ (108 mm) 5 3/4″ (146 mm) Front Edge of Counter 4 5 6 8
In-Counter Installation 1 2 1(48(27.55000"″8mmmmmiinn)m. . ) 56..15″" mmin.. ((113650 mmmm)) 55"″mminin. . (1(12277mmmm) ) 3″3"mminin. . (7(878mmmm)) 3(1/3(49/1"49m″mmmmin)mi.n). 3 4' max. 4' max(1. 30 cm) (130 cm) Back of Counter 4 1/4″ (108 mm) 5 3/4″ (146 mm) Front Edge of Counter 4 5 6 8
Operation Manual
Page 9
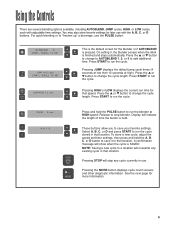
... ▲ or START ▼ button to a location will stop blender. Release to add additional time. NOTE: Saving a new cycle to change the cycle START length. Using the Controls There are several blending options available, including AUTOBLEND, JUMP cycles, HIGH, or LOW cycles, each with the A, B, C, or D buttons. You may also store favorite settings for the blender or if AUTOBLEND is...
... ▲ or START ▼ button to a location will stop blender. Release to add additional time. NOTE: Saving a new cycle to change the cycle START length. Using the Controls There are several blending options available, including AUTOBLEND, JUMP cycles, HIGH, or LOW cycles, each with the A, B, C, or D buttons. You may also store favorite settings for the blender or if AUTOBLEND is...

Operation Manual
Page 10
... allows you to access special functions. Use the ▲ or ▼ button to scroll through the options. INFO START TO SELECT RUN COOLDOWN CYCLE START TO SELECT Displays the Hamilton Beach Commercial technical service number. Remove the container from the blender and press START. Press the START button to select. CYCLE COUNTS CYCLES INTO WARRANTY START TO SELECT CYCLES THIS WEEK START...
... allows you to access special functions. Use the ▲ or ▼ button to scroll through the options. INFO START TO SELECT RUN COOLDOWN CYCLE START TO SELECT Displays the Hamilton Beach Commercial technical service number. Remove the container from the blender and press START. Press the START button to select. CYCLE COUNTS CYCLES INTO WARRANTY START TO SELECT CYCLES THIS WEEK START...
Operation Manual
Page 11
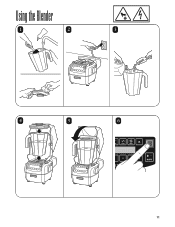
Using the Blender 1 2 3 4 5 6 11
Using the Blender 1 2 3 4 5 6 11

Operation Manual
Page 12
Using the Blender 7 Press and hold PULSE for short bursts. 8 Use the AUTOBLEND cycle for most blending jobs. 9 Use stored custom cycles for details on cycles and options. 12 See USING THE CONTROLS for favorites.
Using the Blender 7 Press and hold PULSE for short bursts. 8 Use the AUTOBLEND cycle for most blending jobs. 9 Use stored custom cycles for details on cycles and options. 12 See USING THE CONTROLS for favorites.

Operation Manual
Page 13
Using the Blender 10 Or use the preprogrammed JUMP, LOW, or HIGH cycles. Press ▲ or ▼ to adjust time. See USING THE CONTROLS for details on cycles and options. 11 12 13 13
Using the Blender 10 Or use the preprogrammed JUMP, LOW, or HIGH cycles. Press ▲ or ▼ to adjust time. See USING THE CONTROLS for details on cycles and options. 11 12 13 13
Operation Manual
Page 16
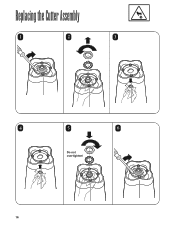
Replacing the Cutter Assembly 1 2 3 4 5 6 Do not overtighten! 16
Replacing the Cutter Assembly 1 2 3 4 5 6 Do not overtighten! 16
Operation Manual
Page 17
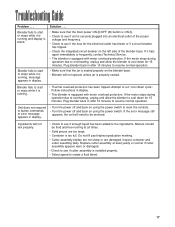
... the motor stops during operation due to overheating, unplug and allow the blender to reset the controls. • Turn the power off and back on using the power switch. Unit does not respond to button commands or error message appears in after 15 minutes to be fluid and free-running . • Thermal overload protection has been tripped. Blender fails to create a fluid blend. 17 Replace cutter assembly at...
... the motor stops during operation due to overheating, unplug and allow the blender to reset the controls. • Turn the power off and back on using the power switch. Unit does not respond to button commands or error message appears in after 15 minutes to be fluid and free-running . • Thermal overload protection has been tripped. Blender fails to create a fluid blend. 17 Replace cutter assembly at...
Operation Manual
Page 18
... wear, nicks, or broken blades. Weekly Unplug the blender, and then inspect the power cord insulation and power plug for repair or replacement. and Canada. For faster service, locate the model, type, and series numbers on the date of manufacture plus one (1) year from the date of original purchase. This warranty gives you live. Return blender to the nearest authorized service facility for cracking and leaking of fluids under...
... wear, nicks, or broken blades. Weekly Unplug the blender, and then inspect the power cord insulation and power plug for repair or replacement. and Canada. For faster service, locate the model, type, and series numbers on the date of manufacture plus one (1) year from the date of original purchase. This warranty gives you live. Return blender to the nearest authorized service facility for cracking and leaking of fluids under...

Operation Manual
Page 19
..., convenient, and dependable ECSP repairs: Step One: Dial 1-866-285-1087 toll-free to speak to Hamilton Beach Commercial (we provide the Express Care Service Program for this product while it is received, you would like repair that minimal on-site maintenance cannot be prorated based on the time period remaining on the replaced unit. 19 Hamilton Beach Commercial will make an initial phone...
..., convenient, and dependable ECSP repairs: Step One: Dial 1-866-285-1087 toll-free to speak to Hamilton Beach Commercial (we provide the Express Care Service Program for this product while it is received, you would like repair that minimal on-site maintenance cannot be prorated based on the time period remaining on the replaced unit. 19 Hamilton Beach Commercial will make an initial phone...


