
Operation Manual
Page 2
... (O), remove container from the cover opening to blender or container and cutter assembly, DO NOT insert utensils into a grounded 3-prong outlet. 3. Keep hands and other than intended use an adapter. 5. Friday www.commercial.hamiltonbeach.com 2 Read the Operation Manual before cleaning or servicing. ... time of your operator training program. Do not use by Hamilton Beach may cause injuries. 14. Replace cutter assembly at least every 90 days. 21. This appliance is operating. 24. Do not leave blender unattended while it is intended for use broken, chipped or cracked...
... (O), remove container from the cover opening to blender or container and cutter assembly, DO NOT insert utensils into a grounded 3-prong outlet. 3. Keep hands and other than intended use an adapter. 5. Friday www.commercial.hamiltonbeach.com 2 Read the Operation Manual before cleaning or servicing. ... time of your operator training program. Do not use by Hamilton Beach may cause injuries. 14. Replace cutter assembly at least every 90 days. 21. This appliance is operating. 24. Do not leave blender unattended while it is intended for use broken, chipped or cracked...
Operation Manual
Page 3
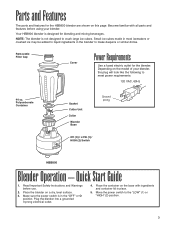
Quick Start Guide 1. Your HBB800 blender is designed for the blender. Polycarbonate Container Gasket Cutter Unit Collar Blender Base Ground prong Off (O) / LOW (1) / HIGH (2) Switch HBB800 Blender Operation - Make sure the power switch is not designed to meet power requirements: 120 VAC, 60Hz 44 oz. Plug the blender into a grounded 3-prong electrical outlet. 4. Move the power switch to...
Quick Start Guide 1. Your HBB800 blender is designed for the blender. Polycarbonate Container Gasket Cutter Unit Collar Blender Base Ground prong Off (O) / LOW (1) / HIGH (2) Switch HBB800 Blender Operation - Make sure the power switch is not designed to meet power requirements: 120 VAC, 60Hz 44 oz. Plug the blender into a grounded 3-prong electrical outlet. 4. Move the power switch to...
Operation Manual
Page 4
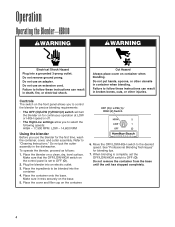
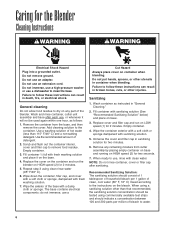
... to "Cleaning Instructions." Place the cover and filler cap on container when blending. OFF (O) / LOW (1) / HIGH (2) Switch 6. Do not use the blender for blending tips. 7. Cut Hazard Always place cover on the container. Failure to select the following speeds: HIGH - 17,500 RPM LOW - 14,600 RPM..." for the first time, wash the container, cover, and cutter assembly. Move the OFF/LOW/HIGH switch to OFF (O). Plug the blender into a grounded 3-prong outlet. Operation Operating the Blender-HBB800 wWARNING wWARNING Electrical Shock Hazard Plug into an electric outlet. 3.
... to "Cleaning Instructions." Place the cover and filler cap on container when blending. OFF (O) / LOW (1) / HIGH (2) Switch 6. Do not use the blender for blending tips. 7. Cut Hazard Always place cover on the container. Failure to select the following speeds: HIGH - 17,500 RPM LOW - 14,600 RPM..." for the first time, wash the container, cover, and cutter assembly. Move the OFF/LOW/HIGH switch to OFF (O). Plug the blender into a grounded 3-prong outlet. Operation Operating the Blender-HBB800 wWARNING wWARNING Electrical Shock Hazard Plug into an electric outlet. 3.
Operation Manual
Page 5
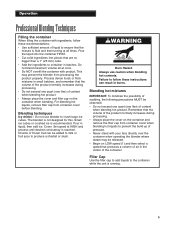
... When filling the container with ingredients, follow these recommendations: • Use sufficient amount of pressure. • Never stand with product. The blender is not designed for this. Pour the liquid into the container FIRST. • Cut solid ingredients into pieces that produces a column of ...hot contents. Failure to crush large ice cubes. Do not blend maximum volume all at all times. wWARNING Burn Hazard Always use blender to follow these instructions can be released. • Begin on the container and remove the filler cap from container cover before blending....
... When filling the container with ingredients, follow these recommendations: • Use sufficient amount of pressure. • Never stand with product. The blender is not designed for this. Pour the liquid into the container FIRST. • Cut solid ingredients into pieces that produces a column of ...hot contents. Failure to crush large ice cubes. Do not blend maximum volume all at all times. wWARNING Burn Hazard Always use blender to follow these instructions can be released. • Begin on the container and remove the filler cap from container cover before blending....
Operation Manual
Page 6
... out the container interior, cover and filler cap to follow these instructions can result in container when blending. Repeat step 3 using commercially available test strips and should be used again within one hour, as instructed in sanitizing solution for two minutes. 6. Failure to...hot water (less than that recommended, the sanitizing solution concentration should indicate a concentration between 100 and 200 parts per million of the blender. Do not remove ground. Wipe the exterior of detergent. 2. Sanitizing 1. Failure to follow these instructions can result in broken bones...
... out the container interior, cover and filler cap to follow these instructions can result in container when blending. Repeat step 3 using commercially available test strips and should be used again within one hour, as instructed in sanitizing solution for two minutes. 6. Failure to...hot water (less than that recommended, the sanitizing solution concentration should indicate a concentration between 100 and 200 parts per million of the blender. Do not remove ground. Wipe the exterior of detergent. 2. Sanitizing 1. Failure to follow these instructions can result in broken bones...
Operation Manual
Page 7
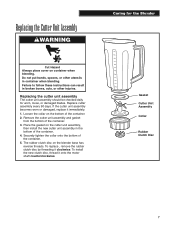
... remove the rubber clutch disc by threading it immediately. 1. Replacing the Cutter Unit Assembly wWARNING Cut Hazard Always place cover on the blender base has reverse threads. Remove the cutter unit assembly and gasket from the bottom of the container. 5. Place the gasket on the... bottom of the container. 4. Replacing the cutter unit assembly The cutter unit assembly should be checked daily for the Blender Gasket Cutter Unit Assembly Collar Rubber Clutch Disc 7 If the cutter unit assembly becomes worn or damaged, replace it clockwise. Caring for worn...
... remove the rubber clutch disc by threading it immediately. 1. Replacing the Cutter Unit Assembly wWARNING Cut Hazard Always place cover on the blender base has reverse threads. Remove the cutter unit assembly and gasket from the bottom of the container. 5. Place the gasket on the... bottom of the container. 4. Replacing the cutter unit assembly The cutter unit assembly should be checked daily for the Blender Gasket Cutter Unit Assembly Collar Rubber Clutch Disc 7 If the cutter unit assembly becomes worn or damaged, replace it clockwise. Caring for worn...
Operation Manual
Page 8
...Inspect container and cutter assembly daily. See "Replacement Parts" below . Replace if necessary. Unplug the blender, and then inspect the power cord insulation and power plug for Model HBB800 For replacement parts, call toll free: 866-285-1087. Replacement Parts for cracks. Maintenance Inspect ...the blender and its various parts and replace as follows: Daily Weekly Quarterly Unplug the blender and remove the container from the ...
...Inspect container and cutter assembly daily. See "Replacement Parts" below . Replace if necessary. Unplug the blender, and then inspect the power cord insulation and power plug for Model HBB800 For replacement parts, call toll free: 866-285-1087. Replacement Parts for cracks. Maintenance Inspect ...the blender and its various parts and replace as follows: Daily Weekly Quarterly Unplug the blender and remove the container from the ...


