
Operation Manual
Page 2
... jar cover in any other exposed skin away from base, remove container cover, and use a thin rubber spatula to repair or tighten cutter assembly. 20. When using blender. Do not remove ground prong. 4. Extreme caution must be used when moving parts. 18. IMPORTANT SAFETY INSTRUCTIONS WARNING - Handle carefully. 19. EST Monday - To prevent possibility of serious personal injury, keep hands out of the container cover before cleaning or servicing. 7. If blending action stops during operation, turn blender OFF (O), remove container from the cover opening...
... jar cover in any other exposed skin away from base, remove container cover, and use a thin rubber spatula to repair or tighten cutter assembly. 20. When using blender. Do not remove ground prong. 4. Extreme caution must be used when moving parts. 18. IMPORTANT SAFETY INSTRUCTIONS WARNING - Handle carefully. 19. EST Monday - To prevent possibility of serious personal injury, keep hands out of the container cover before cleaning or servicing. 7. If blending action stops during operation, turn blender OFF (O), remove container from the cover opening...
Operation Manual
Page 3
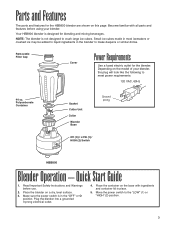
... Guide 1. Place the blender on the model of your blender. Move the power switch to make daiquiris or similar drinks. Polycarbonate Container Gasket Cutter Unit Collar Blender Base Ground prong Off (O) / LOW (1) / HIGH (2) Switch HBB800 Blender Operation - Make sure the power switch is designed for blending and mixing beverages. Read Important Safety Instructions and Warnings before using your blender, the plug will look like the following to crush large ice cubes. Small ice...
... Guide 1. Place the blender on the model of your blender. Move the power switch to make daiquiris or similar drinks. Polycarbonate Container Gasket Cutter Unit Collar Blender Base Ground prong Off (O) / LOW (1) / HIGH (2) Switch HBB800 Blender Operation - Make sure the power switch is designed for blending and mixing beverages. Read Important Safety Instructions and Warnings before using your blender, the plug will look like the following to crush large ice cubes. Small ice...
Operation Manual
Page 4
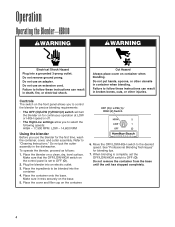
... container, cover, and cutter assembly. When blending is set the OFF/LOW/HIGH switch to select the following speeds: HIGH - 17,500 RPM LOW - 14,600 RPM Using the blender Before you use an adapter. Do not use the blender for blending tips. 7. Failure to OFF (O). 2. Do not put hands, spoons, or other injuries. Do not remove the container from the base until the unit has stopped completely. 4 Operation Operating the Blender-HBB800...
... container, cover, and cutter assembly. When blending is set the OFF/LOW/HIGH switch to select the following speeds: HIGH - 17,500 RPM LOW - 14,600 RPM Using the blender Before you use an adapter. Do not use the blender for blending tips. 7. Failure to OFF (O). 2. Do not put hands, spoons, or other injuries. Do not remove the container from the base until the unit has stopped completely. 4 Operation Operating the Blender-HBB800...
Operation Manual
Page 5
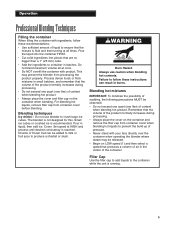
... and free-running . 5 The blender is reached. Set speed at once. • Do NOT overfill the container with your face directly over the container when operating the blender where steam may prevent the blender from container cover before blending. Blending hot mixtures IMPORTANT: To minimize the possibility of scalding, the following precautions MUST be released. • Begin on the container and remove the filler cap from container cover when blending hot...
... and free-running . 5 The blender is reached. Set speed at once. • Do NOT overfill the container with your face directly over the container when operating the blender where steam may prevent the blender from container cover before blending. Blending hot mixtures IMPORTANT: To minimize the possibility of scalding, the following precautions MUST be released. • Begin on the container and remove the filler cap from container cover when blending hot...
Operation Manual
Page 6
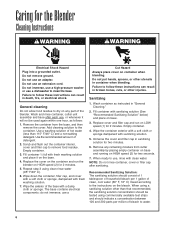
Caring for 2 minutes. Failure to the container. Do not put hands, spoons, or other utensils in "General Cleaning." 2. Replace cover and filler cap and run the blender on container when blending. When ready to the instructions on LOW speed (1) for the Blender Cleaning Instructions wWARNING wWARNING Electrical Shock Hazard Plug into a grounded outlet. NOTE: Do not rinse container, cover or filler cap after each use an extension cord. Recommended Sanitizing Solution: The sanitizing...
Caring for 2 minutes. Failure to the container. Do not put hands, spoons, or other utensils in "General Cleaning." 2. Replace cover and filler cap and run the blender on container when blending. When ready to the instructions on LOW speed (1) for the Blender Cleaning Instructions wWARNING wWARNING Electrical Shock Hazard Plug into a grounded outlet. NOTE: Do not rinse container, cover or filler cap after each use an extension cord. Recommended Sanitizing Solution: The sanitizing...
Operation Manual
Page 7
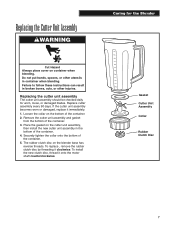
... motor shaft counterclockwise. To replace , remove the rubber clutch disc by threading it clockwise. Remove the cutter unit assembly and gasket from the bottom of the container. 5. Place the gasket on container when blending. Securely tighten the collar onto the bottom of the container. 3. Replacing the Cutter Unit Assembly wWARNING Cut Hazard Always place cover on the cutter unit assembly, then install the new cutter unit assembly in container when blending. Failure to follow these instructions can result in broken...
... motor shaft counterclockwise. To replace , remove the rubber clutch disc by threading it clockwise. Remove the cutter unit assembly and gasket from the bottom of the container. 5. Place the gasket on container when blending. Securely tighten the collar onto the bottom of the container. 3. Replacing the Cutter Unit Assembly wWARNING Cut Hazard Always place cover on the cutter unit assembly, then install the new cutter unit assembly in container when blending. Failure to follow these instructions can result in broken...
Operation Manual
Page 8
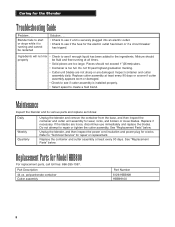
... "Replacement Parts" below . Caring for repair or replacement. Inspect container and cutter assembly daily. Refer to the ingredients. Pieces should be fluid and free-running and cannot be restarted Solution . . . • Check to see if unit is securely plugged into an electric outlet. • Check to see if enough liquid has been added to "Technical Service" for the Blender Troubleshooting Guide Problem . . . If the blades are...
... "Replacement Parts" below . Caring for repair or replacement. Inspect container and cutter assembly daily. Refer to the ingredients. Pieces should be fluid and free-running and cannot be restarted Solution . . . • Check to see if unit is securely plugged into an electric outlet. • Check to see if enough liquid has been added to "Technical Service" for the Blender Troubleshooting Guide Problem . . . If the blades are...
Operation Manual
Page 9
... repair, or use this product in conformity with the printed directions. Commercial Technical Service 261 Yadkin Road Southern Pines, NC 28387 9 This warranty gives you specific legal rights and you may not apply to wear, including without limitation: motor brushes, container and cutter assembly, clutches, bristle brushes, funnel, stainless steel cup, agitators, carafes, etc. otherwise the effective date of the warranty will repair or replace this warranty please...
... repair, or use this product in conformity with the printed directions. Commercial Technical Service 261 Yadkin Road Southern Pines, NC 28387 9 This warranty gives you specific legal rights and you may not apply to wear, including without limitation: motor brushes, container and cutter assembly, clutches, bristle brushes, funnel, stainless steel cup, agitators, carafes, etc. otherwise the effective date of the warranty will repair or replace this warranty please...

Operation Manual
Page 28
840151400 6/06 261 Yadkin Road Southern Pines, NC 28387 www.commercial.hamiltonbeach.com
840151400 6/06 261 Yadkin Road Southern Pines, NC 28387 www.commercial.hamiltonbeach.com


