User Guide
Page 1
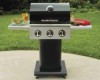
TO PREVENT DAMAGING YOUR GRILL, READ THIS MANUAL FIRST FOR IMPORTANT UNPACKING AND ASSEMBLY INSTRUCTIONS! 840208101 DESIGN CERTIFIED Type OG01 Gas Grill Assembly and Operation Manual Consumer Affairs: 1-800-851-8900 FOR OUTDOOR USE ONLY Hamilton Beach Brands, Inc. Glen Allen, Virginia 23060 STOP!
TO PREVENT DAMAGING YOUR GRILL, READ THIS MANUAL FIRST FOR IMPORTANT UNPACKING AND ASSEMBLY INSTRUCTIONS! 840208101 DESIGN CERTIFIED Type OG01 Gas Grill Assembly and Operation Manual Consumer Affairs: 1-800-851-8900 FOR OUTDOOR USE ONLY Hamilton Beach Brands, Inc. Glen Allen, Virginia 23060 STOP!

User Guide
Page 2
... open flames immediately. 3. TABLE OF CONTENTS BEFORE YOU BEGIN Message to the grill. 2. Open the grill lid. 4. Shut off gas to Our Users ...3 Safety Symbols ...3 Installation/Safety Precautions 4 Propane and Gas Warning ...4 Grill Parts List ...5 Grill Parts Diagram ...7 ASSEMBLY Before the Assembly ...8 Assembly Steps ...11 POST-ASSEMBLY Gas Connection ...19 Leak Testing ...23 Final Installation Checklist ...24...
... open flames immediately. 3. TABLE OF CONTENTS BEFORE YOU BEGIN Message to the grill. 2. Open the grill lid. 4. Shut off gas to Our Users ...3 Safety Symbols ...3 Installation/Safety Precautions 4 Propane and Gas Warning ...4 Grill Parts List ...5 Grill Parts Diagram ...7 ASSEMBLY Before the Assembly ...8 Assembly Steps ...11 POST-ASSEMBLY Gas Connection ...19 Leak Testing ...23 Final Installation Checklist ...24...
User Guide
Page 3
...each of the symbols is not intended to be installed in serious bodily injury and/or property damage. • Some parts of our Gas Grill. Please wear suitable protective gloves. We sincerely wish you will result in minor or moderate bodily injury if the instructions are not properly ...followed. 3 NOTE TO INSTALLER: Leave this manual. IMPORTANT: This grill is intended for outdoor use only and is listed here: wDANGER wWARNING wCAUTION This symbol indicates an imminently hazardous situation which may have any...
...each of the symbols is not intended to be installed in serious bodily injury and/or property damage. • Some parts of our Gas Grill. Please wear suitable protective gloves. We sincerely wish you will result in minor or moderate bodily injury if the instructions are not properly ...followed. 3 NOTE TO INSTALLER: Leave this manual. IMPORTANT: This grill is intended for outdoor use only and is listed here: wDANGER wWARNING wCAUTION This symbol indicates an imminently hazardous situation which may have any...
User Guide
Page 4
...THIS SECTION FIRST BEFORE INSTALLING THE GRILL • This grill is not responsible for any modifications, and all burners on HI: 3 Main burners x 11,000 Btu/hr each: Total 33,000 Btu/h 4 Hamilton Beach is designed to use in ...GAS CONSUMPTION: Total gas consumption (per hour) of California to use in use . • This grill is to cause cancer, birth defects, and other reproductive harm. Wash your hands after handling this appliance must be constructed and marked in use . Never modify to cause cancer, birth defects, or other reproductive harm. 2. Combustion by Hamilton Beach...
...THIS SECTION FIRST BEFORE INSTALLING THE GRILL • This grill is not responsible for any modifications, and all burners on HI: 3 Main burners x 11,000 Btu/hr each: Total 33,000 Btu/h 4 Hamilton Beach is designed to use in ...GAS CONSUMPTION: Total gas consumption (per hour) of California to use in use . • This grill is to cause cancer, birth defects, and other reproductive harm. Wash your hands after handling this appliance must be constructed and marked in use . Never modify to cause cancer, birth defects, or other reproductive harm. 2. Combustion by Hamilton Beach...
User Guide
Page 5
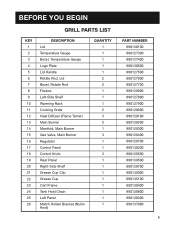
BEFORE YOU BEGIN GRILL PARTS LIST KEY 1 2 3 4 5 6 7 8 9 10 11 12 13 14 15 16 17 18 19 20 21 22 23 24 25 26 DESCRIPTION Lid Temperature Gauge Bezel, ... Lid Handle Rotate Rod, Lid Bezel, Rotate Rod Firebox Left-Side Shelf Warming Rack Cooking Grate Heat Diffuser (Flame Tamer) Main Burner Manifold, Main Burner Gas Valve, Main Burner Regulator Control Panel Control Knob Rear Panel Right-Side Shelf Grease Cup Clip Grease Cup Cart Frame Tank Hold Chain Left Panel...
BEFORE YOU BEGIN GRILL PARTS LIST KEY 1 2 3 4 5 6 7 8 9 10 11 12 13 14 15 16 17 18 19 20 21 22 23 24 25 26 DESCRIPTION Lid Temperature Gauge Bezel, ... Lid Handle Rotate Rod, Lid Bezel, Rotate Rod Firebox Left-Side Shelf Warming Rack Cooking Grate Heat Diffuser (Flame Tamer) Main Burner Manifold, Main Burner Gas Valve, Main Burner Regulator Control Panel Control Knob Rear Panel Right-Side Shelf Grease Cup Clip Grease Cup Cart Frame Tank Hold Chain Left Panel...

User Guide
Page 19
...8. UL-listed Overfill Protection Device (OPD). THE LP TANK USED WITH YOUR GRILL MUST MEET THE FOLLOWING: 1. Includes a collar to use a natural gas supply unless the grill has been reconfigured for LP gas cylinders of this type of Dangerous Goods. Have safety relief valve. 3. REPLACEMENT...5. Measurement: 12" (30.5-cm) diameter x 18" (45.7-cm) tall. 2. This OPD safety feature is an LP (Liquefied Petroleum Gas) configured grill. The installation of the U.S. Constructed and marked in accordance with this appliance must be checked by a unique triangular hand wheel. Has no ...
...8. UL-listed Overfill Protection Device (OPD). THE LP TANK USED WITH YOUR GRILL MUST MEET THE FOLLOWING: 1. Includes a collar to use a natural gas supply unless the grill has been reconfigured for LP gas cylinders of this type of Dangerous Goods. Have safety relief valve. 3. REPLACEMENT...5. Measurement: 12" (30.5-cm) diameter x 18" (45.7-cm) tall. 2. This OPD safety feature is an LP (Liquefied Petroleum Gas) configured grill. The installation of the U.S. Constructed and marked in accordance with this appliance must be checked by a unique triangular hand wheel. Has no ...
User Guide
Page 20
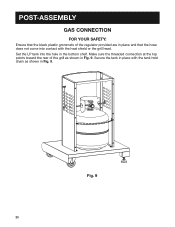
POST-ASSEMBLY GAS CONNECTION FOR YOUR SAFETY: Ensure that the black plastic grommets of the grill as shown in Fig. 9. Make sure the threaded connection at the top points toward the rear of the regulator provided are in place and that the hose does not come into the hole in the bottom shelf. Fig. 9 20 Secure the tank in Fig. 9. Set the LP tank into contact with the tank hold chain as shown in place with the heat shield or the grill head.
POST-ASSEMBLY GAS CONNECTION FOR YOUR SAFETY: Ensure that the black plastic grommets of the grill as shown in Fig. 9. Make sure the threaded connection at the top points toward the rear of the regulator provided are in place and that the hose does not come into the hole in the bottom shelf. Fig. 9 20 Secure the tank in Fig. 9. Set the LP tank into contact with the tank hold chain as shown in place with the heat shield or the grill head.
User Guide
Page 21
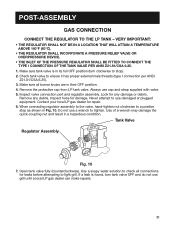
... clockwise to stop as shown in its full OFF position (turn tank valve OFF and do not use a wrench to light grill. Remove any damage or debris. Contact your local LP gas dealer for leaks before attempting to tighten. Use of a wrench may damage the quick-coupling nut and result in their... male threads (type I CONNECTION OF THE TANK VALVE PER ANSI Z21.81/CSA 6.25. 1. Check tank valve to a positive stop ). 2. Do not use grill until a local LP gas dealer can make repairs. 21 If a leak is in Fig. 10. Remove the protective cap from LP tank valve. Look for damage. POST-ASSEMBLY...
... clockwise to stop as shown in its full OFF position (turn tank valve OFF and do not use a wrench to light grill. Remove any damage or debris. Contact your local LP gas dealer for leaks before attempting to tighten. Use of a wrench may damage the quick-coupling nut and result in their... male threads (type I CONNECTION OF THE TANK VALVE PER ANSI Z21.81/CSA 6.25. 1. Check tank valve to a positive stop ). 2. Do not use grill until a local LP gas dealer can make repairs. 21 If a leak is in Fig. 10. Remove the protective cap from LP tank valve. Look for damage. POST-ASSEMBLY...

User Guide
Page 22
... leakage of dust cap on an LP tank could start a fire causing death or serious injury. • NEVER store a spare LP tank under or near grill or in use this grill to stop a gas leak, close the LP tank valve IMMEDIATELY and call the fire department. Detach the regulator assembly from the... grill and call the LP gas supplier or the fire department. An overfilled spare LP tank is provided with the cylinder valve. Only install the type of propane. • If any ...
... leakage of dust cap on an LP tank could start a fire causing death or serious injury. • NEVER store a spare LP tank under or near grill or in use this grill to stop a gas leak, close the LP tank valve IMMEDIATELY and call the fire department. Detach the regulator assembly from the... grill and call the LP gas supplier or the fire department. An overfilled spare LP tank is provided with the cylinder valve. Only install the type of propane. • If any ...

User Guide
Page 23
... 6. Substitution will void the warranty. Periodically check the whole system for help. 7. Keep grill away from ignition sources such as gas-fired or electrical appliances and flammable materials. 6. Do not use the grill until all control knobs are leak-tested at the connection. Check every connection from the... a soapy solution with an open LP tank valve by brushing or spraying the soapy solution on the grill. Call Consumer Affairs for leaks or immediately check if the smell of gas is a leak. Make sure the regulator is removed from the LP tank up to and including the...
... 6. Substitution will void the warranty. Periodically check the whole system for help. 7. Keep grill away from ignition sources such as gas-fired or electrical appliances and flammable materials. 6. Do not use the grill until all control knobs are leak-tested at the connection. Check every connection from the... a soapy solution with an open LP tank valve by brushing or spraying the soapy solution on the grill. Call Consumer Affairs for leaks or immediately check if the smell of gas is a leak. Make sure the regulator is removed from the LP tank up to and including the...
User Guide
Page 24
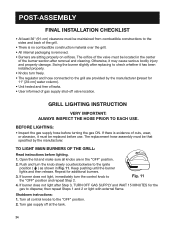
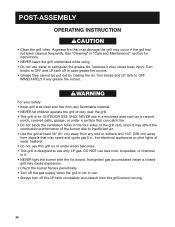
...replaced before use. Shutdown instructions: 1. BEFORE LIGHTING: • Inspect the gas supply hose before lighting. 1. Turn gas supply off valve location. Push and turn the control knob to the grill are sitting properly on orifices. Repeat for the gas to the ignite position ( ) as shown in Fig. 11. Turn ...all knobs are in the center of gas supply shut-off at the tank. 24 POST-ASSEMBLY FINAL ...
...replaced before use. Shutdown instructions: 1. BEFORE LIGHTING: • Inspect the gas supply hose before lighting. 1. Turn gas supply off valve location. Push and turn the control knob to the grill are sitting properly on orifices. Repeat for the gas to the ignite position ( ) as shown in Fig. 11. Turn ...all knobs are in the center of gas supply shut-off at the tank. 24 POST-ASSEMBLY FINAL ...
User Guide
Page 25
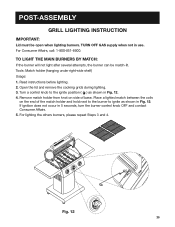
POST-ASSEMBLY GRILL LIGHTING INSTRUCTION IMPORTANT: Lid must be match-lit. Read instructions before lighting. 2. Place a lighted match between the coils on side of the match holder and ... not occur in use. For Consumer Affairs, call: 1-800-851-8900. Fig. 12 25 Tools: Match holder (hanging under right-side shelf) Usage: 1. TURN OFF GAS supply when not in 5 seconds, turn the burner control knob OFF and contact Consumer Affairs. 5.
POST-ASSEMBLY GRILL LIGHTING INSTRUCTION IMPORTANT: Lid must be match-lit. Read instructions before lighting. 2. Place a lighted match between the coils on side of the match holder and ... not occur in use. For Consumer Affairs, call: 1-800-851-8900. Fig. 12 25 Tools: Match holder (hanging under right-side shelf) Usage: 1. TURN OFF GAS supply when not in 5 seconds, turn the burner control knob OFF and contact Consumer Affairs. 5.
User Guide
Page 26
... electrical appliances or pilot lights of water heaters). • Do not use this grill on or under a surface that may damage the grill may cause body injury. NEVER use only LP gas. A grease fire that can catch fire. • Do not block the ventilation holes in the four sides of the ...burner due to OFF and LP tank off the LP tank completely and detach from the grill before moving. 26 Nonignited gas accumulated inside a closed grill may affect the combustion performance of the grill cart, since it . • NEVER light the burner with the lid closed. See "Cleaning" in use ...
... electrical appliances or pilot lights of water heaters). • Do not use this grill on or under a surface that may damage the grill may cause body injury. NEVER use only LP gas. A grease fire that can catch fire. • Do not block the ventilation holes in the four sides of the ...burner due to OFF and LP tank off the LP tank completely and detach from the grill before moving. 26 Nonignited gas accumulated inside a closed grill may affect the combustion performance of the grill cart, since it . • NEVER light the burner with the lid closed. See "Cleaning" in use ...
User Guide
Page 28
...LP tanks must have a safety cap. 9. If the appliance is handy to keep a spray bottle of the cart clear and free from the grill. 8. For any other enclosed areas. 6. The flame in the LO position should be stored outdoors in the three sides of soapy water near an... must be smaller than in a building, garage, or any other flammable vapors and liquids. 2. Keep the grill area clear and free from HI to avoid burns. 4. Check all of the gas supply line. CARE AND MAINTENANCE MAINTENANCE: 1. Disconnected LP tanks in a recreational vehicle or boat which may become...
...LP tanks must have a safety cap. 9. If the appliance is handy to keep a spray bottle of the cart clear and free from the grill. 8. For any other enclosed areas. 6. The flame in the LO position should be stored outdoors in the three sides of soapy water near an... must be smaller than in a building, garage, or any other flammable vapors and liquids. 2. Keep the grill area clear and free from HI to avoid burns. 4. Check all of the gas supply line. CARE AND MAINTENANCE MAINTENANCE: 1. Disconnected LP tanks in a recreational vehicle or boat which may become...
User Guide
Page 29
...off the flame when cooking is completed. Dip a brass bristle barbeque brush in the OFF position. GRILL BURNER CLEANING • Be sure the tank valve and the knobs are blocking the flow of gas through the burner, you will need to call Consumer Affairs. GREASE TRAY CLEANING The grease tray ...should be emptied, wiped down periodically, and washed in the water. These nests can nest in the center of the burner with burning smell. 2. Make sure the grill is cool. ...
...off the flame when cooking is completed. Dip a brass bristle barbeque brush in the OFF position. GRILL BURNER CLEANING • Be sure the tank valve and the knobs are blocking the flow of gas through the burner, you will need to call Consumer Affairs. GREASE TRAY CLEANING The grease tray ...should be emptied, wiped down periodically, and washed in the water. These nests can nest in the center of the burner with burning smell. 2. Make sure the grill is cool. ...
User Guide
Page 30
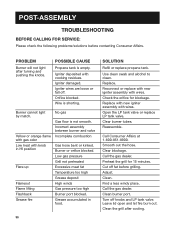
... knobs and LP tank valve. Yellow or orange flame with gas odor Low heat with wires. Low gas pressure Grill not preheated Excessive meat fat Temperature too high Grease deposit High winds Gas pressure too high Burner port blocked. Check the orifice for 15.... POST-ASSEMBLY TROUBLESHOOTING BEFORE CALLING FOR SERVICE: Please check the following problems/solutions before grilling. Incorrect assembly between burner and valve Incomplete combustion Gas hose bent or kinked. Call the gas dealer. Burner or orifice blocked. PROBLEM Burner will not light after cooling.
... knobs and LP tank valve. Yellow or orange flame with gas odor Low heat with wires. Low gas pressure Grill not preheated Excessive meat fat Temperature too high Grease deposit High winds Gas pressure too high Burner port blocked. Check the orifice for 15.... POST-ASSEMBLY TROUBLESHOOTING BEFORE CALLING FOR SERVICE: Please check the following problems/solutions before grilling. Incorrect assembly between burner and valve Incomplete combustion Gas hose bent or kinked. Call the gas dealer. Burner or orifice blocked. PROBLEM Burner will not light after cooling.
User Guide
Page 31
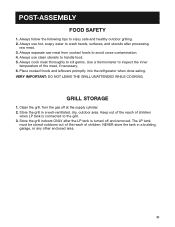
... temperature of children. POST-ASSEMBLY FOOD SAFETY 1. Always separate raw meat from cooked foods to enjoy safe and healthy outdoor grilling. 2. VERY IMPORTANT: DO NOT LEAVE THE GRILL UNATTENDED WHILE COOKING. Turn the gas off and removed. NEVER store the tank in a well-ventilated, dry, outdoor area. Always follow the following tips to...
... temperature of children. POST-ASSEMBLY FOOD SAFETY 1. Always separate raw meat from cooked foods to enjoy safe and healthy outdoor grilling. 2. VERY IMPORTANT: DO NOT LEAVE THE GRILL UNATTENDED WHILE COOKING. Turn the gas off and removed. NEVER store the tank in a well-ventilated, dry, outdoor area. Always follow the following tips to...