User Guide
Page 1
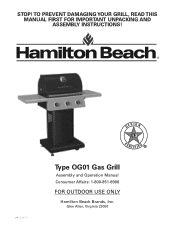
Glen Allen, Virginia 23060 STOP! TO PREVENT DAMAGING YOUR GRILL, READ THIS MANUAL FIRST FOR IMPORTANT UNPACKING AND ASSEMBLY INSTRUCTIONS! 840208101 DESIGN CERTIFIED Type OG01 Gas Grill Assembly and Operation Manual Consumer Affairs: 1-800-851-8900 FOR OUTDOOR USE ONLY Hamilton Beach Brands, Inc.
Glen Allen, Virginia 23060 STOP! TO PREVENT DAMAGING YOUR GRILL, READ THIS MANUAL FIRST FOR IMPORTANT UNPACKING AND ASSEMBLY INSTRUCTIONS! 840208101 DESIGN CERTIFIED Type OG01 Gas Grill Assembly and Operation Manual Consumer Affairs: 1-800-851-8900 FOR OUTDOOR USE ONLY Hamilton Beach Brands, Inc.

User Guide
Page 2
... or your fire department immediately. Open the grill lid. 4. Shut off gas to Our Users ...3 Safety Symbols ...3 Installation/Safety Precautions 4 Propane and Gas Warning ...4 Grill Parts List ...5 Grill Parts Diagram ...7 ASSEMBLY Before the Assembly ...8 Assembly Steps ...11 POST-ASSEMBLY Gas Connection ...19 Leak Testing ...23 Final Installation Checklist ...24 Grill Lighting Instruction ...24 Operating Instruction ...26 Safety Tips ...28 Care and Maintenance ...28 Troubleshooting ...30 Food Safety ...31 Grill Storage ...31 wDANGER • If you smell...
... or your fire department immediately. Open the grill lid. 4. Shut off gas to Our Users ...3 Safety Symbols ...3 Installation/Safety Precautions 4 Propane and Gas Warning ...4 Grill Parts List ...5 Grill Parts Diagram ...7 ASSEMBLY Before the Assembly ...8 Assembly Steps ...11 POST-ASSEMBLY Gas Connection ...19 Leak Testing ...23 Final Installation Checklist ...24 Grill Lighting Instruction ...24 Operating Instruction ...26 Safety Tips ...28 Care and Maintenance ...28 Troubleshooting ...30 Food Safety ...31 Grill Storage ...31 wDANGER • If you smell...
User Guide
Page 3
...: This grill is intended for outdoor use only and is listed here: wDANGER wWARNING wCAUTION This symbol indicates an imminently hazardous situation which may result in serious bodily injury and/or property damage. • Some parts of this grill may result if the instructions are being used throughout this user's manual with the customer after delivery and/or installation. This symbol...
...: This grill is intended for outdoor use only and is listed here: wDANGER wWARNING wCAUTION This symbol indicates an imminently hazardous situation which may result in serious bodily injury and/or property damage. • Some parts of this grill may result if the instructions are being used throughout this user's manual with the customer after delivery and/or installation. This symbol...
User Guide
Page 4
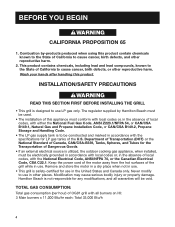
... is utilized, the outdoor cooking gas appliance, when installed, must conform with local codes or, in the absence of local codes, with either the National Fuel Gas Code, ANSI Z223.1/NFPA 54, or CAN/CSA B149.1, Natural Gas and Propane Installation Code, or CAN/CSA B149.2, Propane Storage and Handling Code. • The LP gas supply tank is not responsible for use LP gas only. Remove and store the...
... is utilized, the outdoor cooking gas appliance, when installed, must conform with local codes or, in the absence of local codes, with either the National Fuel Gas Code, ANSI Z223.1/NFPA 54, or CAN/CSA B149.1, Natural Gas and Propane Installation Code, or CAN/CSA B149.2, Propane Storage and Handling Code. • The LP gas supply tank is not responsible for use LP gas only. Remove and store the...
User Guide
Page 5
... Rotate Rod, Lid Bezel, Rotate Rod Firebox Left-Side Shelf Warming Rack Cooking Grate Heat Diffuser (Flame Tamer) Main Burner Manifold, Main Burner Gas Valve, Main Burner Regulator Control Panel Control Knob Rear Panel Right-Side Shelf Grease Cup Clip Grease Cup Cart Frame Tank Hold Chain Left Panel Match Holder Bracket (Nylon Knot) QUANTITY 1 1 1 1 1 2 2 1 1 1 2 3 3 1 3 1 1 3 1 1 1 1 1 1 1 1 PART NUMBER 990130100 990127300 990127400 990130500 990127500 990127600 990127700 990129900 990127800 990127900 990128000 990128100 990128200...
... Rotate Rod, Lid Bezel, Rotate Rod Firebox Left-Side Shelf Warming Rack Cooking Grate Heat Diffuser (Flame Tamer) Main Burner Manifold, Main Burner Gas Valve, Main Burner Regulator Control Panel Control Knob Rear Panel Right-Side Shelf Grease Cup Clip Grease Cup Cart Frame Tank Hold Chain Left Panel Match Holder Bracket (Nylon Knot) QUANTITY 1 1 1 1 1 2 2 1 1 1 2 3 3 1 3 1 1 3 1 1 1 1 1 1 1 1 PART NUMBER 990130100 990127300 990127400 990130500 990127500 990127600 990127700 990129900 990127800 990127900 990128000 990128100 990128200...

User Guide
Page 6
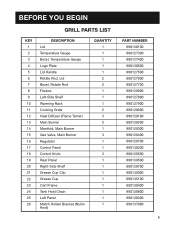
BEFORE YOU BEGIN GRILL PARTS LIST KEY 27 28 29 30 31 32 33 DESCRIPTION Match Holder Tank Baffle Right Panel Front Panel Bottom Shelf Standard Caster Foot QUANTITY 1 1 1 1 1 2 2 PART NUMBER 990137100 990139600 990135600 990130000 990129800 990128900 990129000 6
BEFORE YOU BEGIN GRILL PARTS LIST KEY 27 28 29 30 31 32 33 DESCRIPTION Match Holder Tank Baffle Right Panel Front Panel Bottom Shelf Standard Caster Foot QUANTITY 1 1 1 1 1 2 2 PART NUMBER 990137100 990139600 990135600 990130000 990129800 990128900 990129000 6

User Guide
Page 8
A. Remove all the parts out of protective styrofoam as shown in Fig. Grill Head Left and Right Panels Grill Head Bottom Shelf Warming Rack Front Panel Tank Baffle Cart Frame Fig. Open shipping box by slicing down its edges with a box cutter. A Styrofoam 8 STEP 1: 1. Take out all parts from plastic bags. ASSEMBLY BEFORE THE ASSEMBLY READ AND FOLLOW THE INSTRUCTIONS BELOW TO CORRECTLY UNPACK GRILL PARTS FROM SHIPPING BOX.
A. Remove all the parts out of protective styrofoam as shown in Fig. Grill Head Left and Right Panels Grill Head Bottom Shelf Warming Rack Front Panel Tank Baffle Cart Frame Fig. Open shipping box by slicing down its edges with a box cutter. A Styrofoam 8 STEP 1: 1. Take out all parts from plastic bags. ASSEMBLY BEFORE THE ASSEMBLY READ AND FOLLOW THE INSTRUCTIONS BELOW TO CORRECTLY UNPACK GRILL PARTS FROM SHIPPING BOX.

User Guide
Page 9
B below. Styrofoam Heat Diffusers Grease Cup Clip and Grease Cup Positioning Gage Grill Head Cooking Grids Cardboard Box Left and Right Shelves Tank Hold Chain Feet Casters Fig. B Hardware Pack 9 ASSEMBLY BEFORE THE ASSEMBLY STEP 2: 1. Open grill lid, and take out the small boxes packed within the grill head. Remove all packing materials and remove all parts from boxes as shown in Fig.
B below. Styrofoam Heat Diffusers Grease Cup Clip and Grease Cup Positioning Gage Grill Head Cooking Grids Cardboard Box Left and Right Shelves Tank Hold Chain Feet Casters Fig. B Hardware Pack 9 ASSEMBLY BEFORE THE ASSEMBLY STEP 2: 1. Open grill lid, and take out the small boxes packed within the grill head. Remove all packing materials and remove all parts from boxes as shown in Fig.

User Guide
Page 19
... Canada, CAN/CSA-B339, Cylinders, Spheres, and Tubes for marking. 4. Have type I outlet compatible with the tank retention means in the standard for natural gas use a natural gas supply unless the grill has been reconfigured for compressed gas tank valve outlet and inlet connection ANSI/CGA V-1. 8. This OPD safety feature is an LP (Liquefied Petroleum Gas) configured grill. REPLACEMENT PRESSURE REGULATORS AND HOSE ASSEMBLIES MUST BE THOSE SUPPLIED...
... Canada, CAN/CSA-B339, Cylinders, Spheres, and Tubes for marking. 4. Have type I outlet compatible with the tank retention means in the standard for natural gas use a natural gas supply unless the grill has been reconfigured for compressed gas tank valve outlet and inlet connection ANSI/CGA V-1. 8. This OPD safety feature is an LP (Liquefied Petroleum Gas) configured grill. REPLACEMENT PRESSURE REGULATORS AND HOSE ASSEMBLIES MUST BE THOSE SUPPLIED...
User Guide
Page 21
.... 1. Tank Valve Regulator Assembly Fig. 10 7. POST-ASSEMBLY GAS CONNECTION CONNECT THE REGULATOR TO THE LP TANK - Check tank valve to a positive stop ). 2. Remove any damage or debris. Contact your local LP gas dealer for damage. Do not use cap and strap supplied with valve. 5. Use a soapy water solution to check all burner knobs are in Fig. 10. Always use a wrench to use grill until a local LP gas dealer can make repairs...
.... 1. Tank Valve Regulator Assembly Fig. 10 7. POST-ASSEMBLY GAS CONNECTION CONNECT THE REGULATOR TO THE LP TANK - Check tank valve to a positive stop ). 2. Remove any damage or debris. Contact your local LP gas dealer for damage. Do not use cap and strap supplied with valve. 5. Use a soapy water solution to check all burner knobs are in Fig. 10. Always use a wrench to use grill until a local LP gas dealer can make repairs...

User Guide
Page 22
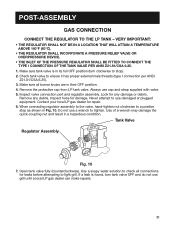
...GAS TANK: 1. Leaking gas may damage the valve and cause a leak. Turn all the knobs OFF. 2. It may result in an enclosed area. • NEVER fill the tank beyond 80% full. Detach the regulator assembly from the grill and call the LP gas supplier or the fire department. Other types of propane...relief valve. Turn the tank valve off fully (turn clockwise to the self-contained LP gas system of dust cap on cylinder valve outlet whenever the cylinder is provided with the cylinder valve. Only install the type of a motor home or camper trailer. • Do not use . Install ...
...GAS TANK: 1. Leaking gas may damage the valve and cause a leak. Turn all the knobs OFF. 2. It may result in an enclosed area. • NEVER fill the tank beyond 80% full. Detach the regulator assembly from the grill and call the LP gas supplier or the fire department. Other types of propane...relief valve. Turn the tank valve off fully (turn clockwise to the self-contained LP gas system of dust cap on cylinder valve outlet whenever the cylinder is provided with the cylinder valve. Only install the type of a motor home or camper trailer. • Do not use . Install ...

User Guide
Page 23
...leak-tested outdoors in a well-ventilated area, away from the LP tank up to and including the connection to the manifold pipe assembly (the pipe that all packing material is removed from open flames and/or sparks while testing. Call your gas dealer or fire department. 4. Open LP tank valve again and ... burner) by the manufacturer should be stopped, DO NOT ATTEMPT TO REPAIR. Call Consumer Affairs for leaks or immediately check if the smell of gas is connected tightly to the connections. Always close the LP tank valve after leak-testing by turning counterclockwise. Do not use the grill ...
...leak-tested outdoors in a well-ventilated area, away from the LP tank up to and including the connection to the manifold pipe assembly (the pipe that all packing material is removed from open flames and/or sparks while testing. Call your gas dealer or fire department. 4. Open LP tank valve again and ... burner) by the manufacturer should be stopped, DO NOT ATTEMPT TO REPAIR. Call Consumer Affairs for leaks or immediately check if the smell of gas is connected tightly to the connections. Always close the LP tank valve after leak-testing by turning counterclockwise. Do not use the grill ...
User Guide
Page 24
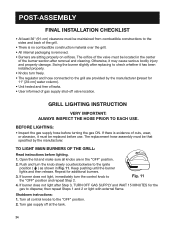
... EACH USE. TO LIGHT MAIN BURNERS OF THE GRILL: Read instructions before turning the gas ON. If burner does not light after Step 3, TURN OFF GAS SUPPLY and WAIT 15 MINUTES for additional burners. 3. Turn gas supply off valve location. Otherwise, it has been installed properly. • Knobs turn freely. • The regulator and hose connected to disperse; BEFORE LIGHTING: • Inspect the gas supply hose before lighting. 1. Shutdown instructions: 1. Keep...
... EACH USE. TO LIGHT MAIN BURNERS OF THE GRILL: Read instructions before turning the gas ON. If burner does not light after Step 3, TURN OFF GAS SUPPLY and WAIT 15 MINUTES for additional burners. 3. Turn gas supply off valve location. Otherwise, it has been installed properly. • Knobs turn freely. • The regulator and hose connected to disperse; BEFORE LIGHTING: • Inspect the gas supply hose before lighting. 1. Shutdown instructions: 1. Keep...
User Guide
Page 25
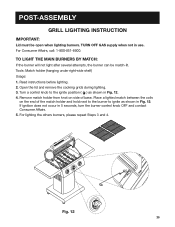
... the match holder and hold next to the burner to the ignite position ( ) as shown in 5 seconds, turn the burner control knob OFF and contact Consumer Affairs. 5. POST-ASSEMBLY GRILL LIGHTING INSTRUCTION IMPORTANT: Lid must be match-lit. For Consumer Affairs, call: 1-800-851-8900. Open the lid and remove the cooking grids during lighting. 3. TO LIGHT THE MAIN BURNERS BY MATCH: If the burner will not light after...
... the match holder and hold next to the burner to the ignite position ( ) as shown in 5 seconds, turn the burner control knob OFF and contact Consumer Affairs. 5. POST-ASSEMBLY GRILL LIGHTING INSTRUCTION IMPORTANT: Lid must be match-lit. For Consumer Affairs, call: 1-800-851-8900. Open the lid and remove the cooking grids during lighting. 3. TO LIGHT THE MAIN BURNERS BY MATCH: If the burner will not light after...
User Guide
Page 26
POST-ASSEMBLY OPERATING INSTRUCTION wCAUTION • Clean the grill often. See "Cleaning" in "Care and Maintenance" section for OUTDOOR USE ONLY. wWARNING For your safety: • Keep grill area clear and free from objects that can catch fire. • Do not block the ventilation holes in it may occur if the grill has not been cleaned frequently. A grease fire that may damage...
POST-ASSEMBLY OPERATING INSTRUCTION wCAUTION • Clean the grill often. See "Cleaning" in "Care and Maintenance" section for OUTDOOR USE ONLY. wWARNING For your safety: • Keep grill area clear and free from objects that can catch fire. • Do not block the ventilation holes in it may occur if the grill has not been cleaned frequently. A grease fire that may damage...
User Guide
Page 27
... or basted with a sugary marinade may be closed during the preheat period. 6. The control knob may be set to minimize blockage from falling grease and debris. The hot grill sears the food, sealing in this manual. 4. Light the grill burners using the instructions in the juices. Heat is properly located. 2. Adjust heat setting, if necessary. Most foods are side-ported to any kind. However, when...
... or basted with a sugary marinade may be closed during the preheat period. 6. The control knob may be set to minimize blockage from falling grease and debris. The hot grill sears the food, sealing in this manual. 4. Light the grill burners using the instructions in the juices. Heat is properly located. 2. Adjust heat setting, if necessary. Most foods are side-ported to any kind. However, when...
User Guide
Page 28
... have threaded valve plugs tightly installed and must have a safety cap. 9. CARE AND MAINTENANCE MAINTENANCE: 1. It is unobstructed. 3. LP tanks must be stored outdoors in the three sides of the cart clear and free from the grill. 8. HI LO 4. Always check for replacement parts. 28 POST-ASSEMBLY SAFETY TIPS SAFETY TIPS: 1. Always check for leaks before each use . 3. See "Troubleshooting" if any...
... have threaded valve plugs tightly installed and must have a safety cap. 9. CARE AND MAINTENANCE MAINTENANCE: 1. It is unobstructed. 3. LP tanks must be stored outdoors in the three sides of the cart clear and free from the grill. 8. HI LO 4. Always check for replacement parts. 28 POST-ASSEMBLY SAFETY TIPS SAFETY TIPS: 1. Always check for leaks before each use . 3. See "Troubleshooting" if any...
User Guide
Page 29
...grease tray to absorb the grease. Yellow flame with a wire brush. Clear stubborn scale with a straightened paper clip. This is a very dangerous condition. Always clean the burners before use a wooden toothpick since it may cause serious bodily injury and property damage. POST-ASSEMBLY CARE AND MAINTENANCE CLEANING COOKING AREA CLEANING The easiest way to clean the grill...insects or other obstructions are in the water. GRILL BURNER CLEANING • Be sure the tank valve and the knobs are blocking the flow of gas through the burner, you will need to call Consumer Affairs....
...grease tray to absorb the grease. Yellow flame with a wire brush. Clear stubborn scale with a straightened paper clip. This is a very dangerous condition. Always clean the burners before use a wooden toothpick since it may cause serious bodily injury and property damage. POST-ASSEMBLY CARE AND MAINTENANCE CLEANING COOKING AREA CLEANING The easiest way to clean the grill...insects or other obstructions are in the water. GRILL BURNER CLEANING • Be sure the tank valve and the knobs are blocking the flow of gas through the burner, you will need to call Consumer Affairs....
User Guide
Page 30
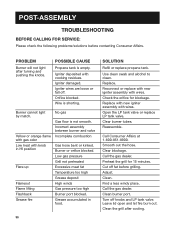
.... Use clean swab and alcohol to clean. Replace. Open the LP tank valve or replace LP tank valve. Adjust. POST-ASSEMBLY TROUBLESHOOTING BEFORE CALLING FOR SERVICE: Please check the following problems/solutions before grilling. Burner cannot light by match. Check the orifice for 15 minutes. Clear burner tubes. Orifice blocked. Reconnect or replace with new igniter assembly with knob in food. 30 SOLUTION Refill or replace propane tank. Reassemble. Igniter damaged. Replace with new igniter assembly with cooking residues. PROBLEM Burner will...
.... Use clean swab and alcohol to clean. Replace. Open the LP tank valve or replace LP tank valve. Adjust. POST-ASSEMBLY TROUBLESHOOTING BEFORE CALLING FOR SERVICE: Please check the following problems/solutions before grilling. Burner cannot light by match. Check the orifice for 15 minutes. Clear burner tubes. Orifice blocked. Reconnect or replace with new igniter assembly with knob in food. 30 SOLUTION Refill or replace propane tank. Reassemble. Igniter damaged. Replace with new igniter assembly with cooking residues. PROBLEM Burner will...
User Guide
Page 32
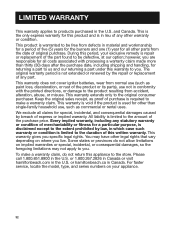
... cover igniter batteries, wear from normal use (such as commercial or rental uses. All liability is repair or replacement of the product or its parts), use , such as paint loss, discoloration, or rust of the part found to be free from accident, alteration, abuse, or misuse. or hamiltonbeach.ca in the U.S. This warranty gives you . For faster service, locate the model, type, and series numbers...
... cover igniter batteries, wear from normal use (such as commercial or rental uses. All liability is repair or replacement of the product or its parts), use , such as paint loss, discoloration, or rust of the part found to be free from accident, alteration, abuse, or misuse. or hamiltonbeach.ca in the U.S. This warranty gives you . For faster service, locate the model, type, and series numbers...