Use & Care
Page 3
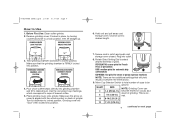
...position. This is aligned with the unlock symbol on next page 5 Pour whole coffee beans directly into position. 4 6. Rotate Grind Setting Dial to cups of grinder. Before First Use: Clean coffee grinder. 2. Use the convenient cup markings, which correspond to select desired fineness of ...grinding. Place grinding cover onto grinder. Secure cord in notch and push cord storage cover closed....
...position. This is aligned with the unlock symbol on next page 5 Pour whole coffee beans directly into position. 4 6. Rotate Grind Setting Dial to cups of grinder. Before First Use: Clean coffee grinder. 2. Use the convenient cup markings, which correspond to select desired fineness of ...grinding. Place grinding cover onto grinder. Secure cord in notch and push cord storage cover closed....
Use & Care
Page 4
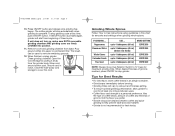
...ml) up to 4 tablespoons (60 ml) GRIND SETTING ESPRESSO ESPRESSO ESPRESSO ESPRESSO ESPRESSO NOTE: Always move Cup Selector Switch to stop grinder. Pour ground coffee into position. 11. Wrap cord 8 4 around center post. When desired fineness of grind to find the flavor you prefer. •...and settings when grinding whole spices. Clean grinding chamber. 840154400 ENv02.qxd 2/7/07 9:37 AM Page 6 10. The coffee grinder will start from base. When finished, unplug grinder. Close the hide-away cord storage to cover the cord. 6 Grinding Whole Spices Follow How to help prevent taste...
...ml) up to 4 tablespoons (60 ml) GRIND SETTING ESPRESSO ESPRESSO ESPRESSO ESPRESSO ESPRESSO NOTE: Always move Cup Selector Switch to stop grinder. Pour ground coffee into position. 11. Wrap cord 8 4 around center post. When desired fineness of grind to find the flavor you prefer. •...and settings when grinding whole spices. Clean grinding chamber. 840154400 ENv02.qxd 2/7/07 9:37 AM Page 6 10. The coffee grinder will start from base. When finished, unplug grinder. Close the hide-away cord storage to cover the cord. 6 Grinding Whole Spices Follow How to help prevent taste...


