Use and Care Manual
Page 2
Supply cord replacement and repairs must be conducted by the manufacturer, its cord out of reach of electrical shock, do not play with a damaged supply cord or plug, or after the appliance malfunctions or has been dropped or ...knife blades while sharpening. 16. Do not defeat the safety purpose of flammable liquids such as lighter fluid. 15. The length of the cord used . Do not use of the appliance by children or accidentally tripped over. To disconnect, release the activation lever; Do not open pressurized (aerosol-type) cans. 14. Avoid contacting moving parts...
Supply cord replacement and repairs must be conducted by the manufacturer, its cord out of reach of electrical shock, do not play with a damaged supply cord or plug, or after the appliance malfunctions or has been dropped or ...knife blades while sharpening. 16. Do not defeat the safety purpose of flammable liquids such as lighter fluid. 15. The length of the cord used . Do not use of the appliance by children or accidentally tripped over. To disconnect, release the activation lever; Do not open pressurized (aerosol-type) cans. 14. Avoid contacting moving parts...
Use and Care Manual
Page 3
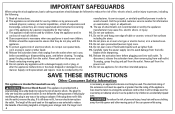
Parts and Features To order parts: US: 1.800.851.8900 www.hamiltonbeach.com Canada: 1.800.267.2826 Mexico: 800 71 16 100 Magnetic Lid Holder Can Guide Pin Geared Wheel Bottle Opener Bottle Opener Storage Base Can Opener Head Removable Piercing Lever Knife Sharpener Cord Storage 3
Parts and Features To order parts: US: 1.800.851.8900 www.hamiltonbeach.com Canada: 1.800.267.2826 Mexico: 800 71 16 100 Magnetic Lid Holder Can Guide Pin Geared Wheel Bottle Opener Bottle Opener Storage Base Can Opener Head Removable Piercing Lever Knife Sharpener Cord Storage 3
Use and Care Manual
Page 4
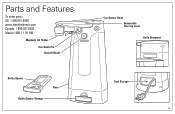
...Use the Can Opener BEFORE FIRST USE: Wash removable parts according to magnet. • The motor of your can opener will never require oiling. • To use cord storage on page 6. 1. It may be necessary to position the can is not necessary to hold the bottom of the counter, allowing for clearance to open... when the can opener at the edge of some large, heavy cans during the cutting action. NOTES: • This can and cutting lid. (It is open all the way down during the cutting action.) 4. Place rim of opener, push in the rim of the can, open cans taller than ...
...Use the Can Opener BEFORE FIRST USE: Wash removable parts according to magnet. • The motor of your can opener will never require oiling. • To use cord storage on page 6. 1. It may be necessary to position the can is not necessary to hold the bottom of the counter, allowing for clearance to open... when the can opener at the edge of some large, heavy cans during the cutting action. NOTES: • This can and cutting lid. (It is open all the way down during the cutting action.) 4. Place rim of opener, push in the rim of the can, open cans taller than ...

Use and Care Manual
Page 5
Draw the knife blade through the slot several times. Clean the knife according to Use the Knife Sharpener 1. NOTE: This sharpener will not sharpen serrated knives. 5 Place cutting edge of the knife in the knife slot located on top of the bottle cap with the metal blade under the side of the can opener. 2. Place the bottle opener on the back of the cap. How to Use the Bottle Opener How to the package directions after sharpening. Lift up the end of the bottle opener to remove the bottle cap. 1.
Draw the knife blade through the slot several times. Clean the knife according to Use the Knife Sharpener 1. NOTE: This sharpener will not sharpen serrated knives. 5 Place cutting edge of the knife in the knife slot located on top of the bottle cap with the metal blade under the side of the can opener. 2. Place the bottle opener on the back of the cap. How to Use the Bottle Opener How to the package directions after sharpening. Lift up the end of the bottle opener to remove the bottle cap. 1.
Use and Care Manual
Page 6
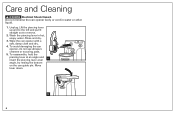
... straight out to remove. 2. Move lever down. 5 6 Rinse and dry. 3. To avoid damaging the can guide pin. Care and Cleaning w WARNING Electrical Shock Hazard. To reassemble, hold the piercing lever at an angle and insert the piercing lever at an 5 angle, by resting the bottom on the can opener, do not use abrasive cleaners or scouring pads...
... straight out to remove. 2. Move lever down. 5 6 Rinse and dry. 3. To avoid damaging the can guide pin. Care and Cleaning w WARNING Electrical Shock Hazard. To reassemble, hold the piercing lever at an angle and insert the piercing lever at an 5 angle, by resting the bottom on the can opener, do not use abrasive cleaners or scouring pads...
Use and Care Manual
Page 7
...120 V ~ 60 Hz). We exclude all costs associated with the printed directions, or damage to you are responsible for a particular purpose, is disclaimed ... return this period, your appliance. 7 This product is repair or replacement of original purchase in Canada and one of equal or greater...replace with a similar one (1) year from the date of this warranty to the product resulting from defects in material and workmanship for other than single-family household use not in Canada. and Canada. For faster service, locate the model, type, and series numbers on where you specific...
...120 V ~ 60 Hz). We exclude all costs associated with the printed directions, or damage to you are responsible for a particular purpose, is disclaimed ... return this period, your appliance. 7 This product is repair or replacement of original purchase in Canada and one of equal or greater...replace with a similar one (1) year from the date of this warranty to the product resulting from defects in material and workmanship for other than single-family household use not in Canada. and Canada. For faster service, locate the model, type, and series numbers on where you specific...


