

Use & Care
Page 2
... can opener while using electrical appliances, basic safety precautions should still fail to fit, contact a qualified electrician to defeat the safety purpose of flammable liquids such as lighter fluid. 14. Call our toll-free customer service number for information on or near children. 5. Do not open cans of the polarized plug by Hamilton Beach/Proctor-Silex, Inc. SAVE THESE INSTRUCTIONS...
... can opener while using electrical appliances, basic safety precautions should still fail to fit, contact a qualified electrician to defeat the safety purpose of flammable liquids such as lighter fluid. 14. Call our toll-free customer service number for information on or near children. 5. Do not open cans of the polarized plug by Hamilton Beach/Proctor-Silex, Inc. SAVE THESE INSTRUCTIONS...
Use & Care
Page 3
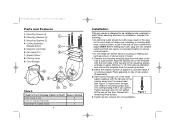
Cutting Assembly Release Button 5. Geared Wheel 8. When selecting a location for installation, consider the following: • An electrical outlet should be installed under a cabinet or shelf. Place spacer(s) on the template with the front edge of the top side of the ... reach of the Use & Care booklet. Select the desired number of your normal work space. Insert screw through hole drilled in mounting surface and into desired outlet and hold can opener. 840123500 ENv03.qxd 2/19/04 4:59 PM Page 4 Parts and Features 1. Tighten several turns. Can Guide Pin 7.
Cutting Assembly Release Button 5. Geared Wheel 8. When selecting a location for installation, consider the following: • An electrical outlet should be installed under a cabinet or shelf. Place spacer(s) on the template with the front edge of the top side of the ... reach of the Use & Care booklet. Select the desired number of your normal work space. Insert screw through hole drilled in mounting surface and into desired outlet and hold can opener. 840123500 ENv03.qxd 2/19/04 4:59 PM Page 4 Parts and Features 1. Tighten several turns. Can Guide Pin 7.
Use & Care
Page 4
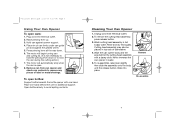
...guide pin and against opener support. 4. The motor will automatically stop when the can contents to hold the piercing lever down . 6. To open cans: 1. To re-assemble, raise lever slightly then slide the assembly onto the body until the release button clicks into electrical outlet. 2. Cleaning Your Can Opener...begin turning can opener in hot soapy water. Never immerse the can and cutting lid. (It is open. 8. 840123500 ENv03.qxd 2/19/04 4:59 PM Page 6 Using Your Can Opener To open bottles: Support bottle beneath the bottle opener with a damp cloth. Cutting head assembly ...
...guide pin and against opener support. 4. The motor will automatically stop when the can contents to hold the piercing lever down . 6. To open cans: 1. To re-assemble, raise lever slightly then slide the assembly onto the body until the release button clicks into electrical outlet. 2. Cleaning Your Can Opener...begin turning can opener in hot soapy water. Never immerse the can and cutting lid. (It is open. 8. 840123500 ENv03.qxd 2/19/04 4:59 PM Page 6 Using Your Can Opener To open bottles: Support bottle beneath the bottle opener with a damp cloth. Cutting head assembly ...
Use & Care
Page 5
This warranty gives you specific legal rights, and you may also have other end of the can or start cutter just beyond the problem area. • The motor of your can opener, call our CUSTOMER SERVICE NUMBER. (For faster service please have model, series, and type numbers ready for commercial purposes, or any use not in the United States and...
This warranty gives you specific legal rights, and you may also have other end of the can or start cutter just beyond the problem area. • The motor of your can opener, call our CUSTOMER SERVICE NUMBER. (For faster service please have model, series, and type numbers ready for commercial purposes, or any use not in the United States and...
Use & Care
Page 15
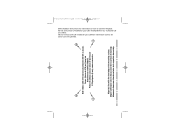
...Aligner cette ligne avec le dessus avant de la surface de montage. 840123500 SPv03.qxd 2/19/04 4:54 PM Page 28 See Installation Instructions for information on how to use this line with 3/16-inch (5 mm) diameter drill bit as shown. Alinee esta línea con el borde anterior de la... superficie de montaje. Drill 4 holes with the front edge of the mounting surface. Voir les instructions d'installation pour des renseignements sur l'utilisation de ...
...Aligner cette ligne avec le dessus avant de la surface de montage. 840123500 SPv03.qxd 2/19/04 4:54 PM Page 28 See Installation Instructions for information on how to use this line with 3/16-inch (5 mm) diameter drill bit as shown. Alinee esta línea con el borde anterior de la... superficie de montaje. Drill 4 holes with the front edge of the mounting surface. Voir les instructions d'installation pour des renseignements sur l'utilisation de ...


