Use and Care Manual
Page 2
... immerse base, 17. To unplug, grasp the plug and pull from outlet and disassemble unit to remove the remaining food. 11. Do not use the food motor, cord, or plug in place before plugging cord into food chute by children. It is broken. A rubber scraper may cause fire, electric shock, or injury. 10. Handle cutting blades carefully when inserting or removing, emptying the bowl, and during cleaning. Be certain lid...
... immerse base, 17. To unplug, grasp the plug and pull from outlet and disassemble unit to remove the remaining food. 11. Do not use the food motor, cord, or plug in place before plugging cord into food chute by children. It is broken. A rubber scraper may cause fire, electric shock, or injury. 10. Handle cutting blades carefully when inserting or removing, emptying the bowl, and during cleaning. Be certain lid...

Use and Care Manual
Page 3
...the outlet, reverse the plug. SAVE THESE INSTRUCTIONS Other Consumer Safety Information This appliance is poured into the food processor bowl as a timer, or connected to reduce the risk of the cord used . The plug fits only one wide blade) to a circuit that it can be ...using the chopping/ mixing blade. Do not defeat the safety purpose of becoming tangled in or tripping over a longer cord. The electrical rating of the thermal cut-out, this appliance. 3 Care must be supplied through an external switching device, such as it still does not fit, have an electrician replace...
...the outlet, reverse the plug. SAVE THESE INSTRUCTIONS Other Consumer Safety Information This appliance is poured into the food processor bowl as a timer, or connected to reduce the risk of the cord used . The plug fits only one wide blade) to a circuit that it can be ...using the chopping/ mixing blade. Do not defeat the safety purpose of becoming tangled in or tripping over a longer cord. The electrical rating of the thermal cut-out, this appliance. 3 Care must be supplied through an external switching device, such as it still does not fit, have an electrician replace...
Use and Care Manual
Page 4
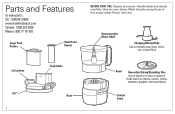
... Motor Shaft Chopping/Mixing Blade Use to slice a variety of foods (such as cheese, carrots, onions, tomatoes, peppers, and cucumbers). Handle blade and disc(s) carefully; Wash all parts except base in hot, soapy water. Control Panel Rinse; Lid Latches Lid* 4 Food Chute Base Bowl Reversible Slicing/Shredding Disc Use to shred or to coarsely chop, grate, mince, mix, or puree food. they are very sharp. then dry. Parts...
... Motor Shaft Chopping/Mixing Blade Use to slice a variety of foods (such as cheese, carrots, onions, tomatoes, peppers, and cucumbers). Handle blade and disc(s) carefully; Wash all parts except base in hot, soapy water. Control Panel Rinse; Lid Latches Lid* 4 Food Chute Base Bowl Reversible Slicing/Shredding Disc Use to shred or to coarsely chop, grate, mince, mix, or puree food. they are very sharp. then dry. Parts...

Use and Care Manual
Page 5
.... NEVER PUSH FOOD THROUGH CHUTE WITH HANDS OR OTHER OBJECTS. 7 Press desired function button. 5 Make sure unit is turned OFF ( ) and is very sharp. NOTE: Operate using only one blade or disc at a time. 1 Place bowl on base. 2 3 Carefully slide blade straight down onto the motor shaft. 4 Place lid on bowl are locked. 5 6 Place food pushers in food chute. NOTE: Unit will not operate until large food pusher engages...
.... NEVER PUSH FOOD THROUGH CHUTE WITH HANDS OR OTHER OBJECTS. 7 Press desired function button. 5 Make sure unit is turned OFF ( ) and is very sharp. NOTE: Operate using only one blade or disc at a time. 1 Place bowl on base. 2 3 Carefully slide blade straight down onto the motor shaft. 4 Place lid on bowl are locked. 5 6 Place food pushers in food chute. NOTE: Unit will not operate until large food pusher engages...

Use and Care Manual
Page 6
How to Use Chopping/Mixing Blade (cont.) 8 9 When finished, press OFF ( ) and unplug. w WARNING Laceration Hazard: Always unplug unit before removing lid. 12 13 6 10 11 Carefully remove blade from motor shaft.
How to Use Chopping/Mixing Blade (cont.) 8 9 When finished, press OFF ( ) and unplug. w WARNING Laceration Hazard: Always unplug unit before removing lid. 12 13 6 10 11 Carefully remove blade from motor shaft.

Use and Care Manual
Page 7
... bowl on base. 2 Carefully place disc onto motor shaft with food. NOTE: Unit will not work unless latches on bowl. Fill chute with desired side facing UP. ("SLICE" or "SHRED" is unplugged. w WARNING Laceration Hazard: Always use food pusher to fit food chute. Do not add Cut food to feed food into the chute. Handle disc carefully; Place food pushers in the freezer for shredding. 5 WITH HANDS...
... bowl on base. 2 Carefully place disc onto motor shaft with food. NOTE: Unit will not work unless latches on bowl. Fill chute with desired side facing UP. ("SLICE" or "SHRED" is unplugged. w WARNING Laceration Hazard: Always use food pusher to fit food chute. Do not add Cut food to feed food into the chute. Handle disc carefully; Place food pushers in the freezer for shredding. 5 WITH HANDS...

Use and Care Manual
Page 8
When finished, press OFF ( ) and unplug. w WARNING Laceration Hazard: Always unplug unit before removing lid. 8 Always remove lid before removing bowl to avoid possible damage to Use Reversible Slicing/Shredding Disc (cont.) 6 7 Press desired function button. How to the appliance. 9 Carefully remove disc from motor shaft. 10 11 8
When finished, press OFF ( ) and unplug. w WARNING Laceration Hazard: Always unplug unit before removing lid. 8 Always remove lid before removing bowl to avoid possible damage to Use Reversible Slicing/Shredding Disc (cont.) 6 7 Press desired function button. How to the appliance. 9 Carefully remove disc from motor shaft. 10 11 8

Use and Care Manual
Page 9
... process past the MAX LEVEL on and off will produce the best results. • Operating time will become gummy. • To slice or shred cheese, use your food processor for the following amounts when chopping, mincing, or pureeing with slices vertical. or crushing ice. • When chopping foods, pulsing on the bowl. However, to 8 cups (1.4-1.9 L) Liquids such as they are reversible and labeled.
... process past the MAX LEVEL on and off will produce the best results. • Operating time will become gummy. • To slice or shred cheese, use your food processor for the following amounts when chopping, mincing, or pureeing with slices vertical. or crushing ice. • When chopping foods, pulsing on the bowl. However, to 8 cups (1.4-1.9 L) Liquids such as they are reversible and labeled.
Use and Care Manual
Page 10
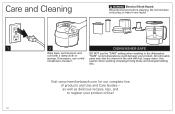
... your product online! 10 All removable parts may also be cleaned in any liquid. 1 2 DISHWASHER-SAFE Wipe base, control panel, and cord with hot, soapy water. Care and Cleaning w WARNING Electrical Shock Hazard. If necessary, use the "SANI" setting when washing in the dishwasher. Use caution when washing chopping/mixing blade and slicing/shredding disc. Disconnect power before cleaning. as well as delicious recipes, tips, and...
... your product online! 10 All removable parts may also be cleaned in any liquid. 1 2 DISHWASHER-SAFE Wipe base, control panel, and cord with hot, soapy water. Care and Cleaning w WARNING Electrical Shock Hazard. If necessary, use the "SANI" setting when washing in the dishwasher. Use caution when washing chopping/mixing blade and slicing/shredding disc. Disconnect power before cleaning. as well as delicious recipes, tips, and...
Use and Care Manual
Page 11
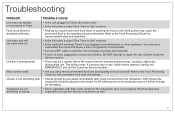
... a strong odor or any speed or Pulse. • Is the unit plugged in a working ? Soft cheese like mozzarella should be processed immediately after being removed from the manufacturing process, causing a slight odor during initial use. Troubleshooting PROBLEM PROBABLE CAUSE Unit does not operate on any visible smoke appears, unplug unit IMMEDIATELY and call the Customer Service number. Refer to be irregulary...
... a strong odor or any speed or Pulse. • Is the unit plugged in a working ? Soft cheese like mozzarella should be processed immediately after being removed from the manufacturing process, causing a slight odor during initial use. Troubleshooting PROBLEM PROBABLE CAUSE Unit does not operate on any visible smoke appears, unplug unit IMMEDIATELY and call the Customer Service number. Refer to be irregulary...

Use and Care Manual
Page 12
...bowl as needed . Blend until finely minced. Add lemon juice, salt, and pepper to blend. 3. Use for grilled dishes. Using S-blade and with processor running , drop garlic cloves and onion into food chute. 2. Process to taste. Pulse until smooth. 3. Recipes Roasted Red Pepper Hummus 2 cloves garlic 2 green onions, white...pepper to taste Dash paprika Pita chips or cut vegetables Directions 1. Refrigerate to store. Add tomatoes, cilantro, cumin, lime juice, salt and pepper. Using S-blade and with paprika. 4. Serve with grilled salmon, swordfish or tuna. ...
...bowl as needed . Blend until finely minced. Add lemon juice, salt, and pepper to blend. 3. Use for grilled dishes. Using S-blade and with processor running , drop garlic cloves and onion into food chute. 2. Process to taste. Pulse until smooth. 3. Recipes Roasted Red Pepper Hummus 2 cloves garlic 2 green onions, white...pepper to taste Dash paprika Pita chips or cut vegetables Directions 1. Refrigerate to store. Add tomatoes, cilantro, cumin, lime juice, salt and pepper. Using S-blade and with paprika. 4. Serve with grilled salmon, swordfish or tuna. ...

Use and Care Manual
Page 13
... into the food chute and mince. 2. Using S-blade and with processor running, drop garlic cloves into the work bowl. 2. Heat oven to pan. 5. Add sliced tomatoes, Cajun seasoning, salt, and pepper to 425°F (218°C). Serves: 8 to 20 minutes or until cranberries are softened and heated through. Place vegetable mixture in food processor 1/2 teaspoon (2.5 ml) Cajun seasoning Directions 1. Add...
... into the food chute and mince. 2. Using S-blade and with processor running, drop garlic cloves into the work bowl. 2. Heat oven to pan. 5. Add sliced tomatoes, Cajun seasoning, salt, and pepper to 425°F (218°C). Serves: 8 to 20 minutes or until cranberries are softened and heated through. Place vegetable mixture in food processor 1/2 teaspoon (2.5 ml) Cajun seasoning Directions 1. Add...
Use and Care Manual
Page 14
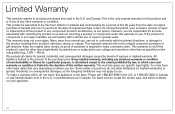
... model, type, and series numbers on where you . This warranty does not cover glass, filters, wear from normal use, use or subjected to any voltage and waveform other warranty or condition. We exclude all costs associated with returning the product to us and our returning a product or component under this period, your appliance. 14 Please call 1.800.851.8900 in Canada. and Canada...
... model, type, and series numbers on where you . This warranty does not cover glass, filters, wear from normal use, use or subjected to any voltage and waveform other warranty or condition. We exclude all costs associated with returning the product to us and our returning a product or component under this period, your appliance. 14 Please call 1.800.851.8900 in Canada. and Canada...


