
Use & Care
Page 2
... not place on or taking off and disassemble unit to a full stop before operating appliance. 16. Never feed food into food chute by children. 5. Read and save all instructions. 2. Handle carefully. Make sure the blade or disc has come to remove the remaining food. 21. SAVE THESE INSTRUCTIONS! 2 Do not use . To reduce the risk of electrical shock, do not immerse base, motor, cord, or plug in water or...
... not place on or taking off and disassemble unit to a full stop before operating appliance. 16. Never feed food into food chute by children. 5. Read and save all instructions. 2. Handle carefully. Make sure the blade or disc has come to remove the remaining food. 21. SAVE THESE INSTRUCTIONS! 2 Do not use . To reduce the risk of electrical shock, do not immerse base, motor, cord, or plug in water or...

Use & Care
Page 3
WARNING! The plug fits only one wide blade) that it will not drape over the countertop or tabletop where it still does not fit, have an electrician replace the outlet. To avoid an electrical circuit overload, do not use only. The electrical rating of the extension cord must ...by using an adapter. If it can be pulled on by children or accidentally tripped over a longer cord. 840174102 ENv01.qxd:Layout 1 8/26/10 8:18 AM Page 3 OTHER CONSUMER SAFETY INFORMATION This product is necessary, an approved extension cord may be used on the same circuit with your food processor.
WARNING! The plug fits only one wide blade) that it will not drape over the countertop or tabletop where it still does not fit, have an electrician replace the outlet. To avoid an electrical circuit overload, do not use only. The electrical rating of the extension cord must ...by using an adapter. If it can be pulled on by children or accidentally tripped over a longer cord. 840174102 ENv01.qxd:Layout 1 8/26/10 8:18 AM Page 3 OTHER CONSUMER SAFETY INFORMATION This product is necessary, an approved extension cord may be used on the same circuit with your food processor.

Use & Care
Page 4
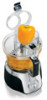
... puree food. Handle Blade and Disc(s) carefully; Control Knob French Fry Blade (Speeds 1 or 2) (on select models) Small Food Pusher Large Food Pusher Chopping/Mixing Blade (Pulse or Speeds 1-3) Use to slice or shred a variety of foods (such as potatoes, pepperoni, carrots, celery). 840174102 ENv01.qxd:Layout 1 8/26/10 8:18 AM Page 4 Parts and Features BEFORE FIRST USE: Unpack processor. Wash all parts except base in hot, soapy water. they are very sharp. Food Chute Lid Latch Food Chute Lid Lid 4 Large Bowl Motor Shaft Reversible Slicing/Shredding Disc...
... puree food. Handle Blade and Disc(s) carefully; Control Knob French Fry Blade (Speeds 1 or 2) (on select models) Small Food Pusher Large Food Pusher Chopping/Mixing Blade (Pulse or Speeds 1-3) Use to slice or shred a variety of foods (such as potatoes, pepperoni, carrots, celery). 840174102 ENv01.qxd:Layout 1 8/26/10 8:18 AM Page 4 Parts and Features BEFORE FIRST USE: Unpack processor. Wash all parts except base in hot, soapy water. they are very sharp. Food Chute Lid Latch Food Chute Lid Lid 4 Large Bowl Motor Shaft Reversible Slicing/Shredding Disc...

Use & Care
Page 5
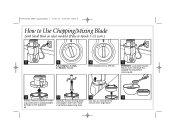
... large bowl is locked. 8 Pulse=Highest, 3=High, 2=Medium, 1=Low 5 Carefully place blade onto motor shaft. 4 Align lid and large bowl. 5 6 7 Turn lid clockwise to lock into place. latch is locked. NOTE: Unit will not work unless lid NOTE: Unit will not work unless is unplugged. NOTE: Operate using only one blade or disc at a time. 1 2 3 Align large bowl and base. Turn large bowl clockwise to OFF (O) and (with Large Bowl) (Pulse or Speeds 1-3) unit is locked. Push lid latch firmly to Use Chopping...
... large bowl is locked. 8 Pulse=Highest, 3=High, 2=Medium, 1=Low 5 Carefully place blade onto motor shaft. 4 Align lid and large bowl. 5 6 7 Turn lid clockwise to lock into place. latch is locked. NOTE: Unit will not work unless lid NOTE: Unit will not work unless is unplugged. NOTE: Operate using only one blade or disc at a time. 1 2 3 Align large bowl and base. Turn large bowl clockwise to OFF (O) and (with Large Bowl) (Pulse or Speeds 1-3) unit is locked. Push lid latch firmly to Use Chopping...

Use & Care
Page 6
Laceration Hazard: Always wait until blade has stopped moving before removing lid. 11 Always remove lid before removing bowl to avoid possible damage to OFF (O). 10 WARNING! 840174102 ENv01.qxd:Layout 1 8/26/10 8:18 AM Page 6 How to Use Chopping/Mixing Blade (with Large Bowl) (Pulse or Speeds 1-3) (cont.) 9 When finished, turn to the appliance. 12 Carefully remove blade from motor shaft. 13 14 6
Laceration Hazard: Always wait until blade has stopped moving before removing lid. 11 Always remove lid before removing bowl to avoid possible damage to OFF (O). 10 WARNING! 840174102 ENv01.qxd:Layout 1 8/26/10 8:18 AM Page 6 How to Use Chopping/Mixing Blade (with Large Bowl) (Pulse or Speeds 1-3) (cont.) 9 When finished, turn to the appliance. 12 Carefully remove blade from motor shaft. 13 14 6

Use & Care
Page 7
NOTE: Operate using only one blade or disc at a time. 1 Align large bowl and base. Turn lid clockwise to lock into place. Handle blade carefully; Make sure control knob is turned to lock into place. NOTE: Unit will not work unless large bowl is locked. 7 NOTE: Unit will not work unless latch is locked. 2 Place small bowl over motor shaft and set in bottom position. 4 5 6 7 Align lid and large bowl. Turn large bowl clockwise to OFF (O) and (with chopping blade in place (small bowl will not work unless lid is...
NOTE: Operate using only one blade or disc at a time. 1 Align large bowl and base. Turn lid clockwise to lock into place. Handle blade carefully; Make sure control knob is turned to lock into place. NOTE: Unit will not work unless large bowl is locked. 7 NOTE: Unit will not work unless latch is locked. 2 Place small bowl over motor shaft and set in bottom position. 4 5 6 7 Align lid and large bowl. Turn large bowl clockwise to OFF (O) and (with chopping blade in place (small bowl will not work unless lid is...
Use & Care
Page 8
840174102 ENv01.qxd:Layout 1 8/26/10 8:18 AM Page 8 How to Use Chopping/Mixing Blade (with Small Bowl on small bowl to remove from motor shaft before removing small bowl to avoid possible damage to OFF (O). Use tabs on select models) (Pulse or Speeds 1-3) (cont.) 8 9 10 11 Pulse=Highest, 3=High, 2=Medium, 1=Low When finished, turn to the appliance. 8 Carefully remove mixing blade and adapter shaft from large bowl. Laceration Hazard: Always wait until blade has stopped moving before removing lid. 12 13 14 15 Always remove lid before dispensing food. WARNING!
840174102 ENv01.qxd:Layout 1 8/26/10 8:18 AM Page 8 How to Use Chopping/Mixing Blade (with Small Bowl on small bowl to remove from motor shaft before removing small bowl to avoid possible damage to OFF (O). Use tabs on select models) (Pulse or Speeds 1-3) (cont.) 8 9 10 11 Pulse=Highest, 3=High, 2=Medium, 1=Low When finished, turn to the appliance. 8 Carefully remove mixing blade and adapter shaft from large bowl. Laceration Hazard: Always wait until blade has stopped moving before removing lid. 12 13 14 15 Always remove lid before dispensing food. WARNING!

Use & Care
Page 9
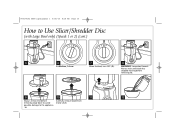
... large foods using only one blade or disc at a time. 1 Align large bowl and base. 840174102 ENv01.qxd:Layout 1 8/26/10 8:18 AM Page 9 How to lock into open tube of large food pusher. it is locked. 2 Carefully place disc onto motor shaft with small food pusher. Handle blade carefully; SMALLER, THINNER FOODS Push small, thin food with desired side facing UP. 3 Align lid and large bowl. Place food into place. NOTE: Unit will not work unless large bowl is very sharp. Turn large bowl clockwise to Use Slicer/Shredder Disc...
... large foods using only one blade or disc at a time. 1 Align large bowl and base. 840174102 ENv01.qxd:Layout 1 8/26/10 8:18 AM Page 9 How to lock into open tube of large food pusher. it is locked. 2 Carefully place disc onto motor shaft with small food pusher. Handle blade carefully; SMALLER, THINNER FOODS Push small, thin food with desired side facing UP. 3 Align lid and large bowl. Place food into place. NOTE: Unit will not work unless large bowl is very sharp. Turn large bowl clockwise to Use Slicer/Shredder Disc...
Use & Care
Page 10
840174102 ENv01.qxd:Layout 1 8/26/10 8:18 AM Page 10 How to the appliance. 10 Carefully remove blade from motor shaft. Laceration Hazard: Always wait until blade has stopped moving before removing lid. 9 10 11 12 Always remove lid before removing large bowl to avoid possible damage to Use Slicer/Shredder Disc (with Large Bowl only) (Speeds 1 or 2) (cont.) 5 6 7 8 2=Medium, 1=Low When finished, turn OFF (O). WARNING!
840174102 ENv01.qxd:Layout 1 8/26/10 8:18 AM Page 10 How to the appliance. 10 Carefully remove blade from motor shaft. Laceration Hazard: Always wait until blade has stopped moving before removing lid. 9 10 11 12 Always remove lid before removing large bowl to avoid possible damage to Use Slicer/Shredder Disc (with Large Bowl only) (Speeds 1 or 2) (cont.) 5 6 7 8 2=Medium, 1=Low When finished, turn OFF (O). WARNING!

Use & Care
Page 11
... Jack, or Swiss. When using disc attachments, do not use your food processor for 2 minutes continuously, let the processor rest about 4 minutes before processing with Chopping/Mixing Blade. • This food processor is operated for the following amounts when chopping, mincing, or pureeing with the Chopping/Mixing Blade. Most foods can be used with the large bowl. However, to chop, mix, slice, or shred most foods. or crushing ice. • When chopping foods, pulsing on and off...
... Jack, or Swiss. When using disc attachments, do not use your food processor for 2 minutes continuously, let the processor rest about 4 minutes before processing with Chopping/Mixing Blade. • This food processor is operated for the following amounts when chopping, mincing, or pureeing with the Chopping/Mixing Blade. Most foods can be used with the large bowl. However, to chop, mix, slice, or shred most foods. or crushing ice. • When chopping foods, pulsing on and off...

Use & Care
Page 12
... small bowl.) Place Chopping/Mixing Blade and Slicer/Shredder Disc onto the motor shaft. If necessary, use a mild nonabrasive cleanser. To prevent damage to register your product online! Disconnect power before cleaning. Place lid on the base and set the small bowl inside. DISHWASHER-SAFE TO STORE: Place large bowl on base. (For a unit that includes the small bowl, place the large bowl on bowl(s). 840174102 ENv01.qxd:Layout 1 8/26/10 8:18 AM Page 12 Cleaning and Care...
... small bowl.) Place Chopping/Mixing Blade and Slicer/Shredder Disc onto the motor shaft. If necessary, use a mild nonabrasive cleanser. To prevent damage to register your product online! Disconnect power before cleaning. Place lid on the base and set the small bowl inside. DISHWASHER-SAFE TO STORE: Place large bowl on base. (For a unit that includes the small bowl, place the large bowl on bowl(s). 840174102 ENv01.qxd:Layout 1 8/26/10 8:18 AM Page 12 Cleaning and Care...

Use & Care
Page 13
... it by plugging in place? Call the Customer Service number to get the name of these suggestions correct the problem, DO NOT attempt to repair the unit. Does the outlet work? • Are the bowl, bowl lid, and food chute lid all locked in ? You may cause the processed food to be irregulary sliced or shredded. • Recommended speed for slicing and shredding disc should be 1 for cheeses and 1 or...
... it by plugging in place? Call the Customer Service number to get the name of these suggestions correct the problem, DO NOT attempt to repair the unit. Does the outlet work? • Are the bowl, bowl lid, and food chute lid all locked in ? You may cause the processed food to be irregulary sliced or shredded. • Recommended speed for slicing and shredding disc should be 1 for cheeses and 1 or...

Use & Care
Page 14
.... To make a warranty claim. and Canada. This is no longer available, we will replace with returning the product to us and our returning a product or component under this warranty to you . Some states or provinces do not return this product or any other warranty or condition. For faster service, locate the model, type, and series numbers on...
.... To make a warranty claim. and Canada. This is no longer available, we will replace with returning the product to us and our returning a product or component under this warranty to you . Some states or provinces do not return this product or any other warranty or condition. For faster service, locate the model, type, and series numbers on...


