Use & Care
Page 2
... off parts, and before the motor is used near children. The unit will not turn switch to use the juice extractor on examination, repair or electrical or mechanical adjustment. 12. Call our toll-free customer service number for use by hand - Do not touch the small cutting blades in any appliance with a damaged cord or plug, or after each use the food pusher. 7. Any...
... off parts, and before the motor is used near children. The unit will not turn switch to use the juice extractor on examination, repair or electrical or mechanical adjustment. 12. Call our toll-free customer service number for use by hand - Do not touch the small cutting blades in any appliance with a damaged cord or plug, or after each use the food pusher. 7. Any...
Use & Care
Page 3
... necessary, an approved extension cord may be used on this appliance was selected to or greater than the rating of the cord used . Care must be pulled on the bottom panel of wear. 3 Call our toll-free customer service number to arrange the extension cord so that reduces... and/or damage the appliance. The strainer basket is not intended for household use by children. CAUTION: This appliance is a delicate screen. WARNING! If bent or damaged, do not use the food pusher. Replace basket when it can result in any way or using an adaptor. The length of the appliance...
... necessary, an approved extension cord may be used on this appliance was selected to or greater than the rating of the cord used . Care must be pulled on the bottom panel of wear. 3 Call our toll-free customer service number to arrange the extension cord so that reduces... and/or damage the appliance. The strainer basket is not intended for household use by children. CAUTION: This appliance is a delicate screen. WARNING! If bent or damaged, do not use the food pusher. Replace basket when it can result in any way or using an adaptor. The length of the appliance...
Use & Care
Page 4
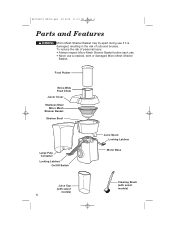
Food Pusher Extra-Wide Feed Chute Juicer Cover Stainless Steel Micro Mesh Strainer Basket Strainer Bowl Large Pulp Container Locking Latches On/Off Switch Juice Spout Locking Latches Motor Base Juice Cup (with select models) 4 Cleaning Brush (with select models) To reduce the risk of cuts and bruises. 840148101 ENv02.qxd 4/14/08 11:12 AM Page 4 Parts and Features w WARNING Micro Mesh...
Food Pusher Extra-Wide Feed Chute Juicer Cover Stainless Steel Micro Mesh Strainer Basket Strainer Bowl Large Pulp Container Locking Latches On/Off Switch Juice Spout Locking Latches Motor Base Juice Cup (with select models) 4 Cleaning Brush (with select models) To reduce the risk of cuts and bruises. 840148101 ENv02.qxd 4/14/08 11:12 AM Page 4 Parts and Features w WARNING Micro Mesh...
Use & Care
Page 5
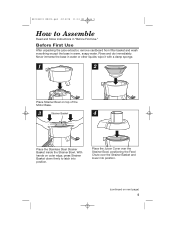
.... 3 Strainer Basket 4 Filter Bowl Place the Stainless Steel Strainer Basket inside the Strainer Bowl. Never immerse the base in "Before First Use." Place the Juicer Cover over the Strainer Bowl, positioning the Feed Chute over the Strainer Basket and lower into position. wipe it with a damp sponge. 1 2 Place Strainer Bowl on next page) 5 Before First Use After unpacking the juice extractor, remove cardboard from filter basket...
.... 3 Strainer Basket 4 Filter Bowl Place the Stainless Steel Strainer Basket inside the Strainer Bowl. Never immerse the base in "Before First Use." Place the Juicer Cover over the Strainer Bowl, positioning the Feed Chute over the Strainer Basket and lower into position. wipe it with a damp sponge. 1 2 Place Strainer Bowl on next page) 5 Before First Use After unpacking the juice extractor, remove cardboard from filter basket...
Use & Care
Page 6
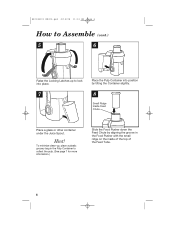
To minimize clean-up to collect the pulp. (See page 7 for more information.) Slide the Food Pusher down the Feed Chute by tilting the Container slightly. 8 Small Ridge Inside Feed Chute Place a glass or other container under the Juice Spout. Hint! 840148101 ENv02.qxd 4/14/08 11:12 AM Page 6 How to Assemble (cont.) 5 6 Raise the Locking Latches up , place a plastic grocery bag in the Pulp Container to lock into place. 7 Place the Pulp Container into position by aligning the groove in the Food Pusher with the small ridge on the inside of the top of the Feed Tube. 6
To minimize clean-up to collect the pulp. (See page 7 for more information.) Slide the Food Pusher down the Feed Chute by tilting the Container slightly. 8 Small Ridge Inside Feed Chute Place a glass or other container under the Juice Spout. Hint! 840148101 ENv02.qxd 4/14/08 11:12 AM Page 6 How to Assemble (cont.) 5 6 Raise the Locking Latches up , place a plastic grocery bag in the Pulp Container to lock into place. 7 Place the Pulp Container into position by aligning the groove in the Food Pusher with the small ridge on the inside of the top of the Feed Tube. 6
Use & Care
Page 7
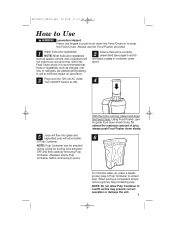
... the Feed Chute. Never use the Food Pusher provided. 1 Wash fruits and vegetables. When juicing is correctly assembled (see pages 5 and 6) and place a glass or container under spout. 3 Plug cord into glass and separated pulp will not need to be emptied during juicing by turning juice extractor OFF and then carefully removing Pulp Container. (Replace empty Pulp Container before...
... the Feed Chute. Never use the Food Pusher provided. 1 Wash fruits and vegetables. When juicing is correctly assembled (see pages 5 and 6) and place a glass or container under spout. 3 Plug cord into glass and separated pulp will not need to be emptied during juicing by turning juice extractor OFF and then carefully removing Pulp Container. (Replace empty Pulp Container before...
Use & Care
Page 8
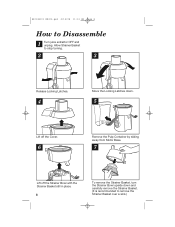
Allow Strainer Basket to stop turning. 2 3 Release Locking Latches. 4 Move the Locking Latches down. 5 Lift off the Cover. 6 Remove the Pulp Container by sliding away from Motor Base. 7 Lift off the Strainer Bowl with the Strainer Basket still in place. 8 To remove the Strainer Basket, turn the Strainer Bowl upside down and carefully remove the Strainer Basket. (It is recommended to Disassemble 1 Turn juice extractor OFF and unplug. 840148101 ENv02.qxd 4/14/08 11:12 AM Page 8 How to remove the Strainer Basket over a sink.)
Allow Strainer Basket to stop turning. 2 3 Release Locking Latches. 4 Move the Locking Latches down. 5 Lift off the Cover. 6 Remove the Pulp Container by sliding away from Motor Base. 7 Lift off the Strainer Bowl with the Strainer Basket still in place. 8 To remove the Strainer Basket, turn the Strainer Bowl upside down and carefully remove the Strainer Basket. (It is recommended to Disassemble 1 Turn juice extractor OFF and unplug. 840148101 ENv02.qxd 4/14/08 11:12 AM Page 8 How to remove the Strainer Basket over a sink.)
Use & Care
Page 9
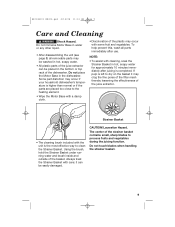
... of the juice extractor can be easily damaged. NOTE: • To assist with the unit is completed. CAUTION! To help prevent this, wash all removable parts may occur with care; Laceration Hazard. The center of the basket. Strainer Basket • The cleaning brush included with cleaning, soak the Strainer Basket in hot, soapy water for approximately 10 minutes immediately after use. Using the...
... of the juice extractor can be easily damaged. NOTE: • To assist with the unit is completed. CAUTION! To help prevent this, wash all removable parts may occur with care; Laceration Hazard. The center of the basket. Strainer Basket • The cleaning brush included with cleaning, soak the Strainer Basket in hot, soapy water for approximately 10 minutes immediately after use. Using the...
Use & Care
Page 10
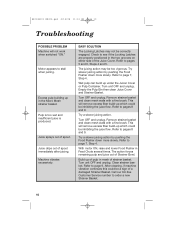
... Pulp Bin then clean Juice Cover and Strainer Basket. This will remove excess fiber build-up under the Juicer Cover or Pulp Container. Call our toll-free Customer Service number to page 7, Step 4. Turn OFF and unplug. This will not work when switched "ON." Try a slower juicing action by pushing the Food Pusher down more slowly. Juice drips out of the Juice Cover. Check...
... Pulp Bin then clean Juice Cover and Strainer Basket. This will remove excess fiber build-up under the Juicer Cover or Pulp Container. Call our toll-free Customer Service number to page 7, Step 4. Turn OFF and unplug. This will not work when switched "ON." Try a slower juicing action by pushing the Food Pusher down more slowly. Juice drips out of the Juice Cover. Check...
Use & Care
Page 11
... juice, pulp should be used in many ways. The liquid extracted from the soaked mixture is recommended that are a number of each milk type. 11 Simply peel the oranges and juice. Soy Milk, Almond Milk, and Rice Milk Your juice extractor may be added to enhance the flavor of recipes ...peeled before placing in juice extractor to avoid loss of vitamins. • There are in season. • Keep your fruits and vegetables ready for juicing by washing them before storing. • Most fruits and hardier type vegetables can be stored at a time into the food chute. Using The Pulp •...
... juice, pulp should be used in many ways. The liquid extracted from the soaked mixture is recommended that are a number of each milk type. 11 Simply peel the oranges and juice. Soy Milk, Almond Milk, and Rice Milk Your juice extractor may be added to enhance the flavor of recipes ...peeled before placing in juice extractor to avoid loss of vitamins. • There are in season. • Keep your fruits and vegetables ready for juicing by washing them before storing. • Most fruits and hardier type vegetables can be stored at a time into the food chute. Using The Pulp •...
Use & Care
Page 12
840148101 ENv02.qxd 4/14/08 11:12 AM Page 12 Recipes The following drink recipes yield a single serving of 6 to taste Y Zone 8 medium tomatoes 1 lemon, peeled 1 stalk celery 1 medium carrot 1 slice of onion 1 teaspoon (5 ml) Worcestershire 1⁄2 teaspoon salt (2.5 ml) ... with stalk 1⁄4 green pepper 1 carrot 1 celery stalk 1 tomato Tabasco sauce to 10 ounces (175-300 ml). If sugar or honey is listed, add to juice after juicing.
840148101 ENv02.qxd 4/14/08 11:12 AM Page 12 Recipes The following drink recipes yield a single serving of 6 to taste Y Zone 8 medium tomatoes 1 lemon, peeled 1 stalk celery 1 medium carrot 1 slice of onion 1 teaspoon (5 ml) Worcestershire 1⁄2 teaspoon salt (2.5 ml) ... with stalk 1⁄4 green pepper 1 carrot 1 celery stalk 1 tomato Tabasco sauce to 10 ounces (175-300 ml). If sugar or honey is listed, add to juice after juicing.
Use & Care
Page 13
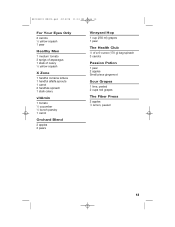
... 1 carrot 2 handfuls spinach 1 stalk celery vitAmin 1 tomato 1⁄2 cucumber 1⁄2 bunch parsley 1 carrot Orchard Blend 2 apples 2 pears Vineyard Hop 1 cup (250 ml) grapes 1 pear The Health Club 1⁄2 of a 6-ounce (170 g) bag spinach 3 carrots Passion Potion 1 pear 2 apples Small piece gingerroot Sour Grapes 1 lime, peeled 2 cups red grapes The Fiber Press...
... 1 carrot 2 handfuls spinach 1 stalk celery vitAmin 1 tomato 1⁄2 cucumber 1⁄2 bunch parsley 1 carrot Orchard Blend 2 apples 2 pears Vineyard Hop 1 cup (250 ml) grapes 1 pear The Health Club 1⁄2 of a 6-ounce (170 g) bag spinach 3 carrots Passion Potion 1 pear 2 apples Small piece gingerroot Sour Grapes 1 lime, peeled 2 cups red grapes The Fiber Press...
Use & Care
Page 14
... of your juice extractor, call our CUSTOMER SERVICE NUMBER. (For faster service please have model, series, and type numbers ready for operator to clean product regularly in accordance with manufacturer's instructions, use not in conformity with respect to the following, which vary from state to state, or province to you. This information will repair or replace this product at our option. MODEL TYPE SERIES This...
... of your juice extractor, call our CUSTOMER SERVICE NUMBER. (For faster service please have model, series, and type numbers ready for operator to clean product regularly in accordance with manufacturer's instructions, use not in conformity with respect to the following, which vary from state to state, or province to you. This information will repair or replace this product at our option. MODEL TYPE SERIES This...


