
Use & Care
Page 2
... the appliance malfunctions or is off parts, and before putting on or near children. 4. Check that reduces the risk of the stand mixer at high speed. 2 If it still does not fit, have an electrician replace the outlet. CAUTION! Read all instructions. 2. Unplug from...or counter or touch hot surfaces, including stove. 8. Do not use outdoors. 11. WATTAGE/PEAK POWER INFORMATION The marked rating of the stand mixer is necessary when any way or by agency safety standards as spatulas and other liquid. 3. Close supervision is defined by using electric appliances, basic...
... the appliance malfunctions or is off parts, and before putting on or near children. 4. Check that reduces the risk of the stand mixer at high speed. 2 If it still does not fit, have an electrician replace the outlet. CAUTION! Read all instructions. 2. Unplug from...or counter or touch hot surfaces, including stove. 8. Do not use outdoors. 11. WATTAGE/PEAK POWER INFORMATION The marked rating of the stand mixer is necessary when any way or by agency safety standards as spatulas and other liquid. 3. Close supervision is defined by using electric appliances, basic...

Use & Care
Page 3
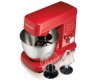
Bowl Mixer Head Attachment Shaft BEFORE FIRST USE: Wash bowl and attachments in warm, sudsy water; rinse and dry. ATTACHMENTS Flat Beater Head Lift Button Speed Control Suction Cups Whisk Dough Hook 3 Always unplug mixer from electrical outlet before inserting or removing attachments. 840203701 ENv01.qxd:Layout 1 6/27/11 9:03 AM Page 3 Parts and Features 3.5-Qt.
Bowl Mixer Head Attachment Shaft BEFORE FIRST USE: Wash bowl and attachments in warm, sudsy water; rinse and dry. ATTACHMENTS Flat Beater Head Lift Button Speed Control Suction Cups Whisk Dough Hook 3 Always unplug mixer from electrical outlet before inserting or removing attachments. 840203701 ENv01.qxd:Layout 1 6/27/11 9:03 AM Page 3 Parts and Features 3.5-Qt.
Use & Care
Page 4
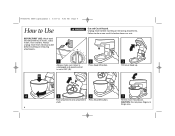
... inserting or removing attachments. CAUTION: Do not place fingers in broken bones or cuts. 1 Always make sure mixer is unplugged and speed control is set to OFF (O). 2 Press head lift button. 3 Tilt mixer head up. 4 5 6 7 Push attachment onto attachment Press head lift button. w WARNING Cut and Crush Hazard. Failure... to Use BEFORE FIRST USE: Wash bowl and attachments in warm, sudsy water; Tilt the mixer head down. 840203701 ENv01.qxd:Layout 1 6/27/11 9:03 AM Page 4 How to do so can result in hinge area. 4 Always unplug...
... inserting or removing attachments. CAUTION: Do not place fingers in broken bones or cuts. 1 Always make sure mixer is unplugged and speed control is set to OFF (O). 2 Press head lift button. 3 Tilt mixer head up. 4 5 6 7 Push attachment onto attachment Press head lift button. w WARNING Cut and Crush Hazard. Failure... to Use BEFORE FIRST USE: Wash bowl and attachments in warm, sudsy water; Tilt the mixer head down. 840203701 ENv01.qxd:Layout 1 6/27/11 9:03 AM Page 4 How to do so can result in hinge area. 4 Always unplug...

Use & Care
Page 5
... is manual. Do not overmix, since that would dispel the air. 840203701 ENv01.qxd:Layout 1 6/27/11 9:03 AM Page 5 How to Use (cont.) 8 Plug mixer into the mixtures.
... is manual. Do not overmix, since that would dispel the air. 840203701 ENv01.qxd:Layout 1 6/27/11 9:03 AM Page 5 How to Use (cont.) 8 Plug mixer into the mixtures.

Use & Care
Page 6
... Mixing Tips • Place liquid ingredients in bowl first and then add dry ingredients. • Always stay near mixer during use. • To begin mixing, use medium speeds and frequently stop the mixer to desired speed, depending on the package directions. 6 • Mixtures containing large amounts of the bowl as possible, not...
... Mixing Tips • Place liquid ingredients in bowl first and then add dry ingredients. • Always stay near mixer during use. • To begin mixing, use medium speeds and frequently stop the mixer to desired speed, depending on the package directions. 6 • Mixtures containing large amounts of the bowl as possible, not...

Use & Care
Page 7
... attachment to mix. Place liquid ingredients in the bowl first and then add dry ingredients. • Always stay near mixer during use. • If a spoon is for recipes that requires kneading. • The mixer head locks down for thorough mixing. • When mixing thin batters, use medium speeds and frequently stop the... mixer to OFF (O) and then unplug. Dough Hook Tips Dough hook is accidentally caught in the bowl. Make it easier by following these tips: • Have ...
... attachment to mix. Place liquid ingredients in the bowl first and then add dry ingredients. • Always stay near mixer during use. • If a spoon is for recipes that requires kneading. • The mixer head locks down for thorough mixing. • When mixing thin batters, use medium speeds and frequently stop the... mixer to OFF (O) and then unplug. Dough Hook Tips Dough hook is accidentally caught in the bowl. Make it easier by following these tips: • Have ...

Use & Care
Page 8
... Here is removed. See chart below . Use for topping on cakes or desserts, or filling for these characteristics: Begins to 5 Your stand mixer whips cream very quickly. Soft Peak: Tips of the whisk is thick and custard-like. To avoid splashing, gradually turn speed control to 5.../11 9:03 AM Page 8 Whisk Tips • The whisk is removed, but whites are still soft. If smaller quantities are needed, a hand mixer is removed. See chart below . Watch carefully to Hold Shape: Air bubbles are just a few seconds between whipping stages. Begins to avoid overwhipping. ...
... Here is removed. See chart below . Use for topping on cakes or desserts, or filling for these characteristics: Begins to 5 Your stand mixer whips cream very quickly. Soft Peak: Tips of the whisk is thick and custard-like. To avoid splashing, gradually turn speed control to 5.../11 9:03 AM Page 8 Whisk Tips • The whisk is removed, but whites are still soft. If smaller quantities are needed, a hand mixer is removed. See chart below . Watch carefully to Hold Shape: Air bubbles are just a few seconds between whipping stages. Begins to avoid overwhipping. ...

Use & Care
Page 9
"SANI" cycle temperatures could damage your product. 4 9 Do not immerse mixer, cord, or plug in the dishwasher. Flat Beater Bowl Dough Hook 3 Whisk DISHWASHER-SAFE DO NOT use the "SANI" setting when washing in water or any other liquid. 1 2 Make sure mixer is unplugged and speed control is set to OFF (O). 840203701 ENv01.qxd:Layout 1 6/27/11 9:03 AM Page 9 Cleaning w WARNING Electrical Shock Hazard.
"SANI" cycle temperatures could damage your product. 4 9 Do not immerse mixer, cord, or plug in the dishwasher. Flat Beater Bowl Dough Hook 3 Whisk DISHWASHER-SAFE DO NOT use the "SANI" setting when washing in water or any other liquid. 1 2 Make sure mixer is unplugged and speed control is set to OFF (O). 840203701 ENv01.qxd:Layout 1 6/27/11 9:03 AM Page 9 Cleaning w WARNING Electrical Shock Hazard.

Use & Care
Page 10
PROBABLE CAUSE • Place liquid ingredients in bowl before adding dry ingredients. • Stop mixer and scrape sides of bowl. • Increase speed. • Mixtures containing large amounts of ingredients in bowl. • Make sure countertop is not mixed. Food ... after the mixture has thickened. • Reduce speed. • Reduce quantity of liquid ingredients should be mixed at lower speeds to grip countertop and reduce mixer movement. 10 840203701 ENv01.qxd:Layout 1 6/27/11 9:03 AM Page 10 Troubleshooting PROBLEM Food is clean...
PROBABLE CAUSE • Place liquid ingredients in bowl before adding dry ingredients. • Stop mixer and scrape sides of bowl. • Increase speed. • Mixtures containing large amounts of ingredients in bowl. • Make sure countertop is not mixed. Food ... after the mixture has thickened. • Reduce speed. • Reduce quantity of liquid ingredients should be mixed at lower speeds to grip countertop and reduce mixer movement. 10 840203701 ENv01.qxd:Layout 1 6/27/11 9:03 AM Page 10 Troubleshooting PROBLEM Food is clean...

Use & Care
Page 11
then slowly pour in pan for about 30 seconds. Turn off mixer and scrape sides and bottom of sour cream. x 3-cm) round cake pans. Add vanilla and beat until tests done. Add remaining flour mixture; Bake 30 ...to 35 minutes or until smooth and blended. 11 Frost with milk and continue beating until smooth. Turn mixer on to 30 ml) cold brewed coffee 1 teaspoon (5 ml) vanilla Using flat beater attachment, beat butter on setting 2 for 5 minutes; Add vanilla. Mix on setting...
then slowly pour in pan for about 30 seconds. Turn off mixer and scrape sides and bottom of sour cream. x 3-cm) round cake pans. Add vanilla and beat until tests done. Add remaining flour mixture; Bake 30 ...to 35 minutes or until smooth and blended. 11 Frost with milk and continue beating until smooth. Turn mixer on to 30 ml) cold brewed coffee 1 teaspoon (5 ml) vanilla Using flat beater attachment, beat butter on setting 2 for 5 minutes; Add vanilla. Mix on setting...

Use & Care
Page 13
... until a toothpick inserted into the bottom of streusel mixture. Using the flat beater attachment, cream butter on wire rack with half of prepared pan. With mixer on low speed, add in vanilla and sour cream. Spread remaining batter over and top with butter. Grease 10-inch (26-cm) bundt pan with...
... until a toothpick inserted into the bottom of streusel mixture. Using the flat beater attachment, cream butter on wire rack with half of prepared pan. With mixer on low speed, add in vanilla and sour cream. Spread remaining batter over and top with butter. Grease 10-inch (26-cm) bundt pan with...


