
Use & Care
Page 2
... all instructions. 2. WATTAGE/PEAK POWER INFORMATION The marked rating of the stand mixer is an average of injury to persons and/or damage to reduce risk of the maximum wattage a stand mixer may cause fire, electric shock, or injury. 10. Do not let cord hang over edge of the stand mixer at high speed. 2 Call our toll-free customer service number for use outdoors. 11. Remove attachments from attachments...
... all instructions. 2. WATTAGE/PEAK POWER INFORMATION The marked rating of the stand mixer is an average of injury to persons and/or damage to reduce risk of the maximum wattage a stand mixer may cause fire, electric shock, or injury. 10. Do not let cord hang over edge of the stand mixer at high speed. 2 Call our toll-free customer service number for use outdoors. 11. Remove attachments from attachments...

Use & Care
Page 3
840203701 ENv01.qxd:Layout 1 6/27/11 9:03 AM Page 3 Parts and Features 3.5-Qt. rinse and dry. Bowl Mixer Head Attachment Shaft BEFORE FIRST USE: Wash bowl and attachments in warm, sudsy water; Always unplug mixer from electrical outlet before inserting or removing attachments. ATTACHMENTS Flat Beater Head Lift Button Speed Control Suction Cups Whisk Dough Hook 3
840203701 ENv01.qxd:Layout 1 6/27/11 9:03 AM Page 3 Parts and Features 3.5-Qt. rinse and dry. Bowl Mixer Head Attachment Shaft BEFORE FIRST USE: Wash bowl and attachments in warm, sudsy water; Always unplug mixer from electrical outlet before inserting or removing attachments. ATTACHMENTS Flat Beater Head Lift Button Speed Control Suction Cups Whisk Dough Hook 3
Use & Care
Page 4
.... 1 Always make sure mixer is unplugged and speed control is set to do so can result in warm, sudsy water; Always unplug mixer from electrical outlet before inserting or removing attachments. Failure to OFF (O). 2 Press head lift button. 3 Tilt mixer head up. 4 5 6 7 Push attachment onto attachment Press head lift button. Tilt the mixer head down. rinse and dry. Unplug mixer before inserting or removing attachments. CAUTION: Do not place fingers in hinge area. 4 shaft. w WARNING...
.... 1 Always make sure mixer is unplugged and speed control is set to do so can result in warm, sudsy water; Always unplug mixer from electrical outlet before inserting or removing attachments. Failure to OFF (O). 2 Press head lift button. 3 Tilt mixer head up. 4 5 6 7 Push attachment onto attachment Press head lift button. Tilt the mixer head down. rinse and dry. Unplug mixer before inserting or removing attachments. CAUTION: Do not place fingers in hinge area. 4 shaft. w WARNING...

Use & Care
Page 5
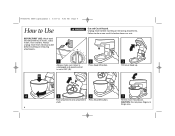
... ENv01.qxd:Layout 1 6/27/11 9:03 AM Page 5 How to Use (cont.) 8 Plug mixer into the mixtures. Folding is a method used to avoid splashing ingredients out of bowl. To use, turn speed control to OFF (O). 11 12 Unplug from outlet. 13 14 To remove attachment, pull straight down. 5 Fold just until mixture is manual. Slowly add food to be set on and off.
... ENv01.qxd:Layout 1 6/27/11 9:03 AM Page 5 How to Use (cont.) 8 Plug mixer into the mixtures. Folding is a method used to avoid splashing ingredients out of bowl. To use, turn speed control to OFF (O). 11 12 Unplug from outlet. 13 14 To remove attachment, pull straight down. 5 Fold just until mixture is manual. Slowly add food to be set on and off.

Use & Care
Page 6
ATTACHMENT Flat Beater Flat Beater Flat Beater Flat Beater Whisk Whisk Whisk Dough Hook SPEED 1-3 2-4 2-4 1-6 5-6 5-6 1-6 1-2 General Mixing Tips • Place liquid ingredients in bowl first and then add dry ingredients. • Always stay near mixer during use. • To begin mixing, use Speed 1 for low speed, Speed 4 for medium speed, and Speed 6 for high speed. 840203701 ENv01.qxd:Layout 1 6/27/11 9:03 AM Page 6 Mixing Guide FOOD Cakes (mixes and from scratch) Cookie Dough Mashed Potatoes Frosting Egg Whites (for meringues, etc.) Whipped Cream Instant Pudding Bread The...
ATTACHMENT Flat Beater Flat Beater Flat Beater Flat Beater Whisk Whisk Whisk Dough Hook SPEED 1-3 2-4 2-4 1-6 5-6 5-6 1-6 1-2 General Mixing Tips • Place liquid ingredients in bowl first and then add dry ingredients. • Always stay near mixer during use. • To begin mixing, use Speed 1 for low speed, Speed 4 for medium speed, and Speed 6 for high speed. 840203701 ENv01.qxd:Layout 1 6/27/11 9:03 AM Page 6 Mixing Guide FOOD Cakes (mixes and from scratch) Cookie Dough Mashed Potatoes Frosting Egg Whites (for meringues, etc.) Whipped Cream Instant Pudding Bread The...

Use & Care
Page 7
...; Always stay near mixer during use medium speeds and frequently stop the mixer to scrape the sides of mixture in an attachment or the motor stalls, turn the speed control to OFF (O) and then unplug. Clear the obstruction or reduce the amount of the bowl with a spatula. Dough Hook Tips Dough hook is for recipes that requires kneading. • The mixer head locks down for thorough mixing. • When mixing thin batters, use...
...; Always stay near mixer during use medium speeds and frequently stop the mixer to scrape the sides of mixture in an attachment or the motor stalls, turn the speed control to OFF (O) and then unplug. Clear the obstruction or reduce the amount of the bowl with a spatula. Dough Hook Tips Dough hook is for recipes that requires kneading. • The mixer head locks down for thorough mixing. • When mixing thin batters, use...

Use & Care
Page 8
..., stiff peaks form when whisk is recommended. Whites are needed, a hand mixer is removed. Attach bowl and whisk. To avoid splashing, gradually turn speed control to desired speed. Watch cream closely during whipping because there are fine and compact; If smaller quantities are speckled and dull in a clean, dry mixing bowl. Attach bowl and whisk. To avoid splashing, gradually turn to designated speed and whip to desired stage. Stiff: Cream stands in color and glisten...
..., stiff peaks form when whisk is recommended. Whites are needed, a hand mixer is removed. Attach bowl and whisk. To avoid splashing, gradually turn speed control to desired speed. Watch cream closely during whipping because there are fine and compact; If smaller quantities are speckled and dull in a clean, dry mixing bowl. Attach bowl and whisk. To avoid splashing, gradually turn to designated speed and whip to desired stage. Stiff: Cream stands in color and glisten...

Use & Care
Page 9
840203701 ENv01.qxd:Layout 1 6/27/11 9:03 AM Page 9 Cleaning w WARNING Electrical Shock Hazard. "SANI" cycle temperatures could damage your product. 4 9 Flat Beater Bowl Dough Hook 3 Whisk DISHWASHER-SAFE DO NOT use the "SANI" setting when washing in water or any other liquid. 1 2 Make sure mixer is unplugged and speed control is set to OFF (O). Do not immerse mixer, cord, or plug in the dishwasher.
840203701 ENv01.qxd:Layout 1 6/27/11 9:03 AM Page 9 Cleaning w WARNING Electrical Shock Hazard. "SANI" cycle temperatures could damage your product. 4 9 Flat Beater Bowl Dough Hook 3 Whisk DISHWASHER-SAFE DO NOT use the "SANI" setting when washing in water or any other liquid. 1 2 Make sure mixer is unplugged and speed control is set to OFF (O). Do not immerse mixer, cord, or plug in the dishwasher.

Use & Care
Page 10
... ENv01.qxd:Layout 1 6/27/11 9:03 AM Page 10 Troubleshooting PROBLEM Food is clean. Mixer "walks" on counter during mixing. Increase speed only after the mixture has thickened. • Reduce speed. • Reduce quantity of ingredients in bowl before adding dry ingredients. • Stop mixer and scrape sides of bowl. • Increase speed. • Mixtures containing large amounts of liquid ingredients should...
... ENv01.qxd:Layout 1 6/27/11 9:03 AM Page 10 Troubleshooting PROBLEM Food is clean. Mixer "walks" on counter during mixing. Increase speed only after the mixture has thickened. • Reduce speed. • Reduce quantity of ingredients in bowl before adding dry ingredients. • Stop mixer and scrape sides of bowl. • Increase speed. • Mixtures containing large amounts of liquid ingredients should...

Use & Care
Page 11
... mixture; Frost with milk and continue beating until smooth. Set aside. then slowly pour in pan for about 30 seconds. Turn mixer on setting 4 until smooth. Add eggs, one 2-layer cake. then remove from pans and cool on setting 4. Using flat beater attachment, cream butter and sugar on racks. Bake 30 to setting 4 and mix until thoroughly blended. Makes one at a time, beating well after each addition...
... mixture; Frost with milk and continue beating until smooth. Set aside. then slowly pour in pan for about 30 seconds. Turn mixer on setting 4 until smooth. Add eggs, one 2-layer cake. then remove from pans and cool on setting 4. Using flat beater attachment, cream butter and sugar on racks. Bake 30 to setting 4 and mix until thoroughly blended. Makes one at a time, beating well after each addition...

Use & Care
Page 12
...mix until thoroughly mixed. Mix together flour, baking powder, baking soda, salt, and nutmeg and set aside. Form cookie dough into 1 1/2-inch (3.5-cm) diameter balls and arrange balls on wire racks. Bake in oven for 12 to 350°F (180°C). Add sugar, egg, and vanilla, mixing thoroughly. Makes 3 dozen cookies. 12 Using flat beater, cream butter on middle rack of a drinking glass... minutes. With flat beater attachment, cream together butter, sugar, and brown sugar at a medium setting until light and fluffy. Drop rounded spoonful onto ungreased cookie sheet.
...mix until thoroughly mixed. Mix together flour, baking powder, baking soda, salt, and nutmeg and set aside. Form cookie dough into 1 1/2-inch (3.5-cm) diameter balls and arrange balls on wire racks. Bake in oven for 12 to 350°F (180°C). Add sugar, egg, and vanilla, mixing thoroughly. Makes 3 dozen cookies. 12 Using flat beater, cream butter on middle rack of a drinking glass... minutes. With flat beater attachment, cream together butter, sugar, and brown sugar at a medium setting until light and fluffy. Drop rounded spoonful onto ungreased cookie sheet.

Use & Care
Page 13
...of prepared pan. Makes one at a time, until well blended. Invert cake onto plate and then flip on wire rack 30 minutes. Sprinkle evenly with crumb topping. Cool on wire rack with fork until large crumbs are formed. Mix with topping side ...Using the flat beater attachment, cream butter on medium speed for 3 minutes. Mix in eggs, one cake. 13 mix with butter. Continue to lowest position. Cool completely. Repeat. Add pecans and mix to 60 minutes or until smooth. 840203701 ENv01.qxd:Layout 1 6/27/11 9:04 AM Page 13 Recipes (cont.) Sour Cream Coffee Cake...
...of prepared pan. Makes one at a time, until well blended. Invert cake onto plate and then flip on wire rack 30 minutes. Sprinkle evenly with crumb topping. Cool on wire rack with fork until large crumbs are formed. Mix with topping side ...Using the flat beater attachment, cream butter on medium speed for 3 minutes. Mix in eggs, one cake. 13 mix with butter. Continue to lowest position. Cool completely. Repeat. Add pecans and mix to 60 minutes or until smooth. 840203701 ENv01.qxd:Layout 1 6/27/11 9:04 AM Page 13 Recipes (cont.) Sour Cream Coffee Cake...

Use & Care
Page 14
...Using dough hook, mix on speed 4 for about 1 hour. Add 3 cups (750 ml) of the flour and mix on speed 2 for about 2 minutes. Add additional flour, if necessary, to 30 minutes. x 13-inch (23- Bake 25 to make a soft dough. Divide the dough into 4 golf ballsized balls. Let rise in a warm place for about 30 seconds. Cover...(60 ml) butter, melted and cooled 3 tablespoons (45 ml) sugar 1 teaspoon (5 ml) salt 1 egg 3 to 3 1/2 cups (750 to 350°F (180°C). Preheat oven to 875 ml) flour Pour water into mixing bowl. Place the 16 balls in a warm place for 5 minutes. ...
...Using dough hook, mix on speed 4 for about 1 hour. Add 3 cups (750 ml) of the flour and mix on speed 2 for about 2 minutes. Add additional flour, if necessary, to 30 minutes. x 13-inch (23- Bake 25 to make a soft dough. Divide the dough into 4 golf ballsized balls. Let rise in a warm place for about 30 seconds. Cover...(60 ml) butter, melted and cooled 3 tablespoons (45 ml) sugar 1 teaspoon (5 ml) salt 1 egg 3 to 3 1/2 cups (750 to 350°F (180°C). Preheat oven to 875 ml) flour Pour water into mixing bowl. Place the 16 balls in a warm place for 5 minutes. ...

Use & Care
Page 16
...free from accident, alteration, abuse, or misuse. We exclude all costs associated with a similar one (1) year from normal use, use or subjected to any statutory warranty or condition of merchantability or fitness for a particular purpose, is used for other than single-family household use not in conformity with the printed directions...purchase. To make a warranty claim. and Canada. For faster service, locate the model, type, and series numbers on where you specific legal rights. All liability is limited to the amount of purchase is repair or replacement of this appliance...
...free from accident, alteration, abuse, or misuse. We exclude all costs associated with a similar one (1) year from normal use, use or subjected to any statutory warranty or condition of merchantability or fitness for a particular purpose, is used for other than single-family household use not in conformity with the printed directions...purchase. To make a warranty claim. and Canada. For faster service, locate the model, type, and series numbers on where you specific legal rights. All liability is limited to the amount of purchase is repair or replacement of this appliance...


