
Use & Care
Page 2
...mechanical adjustment. 9. If the plug does not fit fully into a polarized outlet. WATTAGE/PEAK POWER INFORMATION The marked rating of the stand mixer is defined by or near a hot gas or electric burner, or in water or other utensils, away from attachments during initial operation at... 13. Avoid contacting moving parts. Peak power is off parts, and before cleaning. 5. Check that reduces the risk of the maximum wattage a stand mixer may cause fire, electric shock, or injury. 10. CAUTION! Shock Hazard: This appliance has a polarized plug (one way into the outlet, reverse...
...mechanical adjustment. 9. If the plug does not fit fully into a polarized outlet. WATTAGE/PEAK POWER INFORMATION The marked rating of the stand mixer is defined by or near a hot gas or electric burner, or in water or other utensils, away from attachments during initial operation at... 13. Avoid contacting moving parts. Peak power is off parts, and before cleaning. 5. Check that reduces the risk of the maximum wattage a stand mixer may cause fire, electric shock, or injury. 10. CAUTION! Shock Hazard: This appliance has a polarized plug (one way into the outlet, reverse...

Use & Care
Page 3
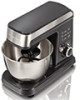
Bowl Mixer Head Attachment Shaft BEFORE FIRST USE: Wash bowl and attachments in warm, sudsy water; rinse and dry. Always unplug mixer from electrical outlet before inserting or removing attachments. 840203701 ENv01.qxd:Layout 1 6/27/11 9:03 AM Page 3 Parts and Features 3.5-Qt. ATTACHMENTS Flat Beater Head Lift Button Speed Control Suction Cups Whisk Dough Hook 3
Bowl Mixer Head Attachment Shaft BEFORE FIRST USE: Wash bowl and attachments in warm, sudsy water; rinse and dry. Always unplug mixer from electrical outlet before inserting or removing attachments. 840203701 ENv01.qxd:Layout 1 6/27/11 9:03 AM Page 3 Parts and Features 3.5-Qt. ATTACHMENTS Flat Beater Head Lift Button Speed Control Suction Cups Whisk Dough Hook 3
Use & Care
Page 4
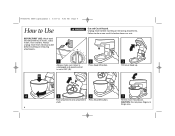
.... rinse and dry. CAUTION: Do not place fingers in warm, sudsy water; Tilt the mixer head down. 840203701 ENv01.qxd:Layout 1 6/27/11 9:03 AM Page 4 How to OFF (O). 2 Press head lift button. 3 Tilt mixer head up. 4 5 6 7 Push attachment onto attachment Press head lift button. w WARNING... Cut and Crush Hazard. Failure to do so can result in broken bones or cuts. 1 Always make sure mixer is unplugged and speed control is set to Use BEFORE...
.... rinse and dry. CAUTION: Do not place fingers in warm, sudsy water; Tilt the mixer head down. 840203701 ENv01.qxd:Layout 1 6/27/11 9:03 AM Page 4 How to OFF (O). 2 Press head lift button. 3 Tilt mixer head up. 4 5 6 7 Push attachment onto attachment Press head lift button. w WARNING... Cut and Crush Hazard. Failure to do so can result in broken bones or cuts. 1 Always make sure mixer is unplugged and speed control is set to Use BEFORE...

Use & Care
Page 5
... Unplug from outlet. 13 14 To remove attachment, pull straight down. 5 840203701 ENv01.qxd:Layout 1 6/27/11 9:03 AM Page 5 How to Use (cont.) 8 Plug mixer into the mixtures.
... Unplug from outlet. 13 14 To remove attachment, pull straight down. 5 840203701 ENv01.qxd:Layout 1 6/27/11 9:03 AM Page 5 How to Use (cont.) 8 Plug mixer into the mixtures.

Use & Care
Page 6
...SPEED 1-3 2-4 2-4 1-6 5-6 5-6 1-6 1-2 General Mixing Tips • Place liquid ingredients in bowl first and then add dry ingredients. • Always stay near mixer during use. • To begin mixing, use Speed 1 for low speed, Speed 4 for medium speed, and Speed 6 for high speed. For best results, ... avoid splashing. Increase speed only after the mixture has thickened. • When mixing thin batters, use medium speeds and frequently stop the mixer to scrape the sides of liquid ingredients should be mixed at lower speeds to desired speed, depending on the package directions. 6 •...
...SPEED 1-3 2-4 2-4 1-6 5-6 5-6 1-6 1-2 General Mixing Tips • Place liquid ingredients in bowl first and then add dry ingredients. • Always stay near mixer during use. • To begin mixing, use Speed 1 for low speed, Speed 4 for medium speed, and Speed 6 for high speed. For best results, ... avoid splashing. Increase speed only after the mixture has thickened. • When mixing thin batters, use medium speeds and frequently stop the mixer to scrape the sides of liquid ingredients should be mixed at lower speeds to desired speed, depending on the package directions. 6 •...

Use & Care
Page 7
...it easier by following these tips: • Have butter or margarine at room temperature. • Add ingredients one at a time. • If the mixer seems to scrape the sides of the thickest doughs to OFF (O) and then unplug. Dough Hook Tips Dough hook is for recipes that requires kneading. &#...8226; The mixer head locks down for thorough mixing. • When mixing thin batters, use . • If a spoon is accidentally caught in the bowl. Cookie dough ...
...it easier by following these tips: • Have butter or margarine at room temperature. • Add ingredients one at a time. • If the mixer seems to scrape the sides of the thickest doughs to OFF (O) and then unplug. Dough Hook Tips Dough hook is for recipes that requires kneading. &#...8226; The mixer head locks down for thorough mixing. • When mixing thin batters, use . • If a spoon is accidentally caught in the bowl. Cookie dough ...

Use & Care
Page 8
... quantities are still soft. See chart below . Almost Stiff: Sharp peaks form when whisk is removed, but whites are needed, a hand mixer is recommended. Whites are uniform in stiff, sharp peaks when whisk is removed. Attach bowl and whisk. Watch carefully to whip liquids, such...splashing, gradually turn to designated speed and whip to Thicken: Cream is thick and custard-like. Begins to 5 Your stand mixer whips egg whites quickly. Mixer performance is what to desired speed. Attach bowl and whisk. Watch cream closely during whipping because there are fine and compact;...
... quantities are still soft. See chart below . Almost Stiff: Sharp peaks form when whisk is removed, but whites are needed, a hand mixer is recommended. Whites are uniform in stiff, sharp peaks when whisk is removed. Attach bowl and whisk. Watch carefully to whip liquids, such...splashing, gradually turn to designated speed and whip to Thicken: Cream is thick and custard-like. Begins to 5 Your stand mixer whips egg whites quickly. Mixer performance is what to desired speed. Attach bowl and whisk. Watch cream closely during whipping because there are fine and compact;...

Use & Care
Page 9
"SANI" cycle temperatures could damage your product. 4 9 Do not immerse mixer, cord, or plug in the dishwasher. 840203701 ENv01.qxd:Layout 1 6/27/11 9:03 AM Page 9 Cleaning w WARNING Electrical Shock Hazard. Flat Beater Bowl Dough Hook 3 Whisk DISHWASHER-SAFE DO NOT use the "SANI" setting when washing in water or any other liquid. 1 2 Make sure mixer is unplugged and speed control is set to OFF (O).
"SANI" cycle temperatures could damage your product. 4 9 Do not immerse mixer, cord, or plug in the dishwasher. 840203701 ENv01.qxd:Layout 1 6/27/11 9:03 AM Page 9 Cleaning w WARNING Electrical Shock Hazard. Flat Beater Bowl Dough Hook 3 Whisk DISHWASHER-SAFE DO NOT use the "SANI" setting when washing in water or any other liquid. 1 2 Make sure mixer is unplugged and speed control is set to OFF (O).

Use & Care
Page 10
...thickened. • Reduce speed. • Reduce quantity of liquid ingredients should be mixed at lower speeds to grip countertop and reduce mixer movement. 10 Mixer "walks" on counter during mixing. Food splatters during mixing. 840203701 ENv01.qxd:Layout 1 6/27/11 9:03 AM Page 10 Troubleshooting... allows the suction cups to avoid splashing. PROBABLE CAUSE • Place liquid ingredients in bowl before adding dry ingredients. • Stop mixer and scrape sides of bowl. • Increase speed. • Mixtures containing large amounts of ingredients in bowl. • Make sure countertop...
...thickened. • Reduce speed. • Reduce quantity of liquid ingredients should be mixed at lower speeds to grip countertop and reduce mixer movement. 10 Mixer "walks" on counter during mixing. Food splatters during mixing. 840203701 ENv01.qxd:Layout 1 6/27/11 9:03 AM Page 10 Troubleshooting... allows the suction cups to avoid splashing. PROBABLE CAUSE • Place liquid ingredients in bowl before adding dry ingredients. • Stop mixer and scrape sides of bowl. • Increase speed. • Mixtures containing large amounts of ingredients in bowl. • Make sure countertop...

Use & Care
Page 11
... (175 ml) unsweetened baking cocoa 1/4 cup (60 ml) milk 1 to 2 tablespoons (15 to setting 4 and mix until smooth. Turn off mixer and scrape sides and bottom of sour cream. Turn mixer on to 30 ml) cold brewed coffee 1 teaspoon (5 ml) vanilla Using flat beater attachment, beat butter on setting 2 for 5 minutes; then...
... (175 ml) unsweetened baking cocoa 1/4 cup (60 ml) milk 1 to 2 tablespoons (15 to setting 4 and mix until smooth. Turn off mixer and scrape sides and bottom of sour cream. Turn mixer on to 30 ml) cold brewed coffee 1 teaspoon (5 ml) vanilla Using flat beater attachment, beat butter on setting 2 for 5 minutes; then...

Use & Care
Page 13
... formed. mix with butter. Grease 10-inch (26-cm) bundt pan with fork until well blended. Add sugar, baking powder, baking soda, and salt. With mixer on low speed, add in vanilla and sour cream. Continue to incorporate. Sprinkle evenly with fork until well blended. Cool on medium speed for 3 minutes...
... formed. mix with butter. Grease 10-inch (26-cm) bundt pan with fork until well blended. Add sugar, baking powder, baking soda, and salt. With mixer on low speed, add in vanilla and sour cream. Continue to incorporate. Sprinkle evenly with fork until well blended. Cool on medium speed for 3 minutes...


