
Use and Care Manual
Page 2
... replace the outlet. SAVE THESE INSTRUCTIONS! The plug fits only one wide blade) to O (OFF) and then remove plug from beaters during initial operation at high speed under a loaded condition. The length of personal injury, always unplug mixer before plugging cord into wall outlet. To reduce the risk of the cord used . Children should always be followed to reduce the risk of attachments...
... replace the outlet. SAVE THESE INSTRUCTIONS! The plug fits only one wide blade) to O (OFF) and then remove plug from beaters during initial operation at high speed under a loaded condition. The length of personal injury, always unplug mixer before plugging cord into wall outlet. To reduce the risk of the cord used . Children should always be followed to reduce the risk of attachments...
Use and Care Manual
Page 3
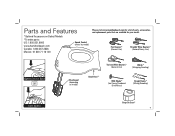
... Accessory on model) Twisted Wire Beaters* (General Use) Whisk* (Whipping/Aerating) Bowl Rest™ Milk Shake* (Ice Cream/Powdered Drink Mixes) Dough Hooks* (Mixing/Kneading) Eject Button Snap-On Case* 3 Flat Beaters* (General Use) Straight Wire Beaters* (General/Heavy Use) Speed Control Eject OR Attachment (depending on Select Models *To order parts: US: 1.800.851.8900 www.hamiltonbeach.com Canada: 1.800.267.2826 Mexico: 01 800 71 16 100 Speed Control (varies by model) Please visit www.hamiltonbeach.com for a list of parts, accessories, and replacement parts...
... Accessory on model) Twisted Wire Beaters* (General Use) Whisk* (Whipping/Aerating) Bowl Rest™ Milk Shake* (Ice Cream/Powdered Drink Mixes) Dough Hooks* (Mixing/Kneading) Eject Button Snap-On Case* 3 Flat Beaters* (General Use) Straight Wire Beaters* (General/Heavy Use) Speed Control Eject OR Attachment (depending on Select Models *To order parts: US: 1.800.851.8900 www.hamiltonbeach.com Canada: 1.800.267.2826 Mexico: 01 800 71 16 100 Speed Control (varies by model) Please visit www.hamiltonbeach.com for a list of parts, accessories, and replacement parts...

Use and Care Manual
Page 4
Eject Button Models Push eject button to desired speed. attachments. Push and click into proper openings on bottom of mixer. Start at 1 and increase speed as needed. 4 6 Speed Control Models When finished, turn speed control Push speed control to eject to O (OFF). 2 3 Following diagrams on bottom of mixer, insert desired attachment(s) into place. 4 OR 5 Move speed control to eject attachments. 4 How to Use Your Hand Mixer 1 Make sure mixer is unplugged and turned to O (OFF) and unplug mixer.
Eject Button Models Push eject button to desired speed. attachments. Push and click into proper openings on bottom of mixer. Start at 1 and increase speed as needed. 4 6 Speed Control Models When finished, turn speed control Push speed control to eject to O (OFF). 2 3 Following diagrams on bottom of mixer, insert desired attachment(s) into place. 4 OR 5 Move speed control to eject attachments. 4 How to Use Your Hand Mixer 1 Make sure mixer is unplugged and turned to O (OFF) and unplug mixer.

Use and Care Manual
Page 5
... or motor may overheat. then set the mixer on the recipe consistency. kneading dough 5 Beating egg whites; To use Bowl Rest on small or plastic mixing bowls. 2 To cream butter and sugar; kneading dough 6 HIGH speed for whipping cream Cookie Dough Mixing Guide • Use a large mixing bowl so that the ingredients spread out for additional power at a time, mixing thoroughly after each addition. • Chips and nuts should be stirred by hand. 5 NOTE: Do not use Bowl...
... or motor may overheat. then set the mixer on the recipe consistency. kneading dough 5 Beating egg whites; To use Bowl Rest on small or plastic mixing bowls. 2 To cream butter and sugar; kneading dough 6 HIGH speed for whipping cream Cookie Dough Mixing Guide • Use a large mixing bowl so that the ingredients spread out for additional power at a time, mixing thoroughly after each addition. • Chips and nuts should be stirred by hand. 5 NOTE: Do not use Bowl...

Use and Care Manual
Page 6
Disconnect power before cleaning. Do not immerse mixer, cord, or plug in any liquid. 1 2 Storage Options OR OR Cord Stored in Case 6 Cord-Wrap Storage Wrap-Around Cord Storage Cleaning w WARNING Electrical Shock Hazard.
Disconnect power before cleaning. Do not immerse mixer, cord, or plug in any liquid. 1 2 Storage Options OR OR Cord Stored in Case 6 Cord-Wrap Storage Wrap-Around Cord Storage Cleaning w WARNING Electrical Shock Hazard.
Use and Care Manual
Page 7
... this written warranty. For faster service, locate the model, type, and series numbers on where you . This warranty is void if the product is warranted to be defective, at our option; All liability is no longer available, we will replace with a similar one (1) year from accident, alteration, abuse, or misuse. Limited Warranty This warranty applies to products purchased and used for other...
... this written warranty. For faster service, locate the model, type, and series numbers on where you . This warranty is void if the product is warranted to be defective, at our option; All liability is no longer available, we will replace with a similar one (1) year from accident, alteration, abuse, or misuse. Limited Warranty This warranty applies to products purchased and used for other...


