

Use & Care
Page 2
...appliances, basic safety precautions should turn the control to reduce the risk of injury, never place cutting unit blades on or taking off parts, and before putting on base without jar properly attached. 15. Always operate blender with moving blades accidentally become exposed. 18. Screw ...; This appliance has a polarized plug (one way into a polarized outlet. To protect against risk of injury to blender. may be used by Hamilton Beach/Proctor-Silex, Inc. Keep hands and other liquid. 3. To disconnect cord, turn when the motor is operating. 20. The plug fits only ...
...appliances, basic safety precautions should turn the control to reduce the risk of injury, never place cutting unit blades on or taking off parts, and before putting on base without jar properly attached. 15. Always operate blender with moving blades accidentally become exposed. 18. Screw ...; This appliance has a polarized plug (one way into a polarized outlet. To protect against risk of injury to blender. may be used by Hamilton Beach/Proctor-Silex, Inc. Keep hands and other liquid. 3. To disconnect cord, turn when the motor is operating. 20. The plug fits only ...

Use & Care
Page 3
... Page 3 Other Consumer Safety Information This appliance is intended for information. This is a better measure of liquids from your unit, but are available as replacement parts.
... Page 3 Other Consumer Safety Information This appliance is intended for information. This is a better measure of liquids from your unit, but are available as replacement parts.
Use & Care
Page 4
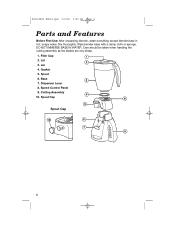
Care should be taken when handling the cutting assembly as the blades are very sharp. 1. Cutting Assembly 10. Jar 4. Spout 6. Spout Cap Spout Cap 4 840143800 ENv03.qxd 1/6/06 9:05 AM Page 4 Parts and Features Before First Use: After unpacking blender, wash everything except blender base in hot, soapy water. Dry thoroughly. DO NOT IMMERSE BASE IN WATER. Gasket 5. Dispenser Lever 8. Lid 3. Speed Control Panel 9. Wipe blender base with a damp cloth or sponge. Filler Cap 2. Base 7.
Care should be taken when handling the cutting assembly as the blades are very sharp. 1. Cutting Assembly 10. Jar 4. Spout 6. Spout Cap Spout Cap 4 840143800 ENv03.qxd 1/6/06 9:05 AM Page 4 Parts and Features Before First Use: After unpacking blender, wash everything except blender base in hot, soapy water. Dry thoroughly. DO NOT IMMERSE BASE IN WATER. Gasket 5. Dispenser Lever 8. Lid 3. Speed Control Panel 9. Wipe blender base with a damp cloth or sponge. Filler Cap 2. Base 7.
Use & Care
Page 5
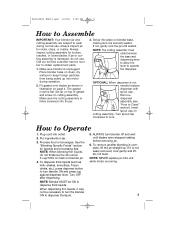
... jar into outlet. 2. 840143800 ENv03.qxd 1/6/06 9:05 AM Page 5 How to Assemble IMPORTANT: Your blender jar and cutting assembly are subject to obtain replacement parts. 1. Always inspect cutting assembly for broken, cracked, or loose blades. Remove dispenser assembly (see "How to dispense the liquid. 5. To dispense thick liquids (such as...
... jar into outlet. 2. 840143800 ENv03.qxd 1/6/06 9:05 AM Page 5 How to Assemble IMPORTANT: Your blender jar and cutting assembly are subject to obtain replacement parts. 1. Always inspect cutting assembly for broken, cracked, or loose blades. Remove dispenser assembly (see "How to dispense the liquid. 5. To dispense thick liquids (such as...
Use & Care
Page 8
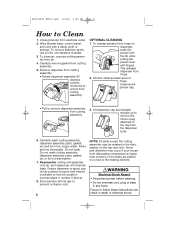
...cap and actuator straight up to remove the interior plug attached to unlock from the dispenser body. 6. Do not wash cutting assembly, dispenser assembly parts, gasket, jar, or lid in any liquid. To remove stubborn spots, use a mild, non-abrasive cleanser. 3. OPTIONAL CLEANING 1. Lift and...reverse steps in hot, soapy water. 840143800 ENv03.qxd 1/6/06 9:05 AM Page 8 How to prevent container odor. 8 NOTE: All parts except the cutting assembly may occur if your household dishwasher temperature is fully pushed on dispenser, push dispenser with thumb while pulling dispenser lever ...
...cap and actuator straight up to remove the interior plug attached to unlock from the dispenser body. 6. Do not wash cutting assembly, dispenser assembly parts, gasket, jar, or lid in any liquid. To remove stubborn spots, use a mild, non-abrasive cleanser. 3. OPTIONAL CLEANING 1. Lift and...reverse steps in hot, soapy water. 840143800 ENv03.qxd 1/6/06 9:05 AM Page 8 How to prevent container odor. 8 NOTE: All parts except the cutting assembly may occur if your household dishwasher temperature is fully pushed on dispenser, push dispenser with thumb while pulling dispenser lever ...
Use & Care
Page 12
...manufacturer's instructions, use for commercial purposes, or any use not in material and workmanship for a period of three (3) years for Hamilton Beach products or one hundred eighty (180) days for operator to products purchased in that information below . These numbers can be found ... or special, incidental or consequential damages, so the foregoing limitations may also have a claim under this product, including without limitation: glass parts, glass containers, cutter/strainers, blades, seals, gaskets, clutches, motor brushes, and/or agitators, etc. LIMITED WARRANTY This product is no...
...manufacturer's instructions, use for commercial purposes, or any use not in material and workmanship for a period of three (3) years for Hamilton Beach products or one hundred eighty (180) days for operator to products purchased in that information below . These numbers can be found ... or special, incidental or consequential damages, so the foregoing limitations may also have a claim under this product, including without limitation: glass parts, glass containers, cutter/strainers, blades, seals, gaskets, clutches, motor brushes, and/or agitators, etc. LIMITED WARRANTY This product is no...


