

Use & Care
Page 2
...fit, have an electrician replace the outlet. If the plug does not fit, reverse the plug. especially when assembling, disassembling or cleaning inside blender jar. 12. Always begin processing at the lowest speed setting. Do not use outdoors. 9. When blending hot liquids, remove center piece of severe ... not put cord, plug, base, or motor in water or other liquid. 3. Always operate blender with lid in use of the plug by Hamilton Beach/Proctor-Silex, Inc. Injury can result if moving parts. 6. If it is dropped or damaged in any appliance is used only when blender is...
...fit, have an electrician replace the outlet. If the plug does not fit, reverse the plug. especially when assembling, disassembling or cleaning inside blender jar. 12. Always begin processing at the lowest speed setting. Do not use outdoors. 9. When blending hot liquids, remove center piece of severe ... not put cord, plug, base, or motor in water or other liquid. 3. Always operate blender with lid in use of the plug by Hamilton Beach/Proctor-Silex, Inc. Injury can result if moving parts. 6. If it is dropped or damaged in any appliance is used only when blender is...

Use & Care
Page 3
... the first seconds of operation. Do not place blender jar in the freezer filled with your blender jar, the round rubber gasket must be used on available cutting blades and jar combinations that it can be taken to the cutting blades, jar, blender and possibly result in damage to arrange the... extension cord so that may draw significantly less power. If a longer cord is necessary, an approved extension cord may be properly placed between jar and cutting assembly as shown in , or tripping over, a longer cord. The electrical rating of the extension cord must be pulled on by ...
... the first seconds of operation. Do not place blender jar in the freezer filled with your blender jar, the round rubber gasket must be used on available cutting blades and jar combinations that it can be taken to the cutting blades, jar, blender and possibly result in damage to arrange the... extension cord so that may draw significantly less power. If a longer cord is necessary, an approved extension cord may be properly placed between jar and cutting assembly as shown in , or tripping over, a longer cord. The electrical rating of the extension cord must be pulled on by ...
Use & Care
Page 4
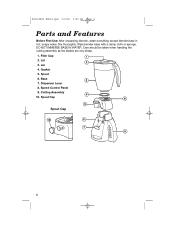
Lid 3. Cutting Assembly 10. Spout Cap Spout Cap 4 Care should be taken when handling the cutting assembly as the blades are very sharp. 1. Dry thoroughly. DO NOT IMMERSE BASE IN WATER. Gasket 5. Wipe blender base with a damp cloth or sponge. Filler Cap 2. Jar 4. Base 7. Dispenser Lever 8. Speed Control Panel 9. Spout 6. 840143800 ENv03.qxd 1/6/06 9:05 AM Page 4 Parts and Features Before First Use: After unpacking blender, wash everything except blender base in hot, soapy water.
Lid 3. Cutting Assembly 10. Spout Cap Spout Cap 4 Care should be taken when handling the cutting assembly as the blades are very sharp. 1. Dry thoroughly. DO NOT IMMERSE BASE IN WATER. Gasket 5. Wipe blender base with a damp cloth or sponge. Filler Cap 2. Jar 4. Base 7. Dispenser Lever 8. Speed Control Panel 9. Spout 6. 840143800 ENv03.qxd 1/6/06 9:05 AM Page 4 Parts and Features Before First Use: After unpacking blender, wash everything except blender base in hot, soapy water.
Use & Care
Page 5
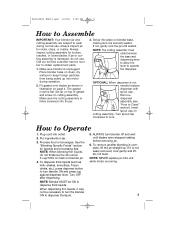
... securely seated. NOTE: The cutting assembly must lie flat. Put ingredients in illustration on blender base, making sure it is complete, lift the jar straight up into motor during normal use . See the "Blending Specific Foods" section for speeds and processing tips. Fit gasket over blades as ...milk- Set jar on top of gasket and screw on blender jar. 4. Set jar into outlet. 2. ALWAYS turn blender ON and press cup against dispenser lever. Make sure blender is not needed replace...
... securely seated. NOTE: The cutting assembly must lie flat. Put ingredients in illustration on blender base, making sure it is complete, lift the jar straight up into motor during normal use . See the "Blending Specific Foods" section for speeds and processing tips. Fit gasket over blades as ...milk- Set jar on top of gasket and screw on blender jar. 4. Set jar into outlet. 2. ALWAYS turn blender ON and press cup against dispenser lever. Make sure blender is not needed replace...
Use & Care
Page 6
...being processed (solid food or ultra-thick beverages) will run the blender until OFF is pushed. Always remove the filler cap of the jar. They all operate similarly. The blender is operating, remove filler cap from container lid and add ingredients through the opening to reduce risk ... Speed increases as the buttons are pushed top to mash potatoes, mix stiff dough, whip egg whites, grind raw meat, or extract juices from jar. • Avoid bumping or dropping the blender. 6 The remaining speed buttons will not dispense always pour from fruits and vegetables. Hints for General...
...being processed (solid food or ultra-thick beverages) will run the blender until OFF is pushed. Always remove the filler cap of the jar. They all operate similarly. The blender is operating, remove filler cap from container lid and add ingredients through the opening to reduce risk ... Speed increases as the buttons are pushed top to mash potatoes, mix stiff dough, whip egg whites, grind raw meat, or extract juices from jar. • Avoid bumping or dropping the blender. 6 The remaining speed buttons will not dispense always pour from fruits and vegetables. Hints for General...
Use & Care
Page 7
.... When only crushed ice is reached. Press a desired speed control button for 30 seconds to make superfine sugar which dissolves instantly in blender jar. Process 1 cup (250 ml) at a time. Chopping Vegetables Cabbage, carrots, onion, green pepper, potatoes. Cover with water. Smooth Gravy...consistency, press a desired speed control button for 10 seconds or until desired chopped consistency is desired then fill jar with recommended amount of water. Pulse a few times. Remove jar from cover to allow steam to redistribute pieces. Place 2 cups (500 ml) of ice cubes. Pulse ...
.... When only crushed ice is reached. Press a desired speed control button for 30 seconds to make superfine sugar which dissolves instantly in blender jar. Process 1 cup (250 ml) at a time. Chopping Vegetables Cabbage, carrots, onion, green pepper, potatoes. Cover with water. Smooth Gravy...consistency, press a desired speed control button for 10 seconds or until desired chopped consistency is desired then fill jar with recommended amount of water. Pulse a few times. Remove jar from cover to allow steam to redistribute pieces. Place 2 cups (500 ml) of ice cubes. Pulse ...
Use & Care
Page 8
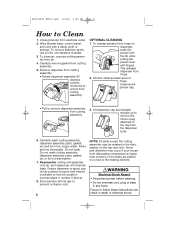
...push dispenser with thumb while pulling dispenser lever with a damp cloth or sponge. Do not wash cutting assembly, dispenser assembly parts, gasket, jar, or lid in hot, soapy water. Store blender with lid ajar to Clean 1. Lift and rotate actuator around hinge. Carefully wash ...• Rotate dispenser assembly 90 degrees counterclockwise to lock into position (reverse steps in number 5 above). 8. Reassemble cutting unit assembly onto jar, and replace jar onto blender base. 840143800 ENv03.qxd 1/6/06 9:05 AM Page 8 How to prevent container odor. 8 NOTE: All parts except the ...
...push dispenser with thumb while pulling dispenser lever with a damp cloth or sponge. Do not wash cutting assembly, dispenser assembly parts, gasket, jar, or lid in hot, soapy water. Store blender with lid ajar to Clean 1. Lift and rotate actuator around hinge. Carefully wash ...• Rotate dispenser assembly 90 degrees counterclockwise to lock into position (reverse steps in number 5 above). 8. Reassemble cutting unit assembly onto jar, and replace jar onto blender base. 840143800 ENv03.qxd 1/6/06 9:05 AM Page 8 How to prevent container odor. 8 NOTE: All parts except the ...
Use & Care
Page 9
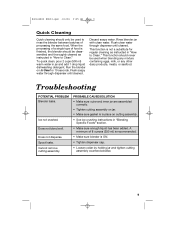
... to Clean." Does not blend well. Spout leaks. Cannot remove cutting assembly. PROBABLE CAUSE/SOLUTION • Make sure outer and inner jar are assembled correctly. • Tighten cutting assembly on cutting assembly. • See ice crushing instructions in "How to Clean." Discard soapy ...A minimum of food is not a substitute for 10 seconds. This function should only be disassembled and thoroughly cleaned as instructed in jar and add 1 drop liquid dishwashing detergent. Flush soapy water through dispenser until cleaned. Ice not crushed. Does not dispense. This ...
... to Clean." Does not blend well. Spout leaks. Cannot remove cutting assembly. PROBABLE CAUSE/SOLUTION • Make sure outer and inner jar are assembled correctly. • Tighten cutting assembly on cutting assembly. • See ice crushing instructions in "How to Clean." Discard soapy ...A minimum of food is not a substitute for 10 seconds. This function should only be disassembled and thoroughly cleaned as instructed in jar and add 1 drop liquid dishwashing detergent. Flush soapy water through dispenser until cleaned. Ice not crushed. Does not dispense. This ...

Use & Care
Page 10
... ml) 16 ounces milk (500 ml) 24 ounces ice cream (750 ml) Select desired ice cream flavor. Blend until smooth. Place all ingredients in blender jar; Makes 32 ounces (950 ml). 10 Margaritas 1⁄2 cup (125 ml) tequila 1⁄2 cup (125 ml) Triple Sec 2 cups (500 ml) ice Juice of 16...
... ml) 16 ounces milk (500 ml) 24 ounces ice cream (750 ml) Select desired ice cream flavor. Blend until smooth. Place all ingredients in blender jar; Makes 32 ounces (950 ml). 10 Margaritas 1⁄2 cup (125 ml) tequila 1⁄2 cup (125 ml) Triple Sec 2 cups (500 ml) ice Juice of 16...
Use & Care
Page 11
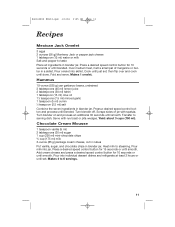
... Jack or pepper jack cheese 1 tablespoon (15 ml) water or milk Salt and pepper to serving dish. Transfer to taste Place all ingredients in blender jar. Chocolate Cream Mousse 1 teaspoon vanilla (5 ml) 2 tablespoons (30 ml) sugar 1 cup (250 ml) mini-chocolate chips 3⁄4 cup (175 ml) milk 3-ounce (...85 g) package cream cheese, cut in cubes Put vanilla, sugar, and chocolate chips in blender jar. Add cream cheese and press a desired speed control button for 15 seconds or until set ; Press a desired speed control button for 10 seconds or until...
... Jack or pepper jack cheese 1 tablespoon (15 ml) water or milk Salt and pepper to serving dish. Transfer to taste Place all ingredients in blender jar. Chocolate Cream Mousse 1 teaspoon vanilla (5 ml) 2 tablespoons (30 ml) sugar 1 cup (250 ml) mini-chocolate chips 3⁄4 cup (175 ml) milk 3-ounce (...85 g) package cream cheese, cut in cubes Put vanilla, sugar, and chocolate chips in blender jar. Add cream cheese and press a desired speed control button for 15 seconds or until set ; Press a desired speed control button for 10 seconds or until...


