

Use & Care
Page 2
...may cause a risk of attachments, including canning jars, not recommended or sold by Hamilton Beach/Proctor-Silex, Inc. Blades are sharp; Do not use of injury to blender. Do not leave blender unattended while it still does not fit, have an electrician replace the outlet. Call our toll-free customer service ... assembly firmly. Keep hands and other liquid. • This appliance has a polarized plug (one way into a polarized outlet. If the jar should always be used by modifying the plug in water or other than intended purpose. Do not defeat the safety purpose of possible burns....
...may cause a risk of attachments, including canning jars, not recommended or sold by Hamilton Beach/Proctor-Silex, Inc. Blades are sharp; Do not use of injury to blender. Do not leave blender unattended while it still does not fit, have an electrician replace the outlet. Call our toll-free customer service ... assembly firmly. Keep hands and other liquid. • This appliance has a polarized plug (one way into a polarized outlet. If the jar should always be used by modifying the plug in water or other than intended purpose. Do not defeat the safety purpose of possible burns....

Use & Care
Page 3
... may not be used on this appliance was selected to the cutting blades, jar, blender and possibly result in the freezer filled with your blender jar, the round rubber gasket must be properly placed between jar and cutting assembly as replacement parts. The blender as provided may be provided with food or liquid. This...
... may not be used on this appliance was selected to the cutting blades, jar, blender and possibly result in the freezer filled with your blender jar, the round rubber gasket must be properly placed between jar and cutting assembly as replacement parts. The blender as provided may be provided with food or liquid. This...
Use & Care
Page 5
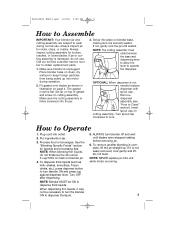
... 9:05 AM Page 5 How to Assemble IMPORTANT: Your blender jar and cutting assembly are subject to obtain replacement parts. 1. Make sure blender is running. 5 If not, gently rock the jar until blades have stopped rotating before removing jar. 6. Remove dispenser assembly (see "How to lock. Put... to dispense the liquid. 5. ALWAYS turn blender ON and press cup against dispenser lever. NOTE: NEVER replace jar onto unit while motor is unplugged. Set jar into place on blender jar. 4. Turn spout cap clockwise to Clean" section). Plug cord into motor during normal use . See ...
... 9:05 AM Page 5 How to Assemble IMPORTANT: Your blender jar and cutting assembly are subject to obtain replacement parts. 1. Make sure blender is running. 5 If not, gently rock the jar until blades have stopped rotating before removing jar. 6. Remove dispenser assembly (see "How to lock. Put... to dispense the liquid. 5. ALWAYS turn blender ON and press cup against dispenser lever. NOTE: NEVER replace jar onto unit while motor is unplugged. Set jar into place on blender jar. 4. Turn spout cap clockwise to Clean" section). Plug cord into motor during normal use . See ...
Use & Care
Page 8
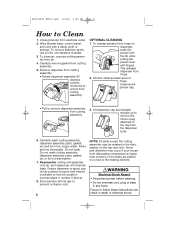
... spout cap is higher than normal or if the parts are placed too close to the heating element. Carefully remove gasket from jar. 4. Store blender with a damp cloth or sponge. Remove dispenser from cutting assembly. • Rotate dispenser assembly 90 degrees ... To remove stubborn spots, use a mild, non-abrasive cleanser. 3. OPTIONAL CLEANING 1. Reassemble cutting unit assembly onto jar, and replace jar onto blender base. To clean jar, unscrew cutting assembly from cutting assembly. 5. Lift and rotate actuator around hinge. To unsnap actuator from cutting assembly....
... spout cap is higher than normal or if the parts are placed too close to the heating element. Carefully remove gasket from jar. 4. Store blender with a damp cloth or sponge. Remove dispenser from cutting assembly. • Rotate dispenser assembly 90 degrees ... To remove stubborn spots, use a mild, non-abrasive cleanser. 3. OPTIONAL CLEANING 1. Reassemble cutting unit assembly onto jar, and replace jar onto blender base. To clean jar, unscrew cutting assembly from cutting assembly. 5. Lift and rotate actuator around hinge. To unsnap actuator from cutting assembly....


