

Use & Care
Page 2
...during blending. Check that the control is operating. 17. Unplug cord from outlet when not in place. 15. Blades are sharp; Always operate blender with lid in use appliance for information on top of table or counter or touch hot surfaces, including stove. 10. With the protection of ... 2. Close supervision is necessary when any appliance is dropped or damaged in water or other than intended purpose. The use a broken, chipped, or cracked blender jar. 13. Do not let cord hang over edge of lid. To disconnect cord, turn the control to persons. 8. Then remove plug from lid....
...during blending. Check that the control is operating. 17. Unplug cord from outlet when not in place. 15. Blades are sharp; Always operate blender with lid in use appliance for information on top of table or counter or touch hot surfaces, including stove. 10. With the protection of ... 2. Close supervision is necessary when any appliance is dropped or damaged in water or other than intended purpose. The use a broken, chipped, or cracked blender jar. 13. Do not let cord hang over edge of lid. To disconnect cord, turn the control to persons. 8. Then remove plug from lid....

Use & Care
Page 3
...Page 3 OTHER CONSUMER SAFETY INFORMATION This appliance is intended for food or liquids only. WARNING! Do not defeat the safety purpose of what a blender motor can be pulled on available cutting blade assembly and jar combinations that may draw significantly less power. If a longer cord is necessary, an ...of the extension cord must be used on this appliance was selected to arrange the extension cord so that reduces the risk of the blender is determined by children or accidentally tripped over the countertop or tabletop where it still does not fit, have an electrician replace the ...
...Page 3 OTHER CONSUMER SAFETY INFORMATION This appliance is intended for food or liquids only. WARNING! Do not defeat the safety purpose of what a blender motor can be pulled on available cutting blade assembly and jar combinations that may draw significantly less power. If a longer cord is necessary, an ...of the extension cord must be used on this appliance was selected to arrange the extension cord so that reduces the risk of the blender is determined by children or accidentally tripped over the countertop or tabletop where it still does not fit, have an electrician replace the ...

Use & Care
Page 4
840208401 ENv01.qxd:Layout 1 12/21/11 4:25 PM Page 4 Parts and Features Filler-Cap Lid Dispenser Assembly Cord Stuff and Spout Cap Storage (located at bottom of blender) 4 Spout Cap Base Jar With Cutting Assembly Control Panel
840208401 ENv01.qxd:Layout 1 12/21/11 4:25 PM Page 4 Parts and Features Filler-Cap Lid Dispenser Assembly Cord Stuff and Spout Cap Storage (located at bottom of blender) 4 Spout Cap Base Jar With Cutting Assembly Control Panel

Use & Care
Page 5
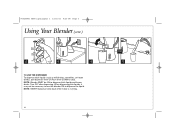
... liquids, do not use . Start blending at lowest speed. 5 6 7 5 If jar or cutting blade assembly is damaged, do not fill blender jar beyond the 3-cup (750-ml) level. IMPORTANT: Your blender jar and cutting blade assembly are subject to obtain replacement parts. 1 2 3 4 BLENDING HOT LIQUIDS WARNING! Call our toll-free customer service... an oven mitt or thick towel, place one hand on top of lid. 840208401 ENv01.qxd:Layout 1 12/21/11 4:25 PM Page 5 Using Your Blender BEFORE FIRST USE: After unpacking the blender, follow the instructions in "Cleaning Your...
... liquids, do not use . Start blending at lowest speed. 5 6 7 5 If jar or cutting blade assembly is damaged, do not fill blender jar beyond the 3-cup (750-ml) level. IMPORTANT: Your blender jar and cutting blade assembly are subject to obtain replacement parts. 1 2 3 4 BLENDING HOT LIQUIDS WARNING! Call our toll-free customer service... an oven mitt or thick towel, place one hand on top of lid. 840208401 ENv01.qxd:Layout 1 12/21/11 4:25 PM Page 5 Using Your Blender BEFORE FIRST USE: After unpacking the blender, follow the instructions in "Cleaning Your...
Use & Care
Page 6
When dispensing thin liquids, it may not be ON to dispense thick liquids and frozen drinks. NOTE: NEVER replace jar onto base while motor is running. 6 OR 11 Push lever DOWN to dispense the liquid. NOTE: Blender MUST be necessary to turn the blender ON to stop. 840208401 ENv01.qxd:Layout 1 12/21/11 4:25 PM Page 6 Using Your Blender (cont.) 8 9 10 TO USE THE DISPENSER: To dispense thick liquids (such as milkshakes, smoothies, or frozen drinks), pull dispenser lever UP. Turn OFF after dispensing.
When dispensing thin liquids, it may not be ON to dispense thick liquids and frozen drinks. NOTE: NEVER replace jar onto base while motor is running. 6 OR 11 Push lever DOWN to dispense the liquid. NOTE: Blender MUST be necessary to turn the blender ON to stop. 840208401 ENv01.qxd:Layout 1 12/21/11 4:25 PM Page 6 Using Your Blender (cont.) 8 9 10 TO USE THE DISPENSER: To dispense thick liquids (such as milkshakes, smoothies, or frozen drinks), pull dispenser lever UP. Turn OFF after dispensing.

Use & Care
Page 7
Mixture will stop blender and PULSE a few times. • When using the dispenser assembly for dispensing, be sure to 10 ... 3 cups [750 ml]) DISPENSE setting for 45 seconds or until blended. TIPS FOR BEST RESULTS: • Always place liquid in blender jar first, then remaining ingredients. • If ice or frozen fruit pieces are not blending, stop dispensing when volume gets lower than..., such as Piña Colada mix 10 ice cubes NUMBER OF SERVINGS 3 to 4 (makes 4 cups [1 L]) BLENDER SETTING/TIME SMOOTHIE setting for 45 seconds or PULSE 5 times and blend on HIGH for 5 to have...
Mixture will stop blender and PULSE a few times. • When using the dispenser assembly for dispensing, be sure to 10 ... 3 cups [750 ml]) DISPENSE setting for 45 seconds or until blended. TIPS FOR BEST RESULTS: • Always place liquid in blender jar first, then remaining ingredients. • If ice or frozen fruit pieces are not blending, stop dispensing when volume gets lower than..., such as Piña Colada mix 10 ice cubes NUMBER OF SERVINGS 3 to 4 (makes 4 cups [1 L]) BLENDER SETTING/TIME SMOOTHIE setting for 45 seconds or PULSE 5 times and blend on HIGH for 5 to have...
Use & Care
Page 8
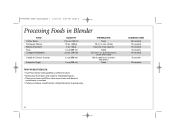
... 30 seconds 15 seconds 15 seconds 5 seconds 10 seconds 5 seconds 30 seconds 8 840208401 ENv01.qxd:Layout 1 12/21/11 4:25 PM Page 8 Processing Foods in Blender FOOD Coffee Beans Parmesan Cheese Baking Chocolate Nuts Chopped Vegetables Cookie or Cracker Crumbs Superfine Sugar QUANTITY 1/2 cup (125 ml) 10 oz. (280 g) 2 oz. (50...
... 30 seconds 15 seconds 15 seconds 5 seconds 10 seconds 5 seconds 30 seconds 8 840208401 ENv01.qxd:Layout 1 12/21/11 4:25 PM Page 8 Processing Foods in Blender FOOD Coffee Beans Parmesan Cheese Baking Chocolate Nuts Chopped Vegetables Cookie or Cracker Crumbs Superfine Sugar QUANTITY 1/2 cup (125 ml) 10 oz. (280 g) 2 oz. (50...

Use & Care
Page 9
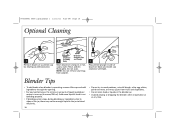
... batches of food is not a substitute for 10 seconds. Do not immerse cord, plug, base, or motor in "Cleaning Your Blender." Do not soak. This function should only be taken when handling the cutting blade assembly as instructed in the dishwasher. Rinse and dry... thoroughly. 840208401 ENv01.qxd:Layout 1 12/21/11 4:25 PM Page 9 Cleaning Your Blender w WARNING Electrical Shock Hazard. Run the blender on EASY CLEAN for regular cleaning as instructed in water or other dairy products, meats, or seafood. Rinse with hot, soapy ...
... batches of food is not a substitute for 10 seconds. Do not immerse cord, plug, base, or motor in "Cleaning Your Blender." Do not soak. This function should only be taken when handling the cutting blade assembly as instructed in the dishwasher. Rinse and dry... thoroughly. 840208401 ENv01.qxd:Layout 1 12/21/11 4:25 PM Page 9 Cleaning Your Blender w WARNING Electrical Shock Hazard. Run the blender on EASY CLEAN for regular cleaning as instructed in water or other dairy products, meats, or seafood. Rinse with hot, soapy ...
Use & Care
Page 10
... seal rings from fruits and vegetables. • Do not store food or liquids in the blender jar. • Avoid bumping or dropping the blender when in operation or at any time. Blender Tips • To add foods when blender is not blending properly. • If blending action stops during blending or ingredients stick to...
... seal rings from fruits and vegetables. • Do not store food or liquids in the blender jar. • Avoid bumping or dropping the blender when in operation or at any time. Blender Tips • To add foods when blender is not blending properly. • If blending action stops during blending or ingredients stick to...


