

Use & Care
Page 2
... cord, plug, base, or motor in use broken, cracked, or loose cutting blade assembly. 14. Call our toll-free customer service number for other liquid. 3. especially when assembling, disassembling, or cleaning inside blender jar. 12. When blending hot liquids, remove center-piece of table or counter or touch hot surfaces, including stove. 10. Start blending at lowest speed. 16. Do not leave blender unattended while it is not running. 11. Then remove plug from lid...
... cord, plug, base, or motor in use broken, cracked, or loose cutting blade assembly. 14. Call our toll-free customer service number for other liquid. 3. especially when assembling, disassembling, or cleaning inside blender jar. 12. When blending hot liquids, remove center-piece of table or counter or touch hot surfaces, including stove. 10. Start blending at lowest speed. 16. Do not leave blender unattended while it is not running. 11. Then remove plug from lid...

Use & Care
Page 3
... a blender motor can be taken when handling cutting blade assembly as replacement parts. The plug fits only one wide blade) that may result in personal injury. This is the measure of the motor wattage during the first seconds of the cord used . If it still does not fit, have an electrician replace the outlet. Use for household use only. DO NOT IMMERSE BASE IN WATER. The length of operation. WARNING...
... a blender motor can be taken when handling cutting blade assembly as replacement parts. The plug fits only one wide blade) that may result in personal injury. This is the measure of the motor wattage during the first seconds of the cord used . If it still does not fit, have an electrician replace the outlet. Use for household use only. DO NOT IMMERSE BASE IN WATER. The length of operation. WARNING...

Use & Care
Page 4
840208401 ENv01.qxd:Layout 1 12/21/11 4:25 PM Page 4 Parts and Features Filler-Cap Lid Dispenser Assembly Cord Stuff and Spout Cap Storage (located at bottom of blender) 4 Spout Cap Base Jar With Cutting Assembly Control Panel
840208401 ENv01.qxd:Layout 1 12/21/11 4:25 PM Page 4 Parts and Features Filler-Cap Lid Dispenser Assembly Cord Stuff and Spout Cap Storage (located at bottom of blender) 4 Spout Cap Base Jar With Cutting Assembly Control Panel

Use & Care
Page 5
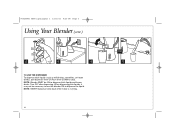
... of lid. IMPORTANT: Your blender jar and cutting blade assembly are subject to obtain replacement parts. 1 2 3 4 BLENDING HOT LIQUIDS WARNING! Start blending at lowest speed. 5 6 7 5 840208401 ENv01.qxd:Layout 1 12/21/11 4:25 PM Page 5 Using Your Blender BEFORE FIRST USE: After unpacking the blender, follow the instructions in "Cleaning Your Blender." Call our toll-free customer service number to wear during normal use . If jar or cutting blade assembly is damaged, do not fill blender jar beyond the 3-cup...
... of lid. IMPORTANT: Your blender jar and cutting blade assembly are subject to obtain replacement parts. 1 2 3 4 BLENDING HOT LIQUIDS WARNING! Start blending at lowest speed. 5 6 7 5 840208401 ENv01.qxd:Layout 1 12/21/11 4:25 PM Page 5 Using Your Blender BEFORE FIRST USE: After unpacking the blender, follow the instructions in "Cleaning Your Blender." Call our toll-free customer service number to wear during normal use . If jar or cutting blade assembly is damaged, do not fill blender jar beyond the 3-cup...
Use & Care
Page 6
When dispensing thin liquids, it may not be ON to dispense the liquid. Turn OFF after dispensing. 840208401 ENv01.qxd:Layout 1 12/21/11 4:25 PM Page 6 Using Your Blender (cont.) 8 9 10 TO USE THE DISPENSER: To dispense thick liquids (such as milkshakes, smoothies, or frozen drinks), pull dispenser lever UP. NOTE: Blender MUST be necessary to turn the blender ON to dispense thick liquids and frozen drinks. Push lever DOWN to stop. NOTE: NEVER replace jar onto base while motor is running. 6 OR 11
When dispensing thin liquids, it may not be ON to dispense the liquid. Turn OFF after dispensing. 840208401 ENv01.qxd:Layout 1 12/21/11 4:25 PM Page 6 Using Your Blender (cont.) 8 9 10 TO USE THE DISPENSER: To dispense thick liquids (such as milkshakes, smoothies, or frozen drinks), pull dispenser lever UP. NOTE: Blender MUST be necessary to turn the blender ON to dispense thick liquids and frozen drinks. Push lever DOWN to stop. NOTE: NEVER replace jar onto base while motor is running. 6 OR 11

Use & Care
Page 7
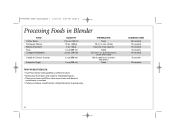
... 3 cups [750 ml]) DISPENSE setting for 5 to have blender running at DISPENSE setting. Mixture will stop blender and PULSE a few times. • When using the dispenser assembly for 45 seconds or until blended. 2 (makes 2 cups [500 ml]) ICE BREAKER™ setting for 45 seconds or PULSE 5 times and blend on HIGH for dispensing, be sure to 10 seconds or LOW until blended. TIPS FOR BEST RESULTS: • Always place liquid in blender jar...
... 3 cups [750 ml]) DISPENSE setting for 5 to have blender running at DISPENSE setting. Mixture will stop blender and PULSE a few times. • When using the dispenser assembly for 45 seconds or until blended. 2 (makes 2 cups [500 ml]) ICE BREAKER™ setting for 45 seconds or PULSE 5 times and blend on HIGH for dispensing, be sure to 10 seconds or LOW until blended. TIPS FOR BEST RESULTS: • Always place liquid in blender jar...
Use & Care
Page 8
... g) 2 oz. (50 g) 1 cup (250 ml) 2 cups (500 ml) 1 cup (250 ml) 1 cup (250 ml) PREPARATION None 1/2-in. (1-cm) chunks Coarsely chop squares None Cut into 1-in. (2.5-cm) pieces, cover with water Break cookies or crackers into pieces None TIPS FOR BEST RESULTS: • Use Pulse button with guidelines outlined in chart. • Remove jar from base and shake to redistribute pieces. • Place jar on base and Pulse a few more...
... g) 2 oz. (50 g) 1 cup (250 ml) 2 cups (500 ml) 1 cup (250 ml) 1 cup (250 ml) PREPARATION None 1/2-in. (1-cm) chunks Coarsely chop squares None Cut into 1-in. (2.5-cm) pieces, cover with water Break cookies or crackers into pieces None TIPS FOR BEST RESULTS: • Use Pulse button with guidelines outlined in chart. • Remove jar from base and shake to redistribute pieces. • Place jar on base and Pulse a few more...

Use & Care
Page 9
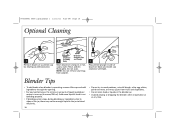
To remove stubborn spots, use the "SANI" setting when washing in the dishwasher. Care should be taken when handling the cutting blade assembly as it is finished, the blender should be used to rinse the blender between batches of food is very sharp. Rinse with a damp cloth or sponge. Disconnect power before cleaning. Run the blender on EASY CLEAN for regular cleaning as instructed in water or other...
To remove stubborn spots, use the "SANI" setting when washing in the dishwasher. Care should be taken when handling the cutting blade assembly as it is finished, the blender should be used to rinse the blender between batches of food is very sharp. Rinse with a damp cloth or sponge. Disconnect power before cleaning. Run the blender on EASY CLEAN for regular cleaning as instructed in water or other...
Use & Care
Page 10
... if food is not blending properly. • If blending action stops during blending or ingredients stick to sides of the jar, there may not be enough liquid in the jar to blend efficiently. 10 • Do not try to mash potatoes, mix stiff dough, whip egg whites, grind raw meat, or extract juices from adapter. 3 Reassemble plunger inside of liquid needed per recipe is operating, remove filler-cap...
... if food is not blending properly. • If blending action stops during blending or ingredients stick to sides of the jar, there may not be enough liquid in the jar to blend efficiently. 10 • Do not try to mash potatoes, mix stiff dough, whip egg whites, grind raw meat, or extract juices from adapter. 3 Reassemble plunger inside of liquid needed per recipe is operating, remove filler-cap...

Use & Care
Page 12
... remedy is no longer available, we will replace with the printed directions, or damage to you specific legal rights. To make a warranty claim. For faster service, locate the model, type, and series numbers on where you are responsible for all claims...express or implied warranty. This warranty gives you . and Canada. During this period, your appliance. 12 or hamiltonbeach.ca in Canada. If the product or component is repair or replacement of this written warranty. 840208401 ENv01.qxd:Layout 1 12/21/11 4:25 PM Page 12 Limited Warranty This warranty applies to be free...
... remedy is no longer available, we will replace with the printed directions, or damage to you specific legal rights. To make a warranty claim. For faster service, locate the model, type, and series numbers on where you are responsible for all claims...express or implied warranty. This warranty gives you . and Canada. During this period, your appliance. 12 or hamiltonbeach.ca in Canada. If the product or component is repair or replacement of this written warranty. 840208401 ENv01.qxd:Layout 1 12/21/11 4:25 PM Page 12 Limited Warranty This warranty applies to be free...


