Use and Care Manual
Page 2
... place before cleaning. 6. handle carefully - Then remove plug from the lid, and start blending at lowest speed. 19. Do not operate any appliance with the protection of an oven mitt or thick towel, place one hand on blender base. 21. especially when assembling, disassembling, or cleaning inside blender jar. 14. To reduce the risk of electrical shock, do not play with blender). Call our toll-free customer service number for...
... place before cleaning. 6. handle carefully - Then remove plug from the lid, and start blending at lowest speed. 19. Do not operate any appliance with the protection of an oven mitt or thick towel, place one hand on blender base. 21. especially when assembling, disassembling, or cleaning inside blender jar. 14. To reduce the risk of electrical shock, do not play with blender). Call our toll-free customer service number for...
Use and Care Manual
Page 3
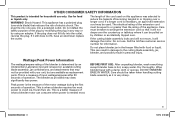
... cloth or sponge. The blender as replacement parts. Shock Hazard: This appliance has a polarized plug (one way into the outlet, reverse the plug. If the cutting blade assembly locks and will damage the motor. Wipe blender base with food or liquid. This is necessary, an approved extension cord may not be taken to crush ice, frozen fruit, etc. Dry thoroughly. DO NOT IMMERSE BASE IN WATER.
... cloth or sponge. The blender as replacement parts. Shock Hazard: This appliance has a polarized plug (one way into the outlet, reverse the plug. If the cutting blade assembly locks and will damage the motor. Wipe blender base with food or liquid. This is necessary, an approved extension cord may not be taken to crush ice, frozen fruit, etc. Dry thoroughly. DO NOT IMMERSE BASE IN WATER.
Use and Care Manual
Page 4
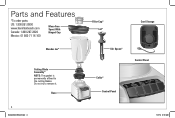
Base 4 840243000 ENv08.indd 4 Filler-Cap* Lid* Cord Storage Stir Spoon* Control Panel Collar* Control Panel 5/7/14 9:53 AM Do not try to the cutting blades. Parts and Features *To order parts: US: 1.800.851.8900 www.hamiltonbeach.com Canada: 1.800.267.2826 Mexico: 01 800 71 16 100 Mess-Free Spout With Hinged Cap Blender Jar* Cutting Blade Assembly* NOTE: The gasket is permanently affixed to remove it.
Base 4 840243000 ENv08.indd 4 Filler-Cap* Lid* Cord Storage Stir Spoon* Control Panel Collar* Control Panel 5/7/14 9:53 AM Do not try to the cutting blades. Parts and Features *To order parts: US: 1.800.851.8900 www.hamiltonbeach.com Canada: 1.800.267.2826 Mexico: 01 800 71 16 100 Mess-Free Spout With Hinged Cap Blender Jar* Cutting Blade Assembly* NOTE: The gasket is permanently affixed to remove it.
Use and Care Manual
Page 5
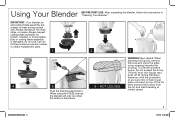
..., place one hand on top of the lid, 4 5 6 - To prevent possible burns: Do not exceed the 3-cup (710-ml) level. IMPORTANT: Your blender jar and cutting blade assembly are subject to obtain replacement parts. 1 2 3 WARNING! Burn Hazard: When blending hot liquids, remove filler-cap and close the edge cover opening intended for nicks, chips, or cracks. Always inspect jar for pouring. lowest speed. Call our toll-free customer service number to wear...
..., place one hand on top of the lid, 4 5 6 - To prevent possible burns: Do not exceed the 3-cup (710-ml) level. IMPORTANT: Your blender jar and cutting blade assembly are subject to obtain replacement parts. 1 2 3 WARNING! Burn Hazard: When blending hot liquids, remove filler-cap and close the edge cover opening intended for nicks, chips, or cracks. Always inspect jar for pouring. lowest speed. Call our toll-free customer service number to wear...
Use and Care Manual
Page 6
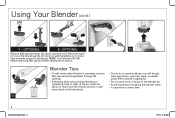
....indd 6 5/7/14 9:53 AM NOTE: Turn blender OFF (O) before removing filler-cap and when adding the stir spoon. OPTIONAL 8 -OPTIONAL 9 10 Remove filler-cap and insert stir spoon into hole in blender jar. Blender Tips • To add foods when blender is operating, remove filler-cap and add ingredients through the opening. • If blending action stops during blending or ingredients stick to sides of the lid and use the stir spoon to add ingredients...
....indd 6 5/7/14 9:53 AM NOTE: Turn blender OFF (O) before removing filler-cap and when adding the stir spoon. OPTIONAL 8 -OPTIONAL 9 10 Remove filler-cap and insert stir spoon into hole in blender jar. Blender Tips • To add foods when blender is operating, remove filler-cap and add ingredients through the opening. • If blending action stops during blending or ingredients stick to sides of the lid and use the stir spoon to add ingredients...
Use and Care Manual
Page 7
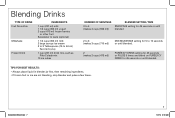
TIPS FOR BEST RESULTS: • Always place liquid in blender jar first, then remaining ingredients. • If frozen fruit or ice are not blending, stop blender and pulse a few times. 840243000 ENv08.indd 7 7 5/7/14 9:53 AM Blending Drinks TYPE OF DRINK Fruit Smoothie Milkshake Frozen Drink INGREDIENTS 1 cup (237 ml) milk 1 1/2 cups (355 ml) yogurt 2 cups (473 ml) frozen berries or other fruit Sweetener...
TIPS FOR BEST RESULTS: • Always place liquid in blender jar first, then remaining ingredients. • If frozen fruit or ice are not blending, stop blender and pulse a few times. 840243000 ENv08.indd 7 7 5/7/14 9:53 AM Blending Drinks TYPE OF DRINK Fruit Smoothie Milkshake Frozen Drink INGREDIENTS 1 cup (237 ml) milk 1 1/2 cups (355 ml) yogurt 2 cups (473 ml) frozen berries or other fruit Sweetener...

Use and Care Manual
Page 8
...; Remove jar from base and shake to redistribute pieces. • Place jar on base and pulse a few more times until desired consistency is reached. • Parmesan cheese should remain refrigerated prior to blending. Blending Food FOOD Parmesan Cheese Baking Chocolate Nuts Chopped Vegetables QUANTITY 10 oz. (283 g) 2 oz. (57 g) 1 cup (237 ml) 2 cups (473 ml) Cookie or Cracker Crumbs 1 cup (237 ml) TIPS FOR BEST RESULTS: • Use PULSE button...
...; Remove jar from base and shake to redistribute pieces. • Place jar on base and pulse a few more times until desired consistency is reached. • Parmesan cheese should remain refrigerated prior to blending. Blending Food FOOD Parmesan Cheese Baking Chocolate Nuts Chopped Vegetables QUANTITY 10 oz. (283 g) 2 oz. (57 g) 1 cup (237 ml) 2 cups (473 ml) Cookie or Cracker Crumbs 1 cup (237 ml) TIPS FOR BEST RESULTS: • Use PULSE button...
Use and Care Manual
Page 9
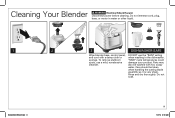
... To remove stubborn spots, use the "SANI" setting when washing in water or other liquid. 1 2 840243000 ENv08.indd 9 3 DISHWASHER-SAFE Wipe blender base, control panel, and cord with hot, soapy water. Do not immerse cord, plug, base, or motor in the dishwasher. Rinse and dry thoroughly. Cleaning Your Blender w WARNING Electrical Shock Hazard. Disconnect power before cleaning. "SANI" cycle temperatures could damage your product. Parts...
... To remove stubborn spots, use the "SANI" setting when washing in water or other liquid. 1 2 840243000 ENv08.indd 9 3 DISHWASHER-SAFE Wipe blender base, control panel, and cord with hot, soapy water. Do not immerse cord, plug, base, or motor in the dishwasher. Rinse and dry thoroughly. Cleaning Your Blender w WARNING Electrical Shock Hazard. Disconnect power before cleaning. "SANI" cycle temperatures could damage your product. Parts...

Use and Care Manual
Page 10
... to be free from normal use, use or subjected to any statutory warranty or condition of this appliance to the store. and Canada. This is no longer available, we will replace with the printed directions, or damage to the product resulting from the date of the purchase price. If the product or component is the only express warranty for a period...
... to be free from normal use, use or subjected to any statutory warranty or condition of this appliance to the store. and Canada. This is no longer available, we will replace with the printed directions, or damage to the product resulting from the date of the purchase price. If the product or component is the only express warranty for a period...


