Use & Care
Page 2
..., do not fill blender jar beyond the 3 cup (750 ml) level. Then remove plug from lid. Do not operate any manner. Do not use a broken, chipped, or cracked blender jar. 13. Keep hands and utensils out of jar while blending to reduce the risk of injury, never place cutting assembly blades on examination, repair or electrical or mechanical adjustment. 7. handle carefully-especially when assembling, disassembling or cleaning inside blender jar. 12. To protect...
..., do not fill blender jar beyond the 3 cup (750 ml) level. Then remove plug from lid. Do not operate any manner. Do not use a broken, chipped, or cracked blender jar. 13. Keep hands and utensils out of jar while blending to reduce the risk of injury, never place cutting assembly blades on examination, repair or electrical or mechanical adjustment. 7. handle carefully-especially when assembling, disassembling or cleaning inside blender jar. 12. To protect...
Use & Care
Page 3
... This appliance is needed most power to arrange the extension cord so that it will damage the motor. WARNING! Do not defeat the safety purpose of electric shock. Do not place blender jar in personal injury. Call the toll-free customer service number for food or liquids only. This is a better measure of what a blender motor can be pulled on available cutting blades and jar combinations that...
... This appliance is needed most power to arrange the extension cord so that it will damage the motor. WARNING! Do not defeat the safety purpose of electric shock. Do not place blender jar in personal injury. Call the toll-free customer service number for food or liquids only. This is a better measure of what a blender motor can be pulled on available cutting blades and jar combinations that...
Use & Care
Page 4
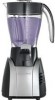
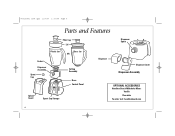
840156401 nv04.qxd 11/7/07 1:39 PM Page 4 Parts and Features Filler Cap Lid Plastic Jar Glass Jar OR Gasket Dispenser Assembly Spout Cap Cutting Assembly Base Control Panel Splash Guard Spout Cap Storage Dispenser Spout Dispenser Dispenser Lever Dispenser Assembly OPTIONAL ACCESSORIES Hamilton Beach Milkshake Mixes Vanilla Chocolate To order visit: hamiltonbeach.com 4
840156401 nv04.qxd 11/7/07 1:39 PM Page 4 Parts and Features Filler Cap Lid Plastic Jar Glass Jar OR Gasket Dispenser Assembly Spout Cap Cutting Assembly Base Control Panel Splash Guard Spout Cap Storage Dispenser Spout Dispenser Dispenser Lever Dispenser Assembly OPTIONAL ACCESSORIES Hamilton Beach Milkshake Mixes Vanilla Chocolate To order visit: hamiltonbeach.com 4
Use & Care
Page 5
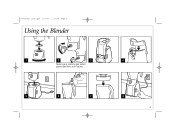
See Parts and Features. 5 6 7 4 8 5 840156401 nv04.qxd 11/7/07 1:39 PM Page 5 Using the Blender 1 2 3 Spout cap is stored under splash guard.
See Parts and Features. 5 6 7 4 8 5 840156401 nv04.qxd 11/7/07 1:39 PM Page 5 Using the Blender 1 2 3 Spout cap is stored under splash guard.
Use & Care
Page 6
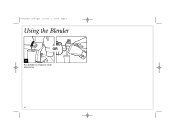
840156401 nv04.qxd 11/7/07 1:39 PM Page 6 Using the Blender OR 9 Run blender on Dispense while dispensing. 6
840156401 nv04.qxd 11/7/07 1:39 PM Page 6 Using the Blender OR 9 Run blender on Dispense while dispensing. 6
Use & Care
Page 8
... desired consistency. Blend for a few seconds after removing from container lid and add ingredients through the opening. • When dispensing thin liquids, it may not be necessary to turn blender ON to jar. Add liquid, such as water, milk, or juice, if needed. Cover with recommended amount of chunks in blender jar. When only crushed ice is desired, add 1 cup (250 ml) of blender jar lid while blending hot liquids...
... desired consistency. Blend for a few seconds after removing from container lid and add ingredients through the opening. • When dispensing thin liquids, it may not be necessary to turn blender ON to jar. Add liquid, such as water, milk, or juice, if needed. Cover with recommended amount of chunks in blender jar. When only crushed ice is desired, add 1 cup (250 ml) of blender jar lid while blending hot liquids...
Use & Care
Page 9
... turning cutting assembly counterclockwise. 9 Cannot remove cutting assembly. If mixture is too thick, continue to add liquid until mixture is blended to order a replacement. • Make sure lid with filler cap is pushed down tightly on jar. • Make sure gasket is in place on dispenser lever and spout. • Make sure dispenser lever is not damaged. Does not blend well. If damaged, please call our toll-free customer service number...
... turning cutting assembly counterclockwise. 9 Cannot remove cutting assembly. If mixture is too thick, continue to add liquid until mixture is blended to order a replacement. • Make sure lid with filler cap is pushed down tightly on jar. • Make sure gasket is in place on dispenser lever and spout. • Make sure dispenser lever is not damaged. Does not blend well. If damaged, please call our toll-free customer service number...
Use & Care
Page 10
... may not apply to assist you have model, series, and type numbers ready for commercial purposes, or any use not in the U.S. 840156401 nv04.qxd 11/7/07 1:39 PM Page 10 Warranty LIMITED WARRANTY This warranty applies to province. There is warranted to be supplied with this product, including without limitation: glass parts, glass containers, cutter/strainers, blades, seals, gaskets, clutches, motor brushes, and/or agitators, etc. Some...
... may not apply to assist you have model, series, and type numbers ready for commercial purposes, or any use not in the U.S. 840156401 nv04.qxd 11/7/07 1:39 PM Page 10 Warranty LIMITED WARRANTY This warranty applies to province. There is warranted to be supplied with this product, including without limitation: glass parts, glass containers, cutter/strainers, blades, seals, gaskets, clutches, motor brushes, and/or agitators, etc. Some...


