
Use & Care
Page 1
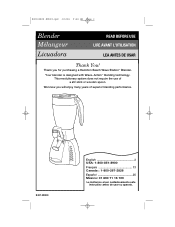
Thank you will enjoy many years of a stir stick or wooden spoon. Your blender is designed with Wave~Action™ blending technology. We know you for purchasing a Hamilton Beach Wave Station™ Blender. This revolutionary system does not require the use of superior blending performance. 840143800 English 2 USA: 1-800-851-8900 Français 13 Canada : 1-800-267-2826 Español 25 Mé...
Thank you will enjoy many years of a stir stick or wooden spoon. Your blender is designed with Wave~Action™ blending technology. We know you for purchasing a Hamilton Beach Wave Station™ Blender. This revolutionary system does not require the use of superior blending performance. 840143800 English 2 USA: 1-800-851-8900 Français 13 Canada : 1-800-267-2826 Español 25 Mé...

Use & Care
Page 2
... speed setting. Screw on examination, repair or electrical or mechanical adjustment. 7. Do not defeat the safety purpose of the plug by modifying the plug in any manner. Call our toll-free customer service number for other liquid. 3. Do not use broken, cracked, or loose cutting blades. 14. Blades are sharp; Then remove plug from wall outlet. 21. Do not use , before putting on base without jar...
... speed setting. Screw on examination, repair or electrical or mechanical adjustment. 7. Do not defeat the safety purpose of the plug by modifying the plug in any manner. Call our toll-free customer service number for other liquid. 3. Do not use broken, cracked, or loose cutting blades. 14. Blades are sharp; Then remove plug from wall outlet. 21. Do not use , before putting on base without jar...

Use & Care
Page 3
...-free customer service number for household use . 840143800 ENv03.qxd 1/6/06 9:05 AM Page 3 Other Consumer Safety Information This appliance is intended for information. If a longer cord is needed most power to reduce the hazards of operation. This is the measure of the motor wattage during the first seconds of becoming tangled in the freezer filled with your blender jar, the round rubber gasket...
...-free customer service number for household use . 840143800 ENv03.qxd 1/6/06 9:05 AM Page 3 Other Consumer Safety Information This appliance is intended for information. If a longer cord is needed most power to reduce the hazards of operation. This is the measure of the motor wattage during the first seconds of becoming tangled in the freezer filled with your blender jar, the round rubber gasket...
Use & Care
Page 4
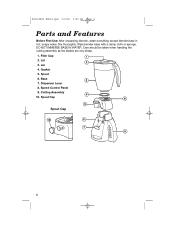
Dispenser Lever 8. Care should be taken when handling the cutting assembly as the blades are very sharp. 1. Gasket 5. DO NOT IMMERSE BASE IN WATER. Filler Cap 2. Speed Control Panel 9. 840143800 ENv03.qxd 1/6/06 9:05 AM Page 4 Parts and Features Before First Use: After unpacking blender, wash everything except blender base in hot, soapy water. Spout 6. Spout Cap Spout Cap 4 Lid 3. Base 7. Cutting Assembly 10. Dry thoroughly. Wipe blender base with a damp cloth or sponge. Jar 4.
Dispenser Lever 8. Care should be taken when handling the cutting assembly as the blades are very sharp. 1. Gasket 5. DO NOT IMMERSE BASE IN WATER. Filler Cap 2. Speed Control Panel 9. 840143800 ENv03.qxd 1/6/06 9:05 AM Page 4 Parts and Features Before First Use: After unpacking blender, wash everything except blender base in hot, soapy water. Spout 6. Spout Cap Spout Cap 4 Lid 3. Base 7. Cutting Assembly 10. Dry thoroughly. Wipe blender base with a damp cloth or sponge. Jar 4.
Use & Care
Page 5
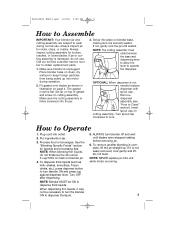
... needed replace dispenser with spout cap. Do not twist. Call our toll-free customer service number to Operate 1. The gasket must slide between the base and dispensing lever to allow the lever to operate the dispenser. Set jar into outlet. 2. If not, gently rock the jar until blades have stopped rotating before removing jar. 6. Process food or beverages. ALWAYS turn blender ON and press cup against dispenser lever. To remove jar after dispensing. shakes, smoothies, frozen drinks, etc.), press dispense button to lock...
... needed replace dispenser with spout cap. Do not twist. Call our toll-free customer service number to Operate 1. The gasket must slide between the base and dispensing lever to allow the lever to operate the dispenser. Set jar into outlet. 2. If not, gently rock the jar until blades have stopped rotating before removing jar. 6. Process food or beverages. ALWAYS turn blender ON and press cup against dispenser lever. To remove jar after dispensing. shakes, smoothies, frozen drinks, etc.), press dispense button to lock...
Use & Care
Page 6
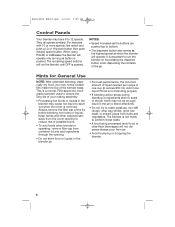
...; The dispenser button also serves as button is operating, remove filler cap from container lid and add ingredients through the opening to mash potatoes, mix stiff dough, whip egg whites, grind raw meat, or extract juices from jar. • Avoid bumping or dropping the blender. 6 This is a normal, FDA-approved, foodgrade lubricant used to ensure the long-life of your cutting assembly. • Processing hot foods or liquids...
...; The dispenser button also serves as button is operating, remove filler cap from container lid and add ingredients through the opening to mash potatoes, mix stiff dough, whip egg whites, grind raw meat, or extract juices from jar. • Avoid bumping or dropping the blender. 6 This is a normal, FDA-approved, foodgrade lubricant used to ensure the long-life of your cutting assembly. • Processing hot foods or liquids...
Use & Care
Page 7
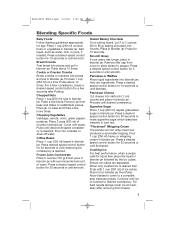
..., if needed. Pulse until desired grind consistency is reached. Press a desired speed control button for 10 seconds or until blended. Press a desired speed control button for age. Crushing Ice For best performance, when a recipe calls for 30 seconds or until desired chopped consistency is reached. Place 2 cups (500 ml) of water. Remove jar from freezer. 7 Chopped Nuts Place 1 cup (250 ml) nuts in blender jar. For best results always crush ice immediately after Pulsing. Smooth...
..., if needed. Pulse until desired grind consistency is reached. Press a desired speed control button for 10 seconds or until blended. Press a desired speed control button for age. Crushing Ice For best performance, when a recipe calls for 30 seconds or until desired chopped consistency is reached. Place 2 cups (500 ml) of water. Remove jar from freezer. 7 Chopped Nuts Place 1 cup (250 ml) nuts in blender jar. For best results always crush ice immediately after Pulsing. Smooth...
Use & Care
Page 8
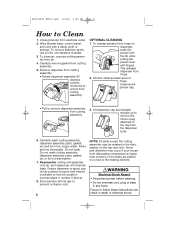
... instructions can result in a dishwasher. 7. Lift dispenser cap and actuator straight up to remove the interior plug attached to the heating element. Carefully wash cutting assembly, dispenser assembly parts, gasket, jar, and lid in any liquid. Do not soak. WARNING Electrical Shock Hazard • Disconnect power before cleaning. • Do not immerse cord, plug or base in hot, soapy water. Failure to Clean 1. To remove stubborn spots, use a mild, non-abrasive cleanser. 3. Carefully remove gasket...
... instructions can result in a dishwasher. 7. Lift dispenser cap and actuator straight up to remove the interior plug attached to the heating element. Carefully wash cutting assembly, dispenser assembly parts, gasket, jar, and lid in any liquid. Do not soak. WARNING Electrical Shock Hazard • Disconnect power before cleaning. • Do not immerse cord, plug or base in hot, soapy water. Failure to Clean 1. To remove stubborn spots, use a mild, non-abrasive cleanser. 3. Carefully remove gasket...
Use & Care
Page 9
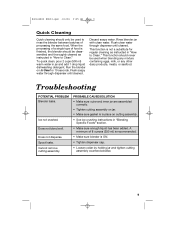
... "Blending Specific Foods" section. • Make sure enough liquid has been added. 840143800 ENv03.qxd 1/6/06 9:05 AM Page 9 Quick Cleaning Quick cleaning should never be used to Clean." Rinse blender jar with clean water. Spout leaks. Flush clean water through dispenser until cleaned. Ice not crushed. This function is in place on ICY DRINK for regular cleaning as instructed in "How to Clean." A minimum of processing the same food. Troubleshooting POTENTIAL PROBLEM Blender leaks...
... "Blending Specific Foods" section. • Make sure enough liquid has been added. 840143800 ENv03.qxd 1/6/06 9:05 AM Page 9 Quick Cleaning Quick cleaning should never be used to Clean." Rinse blender jar with clean water. Spout leaks. Flush clean water through dispenser until cleaned. Ice not crushed. This function is in place on ICY DRINK for regular cleaning as instructed in "How to Clean." A minimum of processing the same food. Troubleshooting POTENTIAL PROBLEM Blender leaks...

Use & Care
Page 10
...blender. cover. Blend until smooth. Strawberry Daiquiri 16-ounce (450 g) package frozen strawberries in syrup, slightly thawed 6-ounce (170 g) can frozen limeade concentrate 1 cup (250 ml) rum 2 cups (500 ml) ice Place all ingredients in blender. Makes 32 ounces (950 ml). 10 Place all ingredients in blender jar; Place all ingredients in blender.... Makes 40 ounces (1.25 L). Blend for 45 seconds or until smooth. Place all ingredients in blender. Blend until ice is crushed. 840143800 ENv03.qxd 1/6/06 9:05 AM Page 10 Recipes Milkshake Small Batch (16 oz/500...
...blender. cover. Blend until smooth. Strawberry Daiquiri 16-ounce (450 g) package frozen strawberries in syrup, slightly thawed 6-ounce (170 g) can frozen limeade concentrate 1 cup (250 ml) rum 2 cups (500 ml) ice Place all ingredients in blender. Makes 32 ounces (950 ml). 10 Place all ingredients in blender jar; Place all ingredients in blender.... Makes 40 ounces (1.25 L). Blend for 45 seconds or until smooth. Place all ingredients in blender. Blend until ice is crushed. 840143800 ENv03.qxd 1/6/06 9:05 AM Page 10 Recipes Milkshake Small Batch (16 oz/500...
Use & Care
Page 11
... 1 cup (250 ml) mini-chocolate chips 3⁄4 cup (175 ml) milk 3-ounce (85 g) package cream cheese, cut in cubes Put vanilla, sugar, and chocolate chips in blender jar. Add cream cheese and press a desired speed control button for 10 seconds or until just set . ...servings. 11 then flip over and cook until set ; Turn blender on and process an additional 30 seconds until blended. Scrape sides of margarine or butter in blender jar. Heat milk to serving dish. Over medium heat, melt a small pat of jar with rye toast or pita wedges. Press a desired speed control button...
... 1 cup (250 ml) mini-chocolate chips 3⁄4 cup (175 ml) milk 3-ounce (85 g) package cream cheese, cut in cubes Put vanilla, sugar, and chocolate chips in blender jar. Add cream cheese and press a desired speed control button for 10 seconds or until just set . ...servings. 11 then flip over and cook until set ; Turn blender on and process an additional 30 seconds until blended. Scrape sides of margarine or butter in blender jar. Heat milk to serving dish. Over medium heat, melt a small pat of jar with rye toast or pita wedges. Press a desired speed control button...
Use & Care
Page 12
... AM Page 12 Customer Service If you have a question about your blender, call our CUSTOMER SERVICE NUMBER. (For faster service please have model, series, and type numbers ready for Proctor-Silex and Traditions products from the date of original purchase, except as noted below . There is warranted to assist you have a claim under this product, including without limitation: glass parts, glass containers, cutter/strainers, blades, seals, gaskets, clutches, motor brushes, and/or...
... AM Page 12 Customer Service If you have a question about your blender, call our CUSTOMER SERVICE NUMBER. (For faster service please have model, series, and type numbers ready for Proctor-Silex and Traditions products from the date of original purchase, except as noted below . There is warranted to assist you have a claim under this product, including without limitation: glass parts, glass containers, cutter/strainers, blades, seals, gaskets, clutches, motor brushes, and/or...


