Use & Care
Page 2
... to replace the obsolete outlet. Unplug cord from outlet when not in use broken, cracked, or loose cutting blades. 14. Do not operate any appliance with moving blades accidentally become exposed. 18. Call our toll-free customer service number for information on jar retaining ring firmly. Keep hands and utensils out of jar while blending to reduce the risk of electrical shock, do not put cord, plug, base, or motor...
... to replace the obsolete outlet. Unplug cord from outlet when not in use broken, cracked, or loose cutting blades. 14. Do not operate any appliance with moving blades accidentally become exposed. 18. Call our toll-free customer service number for information on jar retaining ring firmly. Keep hands and utensils out of jar while blending to reduce the risk of electrical shock, do not put cord, plug, base, or motor...
Use & Care
Page 3
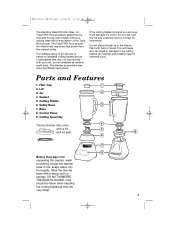
... blender jar in hot, soapy water. This will damage the motor. The blender as they are available as replacement parts. Call the toll-free customer service number for use . Gasket 5. Safety Base 7. Before First Use: After unpacking the blender, wash everything except the blender base in the freezer filled with food or liquid. The Type FP04 food processor attachment may not be taken when handling the cutting blades as provided may draw significantly less power. Cutting Assembly...
... blender jar in hot, soapy water. This will damage the motor. The blender as they are available as replacement parts. Call the toll-free customer service number for use . Gasket 5. Safety Base 7. Before First Use: After unpacking the blender, wash everything except the blender base in the freezer filled with food or liquid. The Type FP04 food processor attachment may not be taken when handling the cutting blades as provided may draw significantly less power. Cutting Assembly...
Use & Care
Page 4
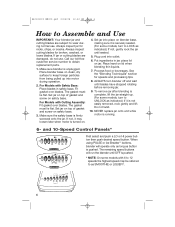
... blender until blades have stopped rotating before removing jar. 9. Fit gasket over blades. Plug cord into motor during normal use . The remaining speed buttons will operate only as long as indicated.) If not, gently rock the jar until seated. 5. Place hand on jar. Put ingredients in safety base. See the "Blending Techniques" section for speeds and processing tips. 8. ALWAYS turn to obtain replacement parts. 1. Process food or beverages. For Models with Safety Base: Place blades in jar; The gasket...
... blender until blades have stopped rotating before removing jar. 9. Fit gasket over blades. Plug cord into motor during normal use . The remaining speed buttons will operate only as long as indicated.) If not, gently rock the jar until seated. 5. Place hand on jar. Put ingredients in safety base. See the "Blending Techniques" section for speeds and processing tips. 8. ALWAYS turn to obtain replacement parts. 1. Process food or beverages. For Models with Safety Base: Place blades in jar; The gasket...
Use & Care
Page 5
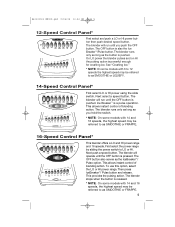
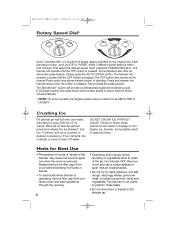
.... The blender will run until the OFF button is pushed. The blender will operate until the OFF button is pressed. This allows instant control of blending action. The OFF button also serves as the button is also the Ice Breaker™/Pulse button. To use this option, select the LO or HI power range. Next select a speed button. Ice Breaker™ is powerful enough for crushing ice. First select the power range...
.... The blender will run until the OFF button is pushed. The blender will operate until the OFF button is pressed. This allows instant control of blending action. The OFF button also serves as the button is also the Ice Breaker™/Pulse button. To use this option, select the LO or HI power range. Next select a speed button. Ice Breaker™ is powerful enough for crushing ice. First select the power range...
Use & Care
Page 6
... extract juices from container cover and add ingredients through the opening. 6 • If blending action stops during blending or ingredients stick to sides of the cover before it shuts off water. The blender will begin pulsing, then start slowly and increase speed to blend, before blending hot foods or liquids. • To add foods when blender is pressed. Place lid on pulse until the OFF button is operating, remove filler cap from fruits and...
... extract juices from container cover and add ingredients through the opening. 6 • If blending action stops during blending or ingredients stick to sides of the cover before it shuts off water. The blender will begin pulsing, then start slowly and increase speed to blend, before blending hot foods or liquids. • To add foods when blender is pressed. Place lid on pulse until the OFF button is operating, remove filler cap from fruits and...
Use & Care
Page 7
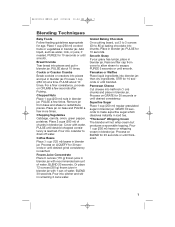
..., if needed. Chopped Nuts Place 1 cup (250 ml) nuts in blender jar. Remove jar from cover to allow steam to redistribute pieces. PULSE until desired chopped consistency is reached. Process on LIQUEFY for 10 seconds or until smooth. PUREE 5 seconds or until desired consistency. Superfine Sugar Place 1 cup (250 ml) regular granulated sugar in blender jar. Place 1 cup (250 ml) cooked fruits or vegetables in blender jar. BLEND 20 seconds...
..., if needed. Chopped Nuts Place 1 cup (250 ml) nuts in blender jar. Remove jar from cover to allow steam to redistribute pieces. PULSE until desired chopped consistency is reached. Process on LIQUEFY for 10 seconds or until smooth. PUREE 5 seconds or until desired consistency. Superfine Sugar Place 1 cup (250 ml) regular granulated sugar in blender jar. Place 1 cup (250 ml) cooked fruits or vegetables in blender jar. BLEND 20 seconds...
Use & Care
Page 8
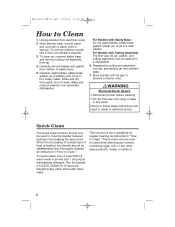
... remove stubborn spots, use a mild, non-abrasive cleanser. 3. When the processing of a single type of processing the same food. Rinse with Cutting Assembly: The filler cap, lid, jar, gasket, and cutting assembly may be used when blending any mixture containing eggs, milk, or any liquid. 840133000 ENv02.qxd 2/24/05 10:50 AM Page 8 How to follow these instructions can result in death or electrical shock. Unplug blender from...
... remove stubborn spots, use a mild, non-abrasive cleanser. 3. When the processing of a single type of processing the same food. Rinse with Cutting Assembly: The filler cap, lid, jar, gasket, and cutting assembly may be used when blending any mixture containing eggs, milk, or any liquid. 840133000 ENv02.qxd 2/24/05 10:50 AM Page 8 How to follow these instructions can result in death or electrical shock. Unplug blender from...

Use & Care
Page 9
... ingredients in blender jar; cover. cover. BLEND about 15 seconds or until desired consistency. PULSE on Ice Breaker 45 seconds or until desired consistency. Makes 36 ounces (1.125 L). BLEND 45 seconds or until shake is smooth. BLEND about 15 seconds or until desired consistency. Frothy Pineapple-Banana Smoothie 11.5-ounce (339 ml) can crushed pineapple 1 cup (250 ml) ice cubes 1 cup (250 ml...
... ingredients in blender jar; cover. cover. BLEND about 15 seconds or until desired consistency. PULSE on Ice Breaker 45 seconds or until desired consistency. Makes 36 ounces (1.125 L). BLEND 45 seconds or until shake is smooth. BLEND about 15 seconds or until desired consistency. Frothy Pineapple-Banana Smoothie 11.5-ounce (339 ml) can crushed pineapple 1 cup (250 ml) ice cubes 1 cup (250 ml...
Use & Care
Page 10
.... BLEND on Pulse or IceBreaker for 15 seconds or until smooth. Turn blender off. Yield: about 10 seconds. Chocolate Cream Mousse 1 teaspoon vanilla (5 ml) 2 tablespoons (30 ml) sugar 1 cup (250 ml) mini-chocolate chips 3⁄4 cup (175 ml) milk 3-ounce (85 g) package cream cheese, cut in cubes Put vanilla, sugar, and chocolate chips in blender jar. Cook until set ; Transfer...
.... BLEND on Pulse or IceBreaker for 15 seconds or until smooth. Turn blender off. Yield: about 10 seconds. Chocolate Cream Mousse 1 teaspoon vanilla (5 ml) 2 tablespoons (30 ml) sugar 1 cup (250 ml) mini-chocolate chips 3⁄4 cup (175 ml) milk 3-ounce (85 g) package cream cheese, cut in cubes Put vanilla, sugar, and chocolate chips in blender jar. Cook until set ; Transfer...

Use & Care
Page 11
... you. MODEL TYPE SERIES This warranty applies to the original consumer purchaser and does not cover a defect resulting from abuse, misuse, neglect, use not in material and workmanship for a period of three (3) years for Hamilton Beach products or one hundred eighty (180) days for commercial purposes, or any use for Proctor-Silex products from the date of your blender. or Canada. This warranty extends only...
... you. MODEL TYPE SERIES This warranty applies to the original consumer purchaser and does not cover a defect resulting from abuse, misuse, neglect, use not in material and workmanship for a period of three (3) years for Hamilton Beach products or one hundred eighty (180) days for commercial purposes, or any use for Proctor-Silex products from the date of your blender. or Canada. This warranty extends only...


