Use & Care
Page 2
... motor in place. 16. Screw on base without jar properly attached. 15. Unplug cord from wall outlet. 21. Call our toll-free customer service number for other liquid. 3. Do not use of injury to persons. 8. If the jar should always be used by the appliance manufacturer may push lid off parts, and before cleaning. 5. When blending hot liquids, remove center-piece of lid. Injury can result if moving parts. 6. Read all instructions...
... motor in place. 16. Screw on base without jar properly attached. 15. Unplug cord from wall outlet. 21. Call our toll-free customer service number for other liquid. 3. Do not use of injury to persons. 8. If the jar should always be used by the appliance manufacturer may push lid off parts, and before cleaning. 5. When blending hot liquids, remove center-piece of lid. Injury can result if moving parts. 6. Read all instructions...

Use & Care
Page 3
... plug in , or tripping over . Peak power is when a blender requires the most . This is the measure of the motor wattage during the first seconds of operation. Optional Accessory Hamilton Beach Stay or Go™ Personal Blending Jar (AC16) may be equal to remove it still does not fit, have an electrician replace the outlet. Use for household use only. Shock Hazard: This appliance has a polarized...
... plug in , or tripping over . Peak power is when a blender requires the most . This is the measure of the motor wattage during the first seconds of operation. Optional Accessory Hamilton Beach Stay or Go™ Personal Blending Jar (AC16) may be equal to remove it still does not fit, have an electrician replace the outlet. Use for household use only. Shock Hazard: This appliance has a polarized...
Use & Care
Page 4
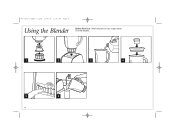
Dry thoroughly. 1 2 3 4 5 6 4 840163101 ENnv01.qxd 2/14/08 5:36 PM Page 4 Using the Blender Before First Use: Wash all parts in hot, soapy water.
Dry thoroughly. 1 2 3 4 5 6 4 840163101 ENnv01.qxd 2/14/08 5:36 PM Page 4 Using the Blender Before First Use: Wash all parts in hot, soapy water.
Use & Care
Page 5
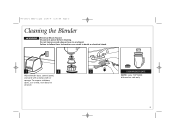
Disconnect power before cleaning. 840163101 ENnv01.qxd 2/14/08 5:36 PM Page 5 Cleaning the Blender w WARNING Electrical Shock Hazard. To remove stubborn spots, use a mild, non-abrasive cleanser. 3 DISHWASHER SAFE NOTE: Lid is TOP RACK dishwasher safe only. 5 Failure to follow these instructions can result in any liquid. Do not immerse cord, plug or base in death or electrical shock. 1 2 Wipe blender base, control panel, and cord with a damp cloth or sponge.
Disconnect power before cleaning. 840163101 ENnv01.qxd 2/14/08 5:36 PM Page 5 Cleaning the Blender w WARNING Electrical Shock Hazard. To remove stubborn spots, use a mild, non-abrasive cleanser. 3 DISHWASHER SAFE NOTE: Lid is TOP RACK dishwasher safe only. 5 Failure to follow these instructions can result in any liquid. Do not immerse cord, plug or base in death or electrical shock. 1 2 Wipe blender base, control panel, and cord with a damp cloth or sponge.
Use & Care
Page 6
... in blender jar followed by the ice cubes. When only crushed ice is operating, remove filler cap from freezer. Optional Accessories Hamilton Beach Stay or Go™ Personal Blending Jar (AC16) may be purchased separately and used with this appliance. 840163101 ENnv01.qxd 2/14/08 5:36 PM Page 6 Blending Tips Crushing Ice For best performance, when a recipe calls for liquid, place the liquid in the blender jar. Ensure ice cubes are separated. Place lid on blender jar then Pulse...
... in blender jar followed by the ice cubes. When only crushed ice is operating, remove filler cap from freezer. Optional Accessories Hamilton Beach Stay or Go™ Personal Blending Jar (AC16) may be purchased separately and used with this appliance. 840163101 ENnv01.qxd 2/14/08 5:36 PM Page 6 Blending Tips Crushing Ice For best performance, when a recipe calls for liquid, place the liquid in the blender jar. Ensure ice cubes are separated. Place lid on blender jar then Pulse...
Use & Care
Page 7
... too thick, continue to add liquid until mixture is recommended. • Do not try to desired consistency. • Loosen jar nut by holding jar and turning jar nut counterclockwise. • Place the blender jar on jar. • See ice crushing instructions in "Blending Tips" section. • Make sure enough liquid has been added. 840163101 ENnv01.qxd 2/14/08 5:36 PM Page 7 Troubleshooting PROBLEM Blender leaks. Cannot remove jar nut. Ice not crushed.
... too thick, continue to add liquid until mixture is recommended. • Do not try to desired consistency. • Loosen jar nut by holding jar and turning jar nut counterclockwise. • Place the blender jar on jar. • See ice crushing instructions in "Blending Tips" section. • Make sure enough liquid has been added. 840163101 ENnv01.qxd 2/14/08 5:36 PM Page 7 Troubleshooting PROBLEM Blender leaks. Cannot remove jar nut. Ice not crushed.
Use & Care
Page 8
... product, including without limitation: glass parts, glass containers, cutter/strainers, blades, seals, gaskets, clutches, motor brushes, and/or agitators, etc. During this period, we will repair or replace this warranty, DO NOT RETURN THE APPLIANCE TO THE STORE! This product is no warranty with the printed directions. or Canada. This warranty gives you specific legal rights, and you have model, series, and type numbers ready for operator to products purchased in conformity...
... product, including without limitation: glass parts, glass containers, cutter/strainers, blades, seals, gaskets, clutches, motor brushes, and/or agitators, etc. During this period, we will repair or replace this warranty, DO NOT RETURN THE APPLIANCE TO THE STORE! This product is no warranty with the printed directions. or Canada. This warranty gives you specific legal rights, and you have model, series, and type numbers ready for operator to products purchased in conformity...


