
Use And Care
Page 2
... use . When blending hot liquids, remove center piece of plug has one way. To disconnect cord, turn when the motor is operating. 20. Use for information. This type of two-piece cover. If you are sharp, handle carefully. 12. If a longer cord is not running. 11. The electrical rating of the extension cord must be taken to prevent possible burns. 2 17. Call the toll-free customer service number for food...
... use . When blending hot liquids, remove center piece of plug has one way. To disconnect cord, turn when the motor is operating. 20. Use for information. This type of two-piece cover. If you are sharp, handle carefully. 12. If a longer cord is not running. 11. The electrical rating of the extension cord must be taken to prevent possible burns. 2 17. Call the toll-free customer service number for food...
Use And Care
Page 3
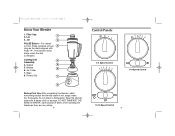
... everything except the blender base in dishwasher. Dry thoroughly. DO NOT IMMERSE THE BASE IN WATER. Blades 6. Pulse operates only as long as they are very sharp. 4 10-18 Speed Control 5 Gasket 5. Base 8. Do not place in hot, soapy water. Cutting Unit Assembly 4. For instant control. Wipe the blender base with Pulse "P". Care should be taken when handling the blades as the dial is released. Filler-Cap 2. Jar Collar 7. Jar PULSE Button - 840111200 ENv00...
... everything except the blender base in dishwasher. Dry thoroughly. DO NOT IMMERSE THE BASE IN WATER. Blades 6. Pulse operates only as long as they are very sharp. 4 10-18 Speed Control 5 Gasket 5. Base 8. Do not place in hot, soapy water. Cutting Unit Assembly 4. For instant control. Wipe the blender base with Pulse "P". Care should be taken when handling the blades as the dial is released. Filler-Cap 2. Jar Collar 7. Jar PULSE Button - 840111200 ENv00...

Use And Care
Page 4
... operation. 2. Do not twist. 10. Fit gasket over blades. Set jar into outlet. 7. Place hand on jar. 6. NEVER replace jar onto unit while motor is not easily removed, rock gently and lift. Put ingredients in retaining ring. To clean jar, unscrew jar collar and remove cutting unit assembly from electrical outlet. 2. Unplug blender from jar. 4. Do not soak. ALWAYS turn blender off and wait until seated. 5. Store blender with lid ajar to obtain replacement parts. 1. Contact an authorized service...
... operation. 2. Do not twist. 10. Fit gasket over blades. Set jar into outlet. 7. Place hand on jar. 6. NEVER replace jar onto unit while motor is not easily removed, rock gently and lift. Put ingredients in retaining ring. To clean jar, unscrew jar collar and remove cutting unit assembly from electrical outlet. 2. Unplug blender from jar. 4. Do not soak. ALWAYS turn blender off and wait until seated. 5. Store blender with lid ajar to obtain replacement parts. 1. Contact an authorized service...
Use And Care
Page 5
... the jar, turn blender OFF. Some states or provinces do not allow limitations on the bottom of your question much more quickly. If you . Please call our toll-free customer service number. Before calling, please note the model, type, and series numbers and fill in that information below . This information will repair or replace this product: glass parts, glass containers, cutter/strainer, blades, and/or agitators. This warranty gives you specific...
... the jar, turn blender OFF. Some states or provinces do not allow limitations on the bottom of your question much more quickly. If you . Please call our toll-free customer service number. Before calling, please note the model, type, and series numbers and fill in that information below . This information will repair or replace this product: glass parts, glass containers, cutter/strainer, blades, and/or agitators. This warranty gives you specific...


