
Operation Manual
Page 2
...: Do not fill blender jar beyond the 1 quart (1 liter) level. Keep exposed skin away from outlet when not in use a thin rubber spatula to repair or tighten cutter assembly. 20. Do not use immediately and replace cutter assembly. If cutter assembly blades are sharp. Do not use an adapter. 5. If blending action stops during blending. Not intended for use appliance for short periods of personal injury, unplug cord from lid. Disconnect power before putting on...
...: Do not fill blender jar beyond the 1 quart (1 liter) level. Keep exposed skin away from outlet when not in use a thin rubber spatula to repair or tighten cutter assembly. 20. Do not use immediately and replace cutter assembly. If cutter assembly blades are sharp. Do not use an adapter. 5. If blending action stops during blending. Not intended for use appliance for short periods of personal injury, unplug cord from lid. Disconnect power before putting on...

Operation Manual
Page 3
... put hands, spoons, or other injuries. Do not use an extension cord. Burn Hazard Always use , rinse with sanitizing solution. 3. Empty container. 2. We recommend keeping a replacement container and cutter on LOW speed for 2 minutes. Failure to follow these instructions can result in death or electrical shock. Fill container with sanitizing solution, replace lid and filler cap and run on HIGH speed for 2 minutes. 4. Stainless Steel container Cutter assembly (Rubber Clutch) Part Number 6126...
... put hands, spoons, or other injuries. Do not use an extension cord. Burn Hazard Always use , rinse with sanitizing solution. 3. Empty container. 2. We recommend keeping a replacement container and cutter on LOW speed for 2 minutes. Failure to follow these instructions can result in death or electrical shock. Fill container with sanitizing solution, replace lid and filler cap and run on HIGH speed for 2 minutes. 4. Stainless Steel container Cutter assembly (Rubber Clutch) Part Number 6126...
Operation Manual
Page 4
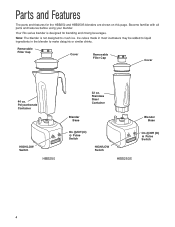
... familiar with all parts and features before using your blender. Stainless Steel Container Blender Base Blender Base On (I)/Off (O) Pulse Switch HIGH/LOW Switch HBB250S On (I)/Off (O) Pulse Switch 4 Parts and Features The parts and features for blending and mixing beverages. Note: The blender is designed for the HBB250 and HBB250S blenders are shown on this page. Polycarbonate Container HIGH/LOW Switch HBB250 32 oz. Removable Filler Cap Cover Removable Filler Cap Cover 44 oz.
... familiar with all parts and features before using your blender. Stainless Steel Container Blender Base Blender Base On (I)/Off (O) Pulse Switch HIGH/LOW Switch HBB250S On (I)/Off (O) Pulse Switch 4 Parts and Features The parts and features for blending and mixing beverages. Note: The blender is designed for the HBB250 and HBB250S blenders are shown on this page. Polycarbonate Container HIGH/LOW Switch HBB250 32 oz. Removable Filler Cap Cover Removable Filler Cap Cover 44 oz.
Operation Manual
Page 5
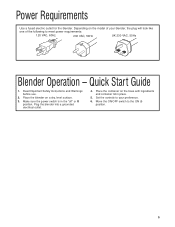
Place the blender on the model of your preference. 6. Place the container on the base with ingredients and container lid in the "off" or O position. Set the controls to the ON (I) position. 5 Power Requirements Use a fused electric outlet for the blender. Make sure the power switch is in place. 5. Quick Start Guide 1. Move the ON/OFF switch to your blender, the plug will look like...
Place the blender on the model of your preference. 6. Place the container on the base with ingredients and container lid in the "off" or O position. Set the controls to the ON (I) position. 5 Power Requirements Use a fused electric outlet for the blender. Make sure the power switch is in place. 5. Quick Start Guide 1. Move the ON/OFF switch to your blender, the plug will look like...

Operation Manual
Page 8
Removing the Old Cutter Assembly 1 2 3 4 5 6 8
Removing the Old Cutter Assembly 1 2 3 4 5 6 8
Operation Manual
Page 9
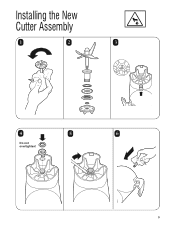
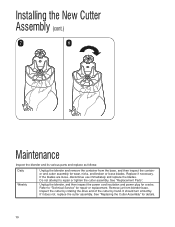
Installing the New Cutter Assembly 1 2 3 4 5 6 Do not overtighten! 9
Installing the New Cutter Assembly 1 2 3 4 5 6 Do not overtighten! 9
Operation Manual
Page 10
... Service" for wear, nicks, and broken or loose blades. See "Replacement Parts". Refer to repair or tighten the cutter assembly. Inspect the cutter by rotating the drive end of the cutter by hand. It should turn smoothly. If the blades are loose, discontinue use immediately and replace the blades. Unplug the blender, and then inspect the power cord insulation and power plug for details. 10 Remove jar from the base, and then inspect the container...
... Service" for wear, nicks, and broken or loose blades. See "Replacement Parts". Refer to repair or tighten the cutter assembly. Inspect the cutter by rotating the drive end of the cutter by hand. It should turn smoothly. If the blades are loose, discontinue use immediately and replace the blades. Unplug the blender, and then inspect the power cord insulation and power plug for details. 10 Remove jar from the base, and then inspect the container...
Operation Manual
Page 11
... state, or province to you have model, series, and type numbers ready for 15 minutes. Troubleshooting Guide Problem . . . Pieces should be free from abuse, misuse, neglect, unauthorized repair, or use this product in conformity with respect to parts subject to create a fluid blend. Product Warranty This Warranty supercedes all times. • Solid pieces are too large. This warranty gives you specific legal rights and you may also have...
... state, or province to you have model, series, and type numbers ready for 15 minutes. Troubleshooting Guide Problem . . . Pieces should be free from abuse, misuse, neglect, unauthorized repair, or use this product in conformity with respect to parts subject to create a fluid blend. Product Warranty This Warranty supercedes all times. • Solid pieces are too large. This warranty gives you specific legal rights and you may also have...


