Use & Care
Page 3
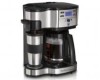
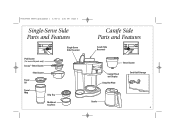
840199600 ENv05.qxd:Layout 1 2/18/11 2:01 PM Page 3 Single-Serve Side Parts and Features Pod Basket (for use with pods only) Scoop™ Brew Basket Filter Basket Travel Lid Travel Mug Drip Tray Multilevel Cup Rest Single-Serve Side Reservoir Carafe Side Parts and Features Carafe Side Reservoir Brew Basket Control Panel and Display Keep-Hot Plate Cord-Stuff Storage Carafe 3
840199600 ENv05.qxd:Layout 1 2/18/11 2:01 PM Page 3 Single-Serve Side Parts and Features Pod Basket (for use with pods only) Scoop™ Brew Basket Filter Basket Travel Lid Travel Mug Drip Tray Multilevel Cup Rest Single-Serve Side Reservoir Carafe Side Parts and Features Carafe Side Reservoir Brew Basket Control Panel and Display Keep-Hot Plate Cord-Stuff Storage Carafe 3

Use & Care
Page 4
... the travel mug with Senseo® Pods, available in place. w WARNING Burn Hazard. NOTES: • The unit will be brewed. • Fully insert mug or cup under filter basket. • This unit can be used with travel mug lid. To avoid contact with warm water 1 before brewing; OR 4 4 OR 5 OR TRAVEL...
... the travel mug with Senseo® Pods, available in place. w WARNING Burn Hazard. NOTES: • The unit will be brewed. • Fully insert mug or cup under filter basket. • This unit can be used with travel mug lid. To avoid contact with warm water 1 before brewing; OR 4 4 OR 5 OR TRAVEL...
Use & Care
Page 7
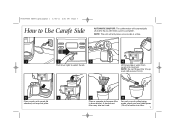
840199600 ENv05.qxd:Layout 1 2/18/11 2:01 PM Page 7 How to select Carafe. NOTE: Do not fill past the 12-cup mark (60 ounces [1.8 L]). 5 6 Place carafe, with carafe lid attached, on one level tablespoon (15 ml) of coffee into reservoir. Lift lid and pour water from ...carafe into filter. 7 A permanent filter may also be used. 8 For each cup of coffee being made, place one side at a time. 1 2 3 4 Push lever right to Use Carafe Side AUTOMATIC SHUTOFF: The coffeemaker will only brew on keep...
840199600 ENv05.qxd:Layout 1 2/18/11 2:01 PM Page 7 How to select Carafe. NOTE: Do not fill past the 12-cup mark (60 ounces [1.8 L]). 5 6 Place carafe, with carafe lid attached, on one level tablespoon (15 ml) of coffee into reservoir. Lift lid and pour water from ...carafe into filter. 7 A permanent filter may also be used. 8 For each cup of coffee being made, place one side at a time. 1 2 3 4 Push lever right to Use Carafe Side AUTOMATIC SHUTOFF: The coffeemaker will only brew on keep...
Use & Care
Page 9
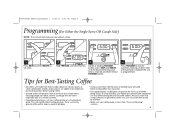
... is reached, and then release PROGRAM button. 4 Press PROGRAM to activate automatic brewing. Also, be aware that using coffee that is clean. Tips for each cup of grounds for Best-Tasting Coffee • All coffees are slightly more expensive, but tend to produce better-tasting coffee. • Ground coffee will become...
... is reached, and then release PROGRAM button. 4 Press PROGRAM to activate automatic brewing. Also, be aware that using coffee that is clean. Tips for each cup of grounds for Best-Tasting Coffee • All coffees are slightly more expensive, but tend to produce better-tasting coffee. • Ground coffee will become...

Use & Care
Page 10
Press I (ON) button. Press O (OFF) button when finished. 5 6 Run 2-3 more brew cycles with hard water). 1 2 3 Pour 1/2 cup (125 ml) of plain white vinegar and 1/2 cup (125 ml) of cold water into single-serve side reservoir. 4 Press I (ON) button. Allow to cool between cycles. 10 DISHWASHER-SAFE Single-Serve Side All coffeemakers should be cleaned at least once a month (once a week for areas with CLEAN WATER only. 840199600 ENv05.qxd:Layout 1 2/18/11 2:01 PM Page 10 Care and Cleaning - Press O (OFF) button after 30 seconds and wait 30 minutes.
Press I (ON) button. Press O (OFF) button when finished. 5 6 Run 2-3 more brew cycles with hard water). 1 2 3 Pour 1/2 cup (125 ml) of plain white vinegar and 1/2 cup (125 ml) of cold water into single-serve side reservoir. 4 Press I (ON) button. Allow to cool between cycles. 10 DISHWASHER-SAFE Single-Serve Side All coffeemakers should be cleaned at least once a month (once a week for areas with CLEAN WATER only. 840199600 ENv05.qxd:Layout 1 2/18/11 2:01 PM Page 10 Care and Cleaning - Press O (OFF) button after 30 seconds and wait 30 minutes.

Use & Care
Page 11
840199600 ENv05.qxd:Layout 1 2/18/11 2:01 PM Page 11 Care and Cleaning - Allow to cool between cycles. 3 4 Press I (ON) button. Carafe Side All coffeemakers should be cleaned at least once a month (once a week for areas with hard water). 1 2 Pour 1 pint (2 cups/500 ml) vinegar into carafe side reservoir. 5 6 Run 2-3 more brew cycles with CLEAN WATER only. Press I (ON) button. Press O (OFF) button after 30 seconds and wait 30 minutes. DISHWASHER-SAFE 11 Press O (OFF) button when finished.
840199600 ENv05.qxd:Layout 1 2/18/11 2:01 PM Page 11 Care and Cleaning - Allow to cool between cycles. 3 4 Press I (ON) button. Carafe Side All coffeemakers should be cleaned at least once a month (once a week for areas with hard water). 1 2 Pour 1 pint (2 cups/500 ml) vinegar into carafe side reservoir. 5 6 Run 2-3 more brew cycles with CLEAN WATER only. Press I (ON) button. Press O (OFF) button after 30 seconds and wait 30 minutes. DISHWASHER-SAFE 11 Press O (OFF) button when finished.
Use & Care
Page 14
... the hardness of your coffeemaker. then plug the unit back in. • Clock requires reset after power outage. • Mineral deposits can build up in cup. NOTE: Do not disassemble the unit. 14 See "Care and Cleaning - 840199600 ENv05.qxd:Layout 1 2/18/11 2:01 PM Page 14 Troubleshooting (Carafe Side) (cont...
... the hardness of your coffeemaker. then plug the unit back in. • Clock requires reset after power outage. • Mineral deposits can build up in cup. NOTE: Do not disassemble the unit. 14 See "Care and Cleaning - 840199600 ENv05.qxd:Layout 1 2/18/11 2:01 PM Page 14 Troubleshooting (Carafe Side) (cont...


