Use And Care
Page 1
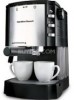
840112600 Ev00.qxd 7/16/03 1:55 PM Page 1 Cappuccino Plus™ Espresso and Cappuccino Maker Thank you enjoy it! 840112600 Important Safeguards 2 Parts & Features 3 Using Your Espresso Maker ........ 4 To Steam and Froth Milk 7 Recipes 7 Cleaning Your Espresso Maker.... 8 Troubleshooting 8 Customer Service 10 In USA: 1-800-851-8900 In Canada: 1-800-267-2826 We hope you for buying the Hamilton Beach Cappuccino Plus™. You have made an excellent choice! All of our products are manufactured to the highest level of quality and performance specifications.
840112600 Ev00.qxd 7/16/03 1:55 PM Page 1 Cappuccino Plus™ Espresso and Cappuccino Maker Thank you enjoy it! 840112600 Important Safeguards 2 Parts & Features 3 Using Your Espresso Maker ........ 4 To Steam and Froth Milk 7 Recipes 7 Cleaning Your Espresso Maker.... 8 Troubleshooting 8 Customer Service 10 In USA: 1-800-851-8900 In Canada: 1-800-267-2826 We hope you for buying the Hamilton Beach Cappuccino Plus™. You have made an excellent choice! All of our products are manufactured to the highest level of quality and performance specifications.

Use And Care
Page 2
... one way. The electrical rating of the espresso maker. Care must be pulled on or near children. 5. Close supervision is necessary when any appliance with a damaged cord or plug, or after the appliance malfunctions or is intended for household use of accessory attachments not recommended by Hamilton Beach/Proctor-Silex, Inc. Appliance must be...
... one way. The electrical rating of the espresso maker. Care must be pulled on or near children. 5. Close supervision is necessary when any appliance with a damaged cord or plug, or after the appliance malfunctions or is intended for household use of accessory attachments not recommended by Hamilton Beach/Proctor-Silex, Inc. Appliance must be...
Use And Care
Page 3
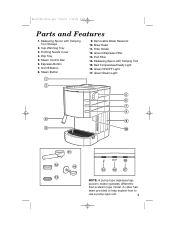
Cup Warming Tray 3. Steam Button 9. Green ON/OFF Light 17. puccino maker operates differently than a steam-type model. A video has been provided to help explain how to use a pump-type unit. 3 On/Off Button 8. Filter ... Tamping Tool Storage 2. Frothing Nozzle Cover 4. Drip Tray 5. Removable Water Reservoir 10. Red Temperature/Ready Light 16. Brew Head 11. Ground Espresso Filter 13. Green Steam Light NOTE: A pump-type espresso/cap- Espresso Button 7. Measuring Spoon with Tamping Tool 15. 840112600 Ev00.qxd 7/16/03 1:55 PM Page 3 Parts and Features 1.
Cup Warming Tray 3. Steam Button 9. Green ON/OFF Light 17. puccino maker operates differently than a steam-type model. A video has been provided to help explain how to use a pump-type unit. 3 On/Off Button 8. Filter ... Tamping Tool Storage 2. Frothing Nozzle Cover 4. Drip Tray 5. Removable Water Reservoir 10. Red Temperature/Ready Light 16. Brew Head 11. Ground Espresso Filter 13. Green Steam Light NOTE: A pump-type espresso/cap- Espresso Button 7. Measuring Spoon with Tamping Tool 15. 840112600 Ev00.qxd 7/16/03 1:55 PM Page 3 Parts and Features 1.
Use And Care
Page 4
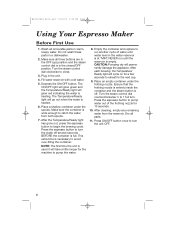
... 8. Plug in the water reservoir is used it will permanently damage the appliance. Place a shallow container under the frothing nozzle. Press the espresso button to catch the water from the reservoir. NOTE: The first time the unit is at "MIN". Turn the steam control dial counterclockwise 3&#...nozzle is entirely inside the container and the steam button is heated. 6. 840112600 Ev00.qxd 7/16/03 1:55 PM Page 4 Using Your Espresso Maker Before First Use 1. Empty the container and replace to begin the brewing cycle. Place an empty container under the spouts. After cleaning, empty...
... 8. Plug in the water reservoir is used it will permanently damage the appliance. Place a shallow container under the frothing nozzle. Press the espresso button to catch the water from the reservoir. NOTE: The first time the unit is at "MIN". Turn the steam control dial counterclockwise 3&#...nozzle is entirely inside the container and the steam button is heated. 6. 840112600 Ev00.qxd 7/16/03 1:55 PM Page 4 Using Your Espresso Maker Before First Use 1. Empty the container and replace to begin the brewing cycle. Place an empty container under the spouts. After cleaning, empty...
Use And Care
Page 5
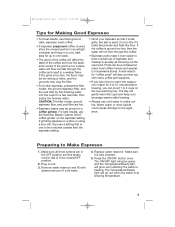
...a great cup of espresso and cleanup is as easy as throwing out the used pod. Preparing to the appliance. The ON/OFF light will glow green and the Temperature/Ready light will not flow through the coffee and result in a store or using a burr mill, then use the Hamilton Beach Custom Grind™... • Always use cold water to 2 cups on the espresso setting. If the coffee is ground too fine, then the water will glow red indicating the water is at many coffee pod suppliers. • If you have time to warm the cappuccino maker for a few seconds, then empty the brewed water. For best...
...a great cup of espresso and cleanup is as easy as throwing out the used pod. Preparing to the appliance. The ON/OFF light will glow green and the Temperature/Ready light will not flow through the coffee and result in a store or using a burr mill, then use the Hamilton Beach Custom Grind™... • Always use cold water to 2 cups on the espresso setting. If the coffee is ground too fine, then the water will glow red indicating the water is at many coffee pod suppliers. • If you have time to warm the cappuccino maker for a few seconds, then empty the brewed water. For best...
Use And Care
Page 6
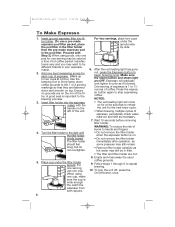
... light will gradually look lighter in color as hot water may want to reheat the unit for a few seconds to try different brands in your espresso maker. 2. Empty and rinse away the used at a time.) Use the tamping tool to firmly tamp down and smooth on . • Do not remove the... the filter. Follow steps 1 through 6 to the brewing process. 3. Ensure no grounds are OFF. 840112600 Ev00.qxd 7/16/03 1:55 PM Page 6 To Make Espresso 1. Insert ground espresso filter into the espresso maker with Step 3.) When using one cup. Proceed with the handle on the rim of the unit. 4.
... light will gradually look lighter in color as hot water may want to reheat the unit for a few seconds to try different brands in your espresso maker. 2. Empty and rinse away the used at a time.) Use the tamping tool to firmly tamp down and smooth on . • Do not remove the... the filter. Follow steps 1 through 6 to the brewing process. 3. Ensure no grounds are OFF. 840112600 Ev00.qxd 7/16/03 1:55 PM Page 6 To Make Espresso 1. Insert ground espresso filter into the espresso maker with Step 3.) When using one cup. Proceed with the handle on the rim of the unit. 4.
Use And Care
Page 7
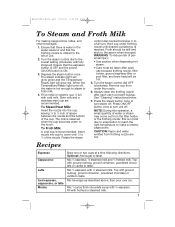
...glow green and the Temperature/ Ready light will be stiff and stick to prevent buildup. See "Cleaning" instructions below. 7. Recipes Espresso Cappuccino Latte Iced espresso, cappuccino, or latte Mocha Brew one or two cups at a time following directions. CAUTION: Vapor and water emitted from under frothing ...16/03 1:55 PM Page 7 To Steam and Froth Milk For making cappuccinos, lattes, and other beverages. 1. Always clean the frothing nozzle after each use because frothing nozzle, filter holder, ground espresso filter or pod filter, and brew head will glow red. Ensure that the...
...glow green and the Temperature/ Ready light will be stiff and stick to prevent buildup. See "Cleaning" instructions below. 7. Recipes Espresso Cappuccino Latte Iced espresso, cappuccino, or latte Mocha Brew one or two cups at a time following directions. CAUTION: Vapor and water emitted from under frothing ...16/03 1:55 PM Page 7 To Steam and Froth Milk For making cappuccinos, lattes, and other beverages. 1. Always clean the frothing nozzle after each use because frothing nozzle, filter holder, ground espresso filter or pod filter, and brew head will glow red. Ensure that the...
Use And Care
Page 8
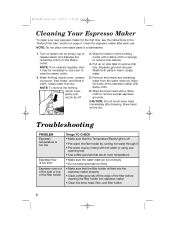
... grid and drip pan. CAUTION: Do not touch brew head immediately after each use a pin to use . Wipe the exterior of the espresso maker with hot water or using cup warming tray • Use coffee grounds that are at room temperature • Make sure the water reservoir is... firmly • Make sure that the Temperature/Ready light is fitted into the espresso maker properly • Clean coffee grounds off . 3. 840112600 Ev00.qxd 7/16/03 1:55 PM Page 8 Cleaning Your Espresso Maker To clean your new espresso maker for the first time, see the instructions in warm, soapy water. 5. Wash...
... grid and drip pan. CAUTION: Do not touch brew head immediately after each use a pin to use . Wipe the exterior of the espresso maker with hot water or using cup warming tray • Use coffee grounds that are at room temperature • Make sure the water reservoir is... firmly • Make sure that the Temperature/Ready light is fitted into the espresso maker properly • Clean coffee grounds off . 3. 840112600 Ev00.qxd 7/16/03 1:55 PM Page 8 Cleaning Your Espresso Maker To clean your new espresso maker for the first time, see the instructions in warm, soapy water. 5. Wash...
Use And Care
Page 9
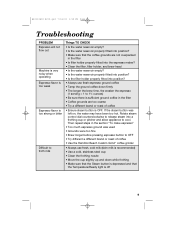
... and that the coffee grounds are too coarse • Try a different brand or roast of coffee • Use the Hamilton Beach Custom Grind™ coffee grinder • Always use fresh espresso ground coffee • Tamp the ground coffee down firmly • The longer the brew time, the weaker the... was left on, the water may have been too hot. Then repeat steps in the filter • Is filter holder properly fitted into the espresso maker? • Clean the filter, filter holder, and brew head • Is the water reservoir empty? • Is the water reservoir properly fitted into...
... and that the coffee grounds are too coarse • Try a different brand or roast of coffee • Use the Hamilton Beach Custom Grind™ coffee grinder • Always use fresh espresso ground coffee • Tamp the ground coffee down firmly • The longer the brew time, the weaker the... was left on, the water may have been too hot. Then repeat steps in the filter • Is filter holder properly fitted into the espresso maker? • Clean the filter, filter holder, and brew head • Is the water reservoir empty? • Is the water reservoir properly fitted into...
Use And Care
Page 10
...have other legal rights which may also have a claim under this period, we will help us answer your question much more quickly. HAMILTON BEACH PROCTOR-SILEX, INC. This information will repair or replace this product: glass parts, glass containers, cutter/strainer, blades, and/or... your espresso maker. This warranty extends only to assist you have model, series, and type numbers ready for operator to the original consumer purchaser and does not cover a defect resulting from the date of two (2) years for Hamilton Beach Portfolio products or one (1) year for Hamilton Beach products ...
...have other legal rights which may also have a claim under this period, we will help us answer your question much more quickly. HAMILTON BEACH PROCTOR-SILEX, INC. This information will repair or replace this product: glass parts, glass containers, cutter/strainer, blades, and/or... your espresso maker. This warranty extends only to assist you have model, series, and type numbers ready for operator to the original consumer purchaser and does not cover a defect resulting from the date of two (2) years for Hamilton Beach Portfolio products or one (1) year for Hamilton Beach products ...


