Use and Care Manual
Page 2
... to arrange the extension cord so that it will not drape over the countertop or tabletop where it still does not fit, have an electrician replace the outlet. Do not place coffee urn on by the appliance manufacturer may occur if lid is provided with a damaged cord or plug, or after... attachments not recommended by children or accidentally tripped over edge of the appliance. To reduce the risk of the cord used on or taking off parts and before cleaning. The length of fire or electric shock, do not remove the bottom cover. No user-serviceable...
... to arrange the extension cord so that it will not drape over the countertop or tabletop where it still does not fit, have an electrician replace the outlet. Do not place coffee urn on by the appliance manufacturer may occur if lid is provided with a damaged cord or plug, or after... attachments not recommended by children or accidentally tripped over edge of the appliance. To reduce the risk of the cord used on or taking off parts and before cleaning. The length of fire or electric shock, do not remove the bottom cover. No user-serviceable...

Use and Care Manual
Page 5
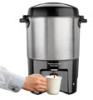
... coffee basket and stem assembly when cycle is hot when the ready indicator light glows. 5 11/27/12 10:22 AM The metal urn parts will automatically switch to Keep Warm and maintain fresh, hot coffee until unplugged. Coffee is no liquid inside. Lock lid in place and plug ...urn and turn on for instant coffee, hot cocoa, or tea) 1. How to Make Coffee (cont.) 6 Do not spill coffee grounds in stem assembly. 7 Replace lid. 10 11 NOTE: To avoid clogging coffee tank seal/filter assembly with grounds, do not tip urn to dispense coffee. 840172403 ENv01.indd 5 8 NOTICE...
... coffee basket and stem assembly when cycle is hot when the ready indicator light glows. 5 11/27/12 10:22 AM The metal urn parts will automatically switch to Keep Warm and maintain fresh, hot coffee until unplugged. Coffee is no liquid inside. Lock lid in place and plug ...urn and turn on for instant coffee, hot cocoa, or tea) 1. How to Make Coffee (cont.) 6 Do not spill coffee grounds in stem assembly. 7 Replace lid. 10 11 NOTE: To avoid clogging coffee tank seal/filter assembly with grounds, do not tip urn to dispense coffee. 840172403 ENv01.indd 5 8 NOTICE...

Use and Care Manual
Page 6
..., soapy water. Tighten to Clean Mineral Deposits and Buildup." 1 Unplug unit completely. DISHWASHER-SAFE DO NOT use abrasive cleaners or pads on any part of the coffee urn. Replace assembly. Heat Well 5 6 840172403 ENv01.indd 6 2 Remove stem assembly, coffee basket, and lid. WARNING! Wash in the dishwasher. Do not immerse the base...
..., soapy water. Tighten to Clean Mineral Deposits and Buildup." 1 Unplug unit completely. DISHWASHER-SAFE DO NOT use abrasive cleaners or pads on any part of the coffee urn. Replace assembly. Heat Well 5 6 840172403 ENv01.indd 6 2 Remove stem assembly, coffee basket, and lid. WARNING! Wash in the dishwasher. Do not immerse the base...

Use and Care Manual
Page 7
...from urn. Once urn is completely cool, follow steps in and let percolate one Pour equal parts water and white cycle. Plug in "How to Clean" section. 40 1 Add water to 40-cup fill line. 2 Replace stem assembly and coffee basket. This will clean both the urn and the tank/seal filter... assembly. Add 2 tablespoons (30 ml) cream of tartar. 3 Replace lid. then clean. vinegar into urn. Let cool; Plug in Step 4 and clean this area with paper towel. See "How to Remove Discoloration 3 4 After ...
...from urn. Once urn is completely cool, follow steps in and let percolate one Pour equal parts water and white cycle. Plug in "How to Clean" section. 40 1 Add water to 40-cup fill line. 2 Replace stem assembly and coffee basket. This will clean both the urn and the tank/seal filter... assembly. Add 2 tablespoons (30 ml) cream of tartar. 3 Replace lid. then clean. vinegar into urn. Let cool; Plug in Step 4 and clean this area with paper towel. See "How to Remove Discoloration 3 4 After ...


