Use and Care Manual
Page 2
... Do not operate any way or by the appliance manufacturer may result in water or other than the rating of the appliance. Do not place coffee urn on examination, repair, or adjustment. 8. Care must be taken to persons, do not remove the bottom cover. IMPORTANT SAFEGUARDS When using an ...this appliance was selected to reduce the risk of electric shock. Repair should be equal to persons, including the following: 1. To disconnect coffee urn, remove plug from the edge of the grounding type, the extension cord should be used on or taking off parts and before cleaning...
... Do not operate any way or by the appliance manufacturer may result in water or other than the rating of the appliance. Do not place coffee urn on examination, repair, or adjustment. 8. Care must be taken to persons, do not remove the bottom cover. IMPORTANT SAFEGUARDS When using an ...this appliance was selected to reduce the risk of electric shock. Repair should be equal to persons, including the following: 1. To disconnect coffee urn, remove plug from the edge of the grounding type, the extension cord should be used on or taking off parts and before cleaning...

Use and Care Manual
Page 4
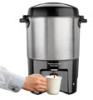
... 10 cups. How to overflow and result in grounds in the coffee. 11/27/12 10:21 AM Do not fill urn above fill line. 3 Wet coffee basket (to desired water level. NOTE: We recommend using a coffee grinder and whole beans, percolator coffee should be a coarse grind. NOTE: For best results, always... use in center or urn may cause the basket to Make Coffee BEFORE FIRST USE: Clean the urn by following the steps in "How To Clean." If using coffee that has been ground specifically for your urn size. You must brew a minimum of Ground Coffee* 40 cups 2-21⁄2 cups 30...
... 10 cups. How to overflow and result in grounds in the coffee. 11/27/12 10:21 AM Do not fill urn above fill line. 3 Wet coffee basket (to desired water level. NOTE: We recommend using a coffee grinder and whole beans, percolator coffee should be a coarse grind. NOTE: For best results, always... use in center or urn may cause the basket to Make Coffee BEFORE FIRST USE: Clean the urn by following the steps in "How To Clean." If using coffee that has been ground specifically for your urn size. You must brew a minimum of Ground Coffee* 40 cups 2-21⁄2 cups 30...

Use and Care Manual
Page 5
...the ready indicator light glows. 5 11/27/12 10:22 AM Fill urn with grounds, do not tip urn to 60 minutes, depending on amount of the coffee. Place lid onto coffee urn and turn on for 20 to dispense coffee. 840172403 ENv01.indd 5 8 NOTICE: To avoid damage, do not plug ...in unit; Place stem assembly and coffee basket into heating unit well. 3. Burn Hazard. The metal urn parts will automatically switch to serve...
...the ready indicator light glows. 5 11/27/12 10:22 AM Fill urn with grounds, do not tip urn to 60 minutes, depending on amount of the coffee. Place lid onto coffee urn and turn on for 20 to dispense coffee. 840172403 ENv01.indd 5 8 NOTICE: To avoid damage, do not plug ...in unit; Place stem assembly and coffee basket into heating unit well. 3. Burn Hazard. The metal urn parts will automatically switch to serve...

Use and Care Manual
Page 6
... tank. Replace assembly. STORAGE Turn lid upside down and place in water. Do not immerse the base or tank in urn for storage. 11/27/12 10:22 AM Periodically clean coffee urn with warm, soapy water. 4 NOTICE: To avoid damage to Clean Mineral Deposits and Buildup." 1 Unplug unit completely. See...use the "SANI" setting when washing in warm, soapy water. The metal urn parts will be hot. Wash in the dishwasher. To ensure proper operation, periodically scrub the heat well located at the bottom of the coffee urn. DISHWASHER-SAFE DO NOT use abrasive cleaners or pads on any part of...
... tank. Replace assembly. STORAGE Turn lid upside down and place in water. Do not immerse the base or tank in urn for storage. 11/27/12 10:22 AM Periodically clean coffee urn with warm, soapy water. 4 NOTICE: To avoid damage to Clean Mineral Deposits and Buildup." 1 Unplug unit completely. See...use the "SANI" setting when washing in warm, soapy water. The metal urn parts will be hot. Wash in the dishwasher. To ensure proper operation, periodically scrub the heat well located at the bottom of the coffee urn. DISHWASHER-SAFE DO NOT use abrasive cleaners or pads on any part of...

Use and Care Manual
Page 7
...white cycle. Let cool; How to Clean Mineral Deposits and Buildup Clean urn every 15 to 20 cycles to Remove Discoloration 3 4 After one cycle, let sit 15 minutes. Drain liquid from urn using hard water. 1 2 Remove coffee basket and lid. See "How to 40-cup fill line. 2 ...Replace stem assembly and coffee basket. Add 2 tablespoons (30 ml) cream of tartar. 3 Replace lid. Plug in "...
...white cycle. Let cool; How to Clean Mineral Deposits and Buildup Clean urn every 15 to 20 cycles to Remove Discoloration 3 4 After one cycle, let sit 15 minutes. Drain liquid from urn using hard water. 1 2 Remove coffee basket and lid. See "How to 40-cup fill line. 2 ...Replace stem assembly and coffee basket. Add 2 tablespoons (30 ml) cream of tartar. 3 Replace lid. Plug in "...

Use and Care Manual
Page 8
... is tight. • Mineral deposits have built up. Clean the urn following instructions in "How to Clean Mineral Deposits and Buildup." 8 840172403 ENv01.indd 8 11/27/12 10:24 AM Unplug and then plug the unit back in coffee tank dispensing mechanism under coffee tank seal/ filter assembly. PROBABLE CAUSE • Residue trapped...
... is tight. • Mineral deposits have built up. Clean the urn following instructions in "How to Clean Mineral Deposits and Buildup." 8 840172403 ENv01.indd 8 11/27/12 10:24 AM Unplug and then plug the unit back in coffee tank dispensing mechanism under coffee tank seal/ filter assembly. PROBABLE CAUSE • Residue trapped...


