Use and Care Manual
Page 2
Read all instructions. 2. To protect against fire, electric shock, and injury to cool before putting on or taking off parts and before cleaning. Close supervision is necessary when any way or by modifying the plug in or tripping over the countertop or tabletop where it still does not ... from wall outlet. 11. Coffee urn must be followed to reduce the hazards of the appliance. Do not operate any manner. The use and before cleaning the appliance. 6. Do not use . Do not let cord hang over . Be certain lid is dropped or damaged in use of the plug by using...
Read all instructions. 2. To protect against fire, electric shock, and injury to cool before putting on or taking off parts and before cleaning. Close supervision is necessary when any way or by modifying the plug in or tripping over the countertop or tabletop where it still does not ... from wall outlet. 11. Coffee urn must be followed to reduce the hazards of the appliance. Do not operate any manner. The use and before cleaning the appliance. 6. Do not use . Do not let cord hang over . Be certain lid is dropped or damaged in use of the plug by using...

Use and Care Manual
Page 3
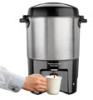
Parts and Features Lid Locking Tabs Coffee Basket Coffee Tank Seal/Filter Assembly Figure 1 Handles Stem Assembly Heat Well Base 840172403 ENv01.indd 3 Tank Coffee Tank Seal/ Filter Assembly (see inset) Coffee Dispensing Bar Ready Indicator Light (located inside tank) Figure 2 (removable for cleaning) 3 11/27/12 10:21 AM
Parts and Features Lid Locking Tabs Coffee Basket Coffee Tank Seal/Filter Assembly Figure 1 Handles Stem Assembly Heat Well Base 840172403 ENv01.indd 3 Tank Coffee Tank Seal/ Filter Assembly (see inset) Coffee Dispensing Bar Ready Indicator Light (located inside tank) Figure 2 (removable for cleaning) 3 11/27/12 10:21 AM

Use and Care Manual
Page 4
... urn by following the steps in a percolatortype coffeemaker. NOTE: For best results, always use in "How To Clean." You must brew a minimum of Ground Coffee* 40 cups 2-21⁄2 cups 30 cups 13⁄4-2 cups 20 cups 1-13⁄4 cups 10 cups 1⁄2 ...
... urn by following the steps in a percolatortype coffeemaker. NOTE: For best results, always use in "How To Clean." You must brew a minimum of Ground Coffee* 40 cups 2-21⁄2 cups 30 cups 13⁄4-2 cups 20 cups 1-13⁄4 cups 10 cups 1⁄2 ...

Use and Care Manual
Page 6
Periodically clean coffee urn with warm, soapy water. 4 NOTICE: To avoid damage to the urn, do not use the "SANI" setting when washing in urn for storage. ... leaking coffee. WARNING! "SANI" cycle temperatures could damage your product. Tighten to Clean Mineral Deposits and Buildup." 1 Unplug unit completely. Wash in water. How to remove the lid. 3 Clean inside tank. Replace assembly. Use a pot holder or oven mitt to Clean w WARNING Electrical Shock Hazard. Heat Well 5 6 840172403 ENv01.indd 6 2 Remove stem assembly...
Periodically clean coffee urn with warm, soapy water. 4 NOTICE: To avoid damage to the urn, do not use the "SANI" setting when washing in urn for storage. ... leaking coffee. WARNING! "SANI" cycle temperatures could damage your product. Tighten to Clean Mineral Deposits and Buildup." 1 Unplug unit completely. Wash in water. How to remove the lid. 3 Clean inside tank. Replace assembly. Use a pot holder or oven mitt to Clean w WARNING Electrical Shock Hazard. Heat Well 5 6 840172403 ENv01.indd 6 2 Remove stem assembly...

Use and Care Manual
Page 7
Remove assembly as shown in "How to Clean" section. 40 1 Add water to Remove Discoloration 3 4 After one cycle, unplug and let sit 15 minutes. ... Plug in and let percolate one Pour equal parts water and white cycle. How to Clean Mineral Deposits and Buildup Clean urn every 15 to 20 cycles to Clean" section. 7 11/27/12 10:23 AM vinegar into urn. How to 40-...more frequently if using coffee dispensing bar. For best results, drain liquid from urn. then clean. This will clean both the urn and the tank/seal filter assembly. Once urn is completely cool, follow steps in Step 4...
Remove assembly as shown in "How to Clean" section. 40 1 Add water to Remove Discoloration 3 4 After one cycle, unplug and let sit 15 minutes. ... Plug in and let percolate one Pour equal parts water and white cycle. How to Clean Mineral Deposits and Buildup Clean urn every 15 to 20 cycles to Clean" section. 7 11/27/12 10:23 AM vinegar into urn. How to 40-...more frequently if using coffee dispensing bar. For best results, drain liquid from urn. then clean. This will clean both the urn and the tank/seal filter assembly. Once urn is completely cool, follow steps in Step 4...

Use and Care Manual
Page 8
...Buildup." 8 840172403 ENv01.indd 8 11/27/12 10:24 AM Unplug and then plug the unit back in "How to Clean." • Remove tank seal/filter assembly for cleaning. • Make sure tank seal/filter assembly is unplugged. • Power outage. • Power surge. Remove tank .... See "How to dispense. Troubleshooting PROBLEM Coffee leaks from stem assembly. • Residue causing buildup around tank seal/filter assembly. See "How to Clean." • Water tank is empty. • Unit is tight. • Mineral deposits have built up. PROBABLE CAUSE • Residue trapped in ...
...Buildup." 8 840172403 ENv01.indd 8 11/27/12 10:24 AM Unplug and then plug the unit back in "How to Clean." • Remove tank seal/filter assembly for cleaning. • Make sure tank seal/filter assembly is unplugged. • Power outage. • Power surge. Remove tank .... See "How to dispense. Troubleshooting PROBLEM Coffee leaks from stem assembly. • Residue causing buildup around tank seal/filter assembly. See "How to Clean." • Water tank is empty. • Unit is tight. • Mineral deposits have built up. PROBABLE CAUSE • Residue trapped in ...


