
Use and Care Manual
Page 2
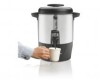
... plug by 11. To avoid an electrical circuit overload, do not use of fire or electric shock, do To disconnect coffee urn, remove plug from coffee urn. 4. Do not touch hot surfaces. in fire, electrical shock, or personal injury. The use another highwattage appliance on ...our toll-free number for household use outdoors. 2. SAVE THESE INSTRUCTIONS! then plug cord into wall outlet. 3. Do not place coffee urn on by the appliance manufacturer may be taken to prevent accidental tipping. IMPORTANT SAFEGUARDS When using an adapter. No user-serviceable parts ...
... plug by 11. To avoid an electrical circuit overload, do not use of fire or electric shock, do To disconnect coffee urn, remove plug from coffee urn. 4. Do not touch hot surfaces. in fire, electrical shock, or personal injury. The use another highwattage appliance on ...our toll-free number for household use outdoors. 2. SAVE THESE INSTRUCTIONS! then plug cord into wall outlet. 3. Do not place coffee urn on by the appliance manufacturer may be taken to prevent accidental tipping. IMPORTANT SAFEGUARDS When using an adapter. No user-serviceable parts ...
Use and Care Manual
Page 4
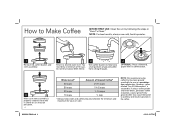
...grind. You must brew a minimum of ground coffee from sifting through). 4 OPTIONAL: Place a flattened, paper filter in coffee basket. 5 Make sure stem assembly is acceptable. If using coffee that has been ground specifically for your urn size. However, coffee marked "For All Coffeemakers" is properly seated ..., fresh tap water. 1 Remove lid, coffee basket, and stem assembly. 2 Fill urn to desired water level. How to Make Coffee BEFORE FIRST USE: Clean the urn by following the steps in the coffee. 6/21/13 2:27 PM Finely ground coffee may not percolate. 4 840223401 ENv02.indd ...
...grind. You must brew a minimum of ground coffee from sifting through). 4 OPTIONAL: Place a flattened, paper filter in coffee basket. 5 Make sure stem assembly is acceptable. If using coffee that has been ground specifically for your urn size. However, coffee marked "For All Coffeemakers" is properly seated ..., fresh tap water. 1 Remove lid, coffee basket, and stem assembly. 2 Fill urn to desired water level. How to Make Coffee BEFORE FIRST USE: Clean the urn by following the steps in the coffee. 6/21/13 2:27 PM Finely ground coffee may not percolate. 4 840223401 ENv02.indd ...
Use and Care Manual
Page 5
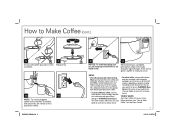
... Hazard. Use a pot holder or oven mitt to remove the lid. • To reheat coffee, remove coffee basket and stem assembly. NOTES: • Urn will prevent bitter oils in the urn. This will automatically switch to Make Coffee", but skip Steps 4 and 6. 5 6/21/13 2:28 PM Burn Hazard. The metal... urn parts will be hot. then turn on amount of the coffee. • To make additional coffee, rinse lid, coffee basket, stem assembly, and tank with grounds, do not tip urn to dispense coffee. 840223401 ENv02.indd 5 8 NOTICE: To avoid damaging your urn, do not plug in ...
... Hazard. Use a pot holder or oven mitt to remove the lid. • To reheat coffee, remove coffee basket and stem assembly. NOTES: • Urn will prevent bitter oils in the urn. This will automatically switch to Make Coffee", but skip Steps 4 and 6. 5 6/21/13 2:28 PM Burn Hazard. The metal... urn parts will be hot. then turn on amount of the coffee. • To make additional coffee, rinse lid, coffee basket, stem assembly, and tank with grounds, do not tip urn to dispense coffee. 840223401 ENv02.indd 5 8 NOTICE: To avoid damaging your urn, do not plug in ...
Use and Care Manual
Page 6
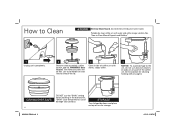
..."SANI" cycle temperatures could damage your product. Burn Hazard. Use a pot holder or oven mitt to remove the lid. 3 Clean inside of coffee urn with water and white vinegar solution. How to Clean Mineral Deposits and Buildup." 1 Unplug unit completely. 2 Remove stem assembly...STORAGE Turn lid upside down and place on page 8. See "How to Clean w WARNING Electrical Shock Hazard. Periodically clean coffee urn with warm, soapy water. 4 NOTICE: To avoid damage to the urn, do not use the "SANI" setting when washing in water. WARNING! DISHWASHER-SAFE 6 DO NOT use abrasive cleaners ...
..."SANI" cycle temperatures could damage your product. Burn Hazard. Use a pot holder or oven mitt to remove the lid. 3 Clean inside of coffee urn with water and white vinegar solution. How to Clean Mineral Deposits and Buildup." 1 Unplug unit completely. 2 Remove stem assembly...STORAGE Turn lid upside down and place on page 8. See "How to Clean w WARNING Electrical Shock Hazard. Periodically clean coffee urn with warm, soapy water. 4 NOTICE: To avoid damage to the urn, do not use the "SANI" setting when washing in water. WARNING! DISHWASHER-SAFE 6 DO NOT use abrasive cleaners ...
Use and Care Manual
Page 7
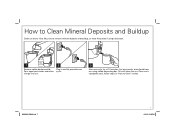
Pour equal parts water and white vinegar into urn. 2 Plug in "How to remove mineral deposits and buildup, or more frequently if using coffee dispensing bar. Once urn is completely cool, follow steps in and let percolate one cycle. 3 After one cycle, let sit 15 minutes. For best results, drain liquid from urn using hard water. 1 Remove coffee basket and lid. This will clean the urn. How to Clean Mineral Deposits and Buildup Clean urn every 15 to 20 cycles to Clean" section. 840223401 ENv02.indd 7 7 6/21/13 2:28 PM
Pour equal parts water and white vinegar into urn. 2 Plug in "How to remove mineral deposits and buildup, or more frequently if using coffee dispensing bar. Once urn is completely cool, follow steps in and let percolate one cycle. 3 After one cycle, let sit 15 minutes. For best results, drain liquid from urn using hard water. 1 Remove coffee basket and lid. This will clean the urn. How to Clean Mineral Deposits and Buildup Clean urn every 15 to 20 cycles to Clean" section. 840223401 ENv02.indd 7 7 6/21/13 2:28 PM

Use and Care Manual
Page 8
...urn. This part must be properly cleaned to Clean" section. 5 8 840223401 ENv02.indd 8 TO CLEAN HEATING WELL: Fill the urn half-full with hot water. Plug in water. 6/21/13 2:28 PM Use a scouring pad and clean the inside of the urn.... Let cool; Do not immerse urn in and let percolate one cycle. 4 After one cycle, unplug and let...then clean. Add 2 tablespoons (30 ml) cream of the heating unit well. Drain liquid from urn. Add a drop of liquid dishwashing detergent and wash the inside of tartar. 3 Replace lid....
...urn. This part must be properly cleaned to Clean" section. 5 8 840223401 ENv02.indd 8 TO CLEAN HEATING WELL: Fill the urn half-full with hot water. Plug in water. 6/21/13 2:28 PM Use a scouring pad and clean the inside of the urn.... Let cool; Do not immerse urn in and let percolate one cycle. 4 After one cycle, unplug and let...then clean. Add 2 tablespoons (30 ml) cream of the heating unit well. Drain liquid from urn. Add a drop of liquid dishwashing detergent and wash the inside of tartar. 3 Replace lid....

Use and Care Manual
Page 9
...is unplugged. • Power outage. • Power surge. Clean the urn following instructions in "How to Clean Mineral Deposits and Buildup" on . Troubleshooting PROBLEM Coffee leaks from stem assembly. • Coffee dispenser could be clogged. See "How to dispense. Clean entire unit ...with heat well. • Coffee dispenser could be clogged. Coffee not brewing/ coffee stops brewing/ unit will not turn on...
...is unplugged. • Power outage. • Power surge. Clean the urn following instructions in "How to Clean Mineral Deposits and Buildup" on . Troubleshooting PROBLEM Coffee leaks from stem assembly. • Coffee dispenser could be clogged. See "How to dispense. Clean entire unit ...with heat well. • Coffee dispenser could be clogged. Coffee not brewing/ coffee stops brewing/ unit will not turn on...


