
Use and Care Manual
Page 2
... to basket and locked into place. Open the lid carefully. 25. Supply cord replacement and repairs must be followed to reduce the risk of fire, electric shock, and/or injury to ensure that may cause a fire. To unplug, grasp the plug and pull from the power cord. 8. Never pull from the outlet. See detailed assembly instructions. 10. Do not use...
... to basket and locked into place. Open the lid carefully. 25. Supply cord replacement and repairs must be followed to reduce the risk of fire, electric shock, and/or injury to ensure that may cause a fire. To unplug, grasp the plug and pull from the power cord. 8. Never pull from the outlet. See detailed assembly instructions. 10. Do not use...

Use and Care Manual
Page 3
... w WARNING Electrical Shock Hazard: This appliance is off a countertop. Do not defeat the safety purpose of the plug by using an adapter. If it may result from a deep-fat fryer being pulled off . 3 Do not use with the user. Do not lean over a longer cord. • Serious hot-oil burns may... for use a longer detachable power supply cord or extension cord. • Hot liquid will splash if you miss the drain bracket and accidentally drop the frying basket into the outlet, reverse the plug. This product is only intended for household use only. Do not allow the cord to ...
... w WARNING Electrical Shock Hazard: This appliance is off a countertop. Do not defeat the safety purpose of the plug by using an adapter. If it may result from a deep-fat fryer being pulled off . 3 Do not use with the user. Do not lean over a longer cord. • Serious hot-oil burns may... for use a longer detachable power supply cord or extension cord. • Hot liquid will splash if you miss the drain bracket and accidentally drop the frying basket into the outlet, reverse the plug. This product is only intended for household use only. Do not allow the cord to ...

Use and Care Manual
Page 4
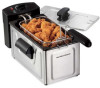
... To order parts, visit: hamiltonbeach.com/parts 1 3 1 Removable Lid 2 Removable Basket Handle 3 Frying Basket 4 Basket Drain Bracket 5 Heating Element Assembly 5 6 6 RESET Button 7 Removable Oil Pot 8 Base 9 Magnetic Cord Assembly 10 Adjustable Thermostat 11 Power On Light 7 12 READY Light 8 4 2 4 Before first use: Wash Oil Pot, Lid, Basket, and Handle in hot, soapy water. Rinse and dry. 10 11 12 RESET 9 RESET Button Press RESET...
... To order parts, visit: hamiltonbeach.com/parts 1 3 1 Removable Lid 2 Removable Basket Handle 3 Frying Basket 4 Basket Drain Bracket 5 Heating Element Assembly 5 6 6 RESET Button 7 Removable Oil Pot 8 Base 9 Magnetic Cord Assembly 10 Adjustable Thermostat 11 Power On Light 7 12 READY Light 8 4 2 4 Before first use: Wash Oil Pot, Lid, Basket, and Handle in hot, soapy water. Rinse and dry. 10 11 12 RESET 9 RESET Button Press RESET...

Use and Care Manual
Page 5
...Oil Pot into metal bracket. 5. Align grooves of Heating Element Assembly with round holes on Base. Align tines with grooves on metal Bracket of Handle together. Push down on a stable, flat surface. Release tines to allow them to spread and then pull Handle back to Base. Place Base on Heating Element Assembly... to connect it to lock into Base. 2. For storage: Push Handle into Frying Basket and squeeze tines together to Assemble 1. NOTE: Heater cannot be turned on unless correctly installed on Base. 5 To assemble Handle, squeeze tines of Basket. 4....
...Oil Pot into metal bracket. 5. Align grooves of Heating Element Assembly with round holes on Base. Align tines with grooves on metal Bracket of Handle together. Push down on a stable, flat surface. Release tines to allow them to spread and then pull Handle back to Base. Place Base on Heating Element Assembly... to connect it to lock into Base. 2. For storage: Push Handle into Frying Basket and squeeze tines together to Assemble 1. NOTE: Heater cannot be turned on unless correctly installed on Base. 5 To assemble Handle, squeeze tines of Basket. 4....

Use and Care Manual
Page 6
... Fryer socket. Place assembled Deep Fryer on stable, level, heat-resistant surface out of reach of Cord Assembly to follow these instructions may result in Oil Pot or unit will exceed temperature limit and will require resetting. Remove Frying Basket from food as possible. See chart below for oil amounts for your Deep Fryer. Lift Lid to disturb magnetic connection when plugging cord into electrical...
... Fryer socket. Place assembled Deep Fryer on stable, level, heat-resistant surface out of reach of Cord Assembly to follow these instructions may result in Oil Pot or unit will exceed temperature limit and will require resetting. Remove Frying Basket from food as possible. See chart below for oil amounts for your Deep Fryer. Lift Lid to disturb magnetic connection when plugging cord into electrical...

Use and Care Manual
Page 7
...use. When oil has reached selected temperature, READY Light will come on when oil has reached preset temperature. 6. Set thermostat to desired setting. NOTE: Do not allow condensation to drain into Oil Pot while removing Lid or while unit is now ready to fry next batch of food. Set... 7. Unit is done, remove Lid, raise Frying Basket, and hook over Removable Oil Pot to drain. READY Light will come back on . Carefully place Frying Basket in basket. To fry food, place food in Fryer. Replace Lid. When oil has reached selected temperature, READY Light will require resetting...
...use. When oil has reached selected temperature, READY Light will come on when oil has reached preset temperature. 6. Set thermostat to desired setting. NOTE: Do not allow condensation to drain into Oil Pot while removing Lid or while unit is now ready to fry next batch of food. Set... 7. Unit is done, remove Lid, raise Frying Basket, and hook over Removable Oil Pot to drain. READY Light will come back on . Carefully place Frying Basket in basket. To fry food, place food in Fryer. Replace Lid. When oil has reached selected temperature, READY Light will require resetting...

Use and Care Manual
Page 8
...(3/4 full basket) Do not fill Basket more information to obtain best results. • Always follow package directions. • When cooking meat, poultry, or fish, use cooking thermometer...your area. If you live in a high-altitude area: The Extension service will have detailed information about cooking for each batch. • Frozen, ...180°C) 375°F (190°C) 375°F (190°C) COOKING TIME Models 35210, 35335, 35336 2 to 3 minutes 7 to 8 minutes 2 to 3 minutes 2 to 3 minutes 3 to...Basket slowly and raise it carefully and slowly from the oil when done frying.
...(3/4 full basket) Do not fill Basket more information to obtain best results. • Always follow package directions. • When cooking meat, poultry, or fish, use cooking thermometer...your area. If you live in a high-altitude area: The Extension service will have detailed information about cooking for each batch. • Frozen, ...180°C) 375°F (190°C) 375°F (190°C) COOKING TIME Models 35210, 35335, 35336 2 to 3 minutes 7 to 8 minutes 2 to 3 minutes 2 to 3 minutes 3 to...Basket slowly and raise it carefully and slowly from the oil when done frying.

Use and Care Manual
Page 9
... excess oil or oil film from Deep Fryer. 3. Before frying • Excess water or ice particles can take several hours. 2. General tips • DO NOT use plastic utensils in refrigerator or a cool, dark, dry place for up to completely cool. First, lower Frying Basket completely and then carefully place each use care when cleaning Heating Element Assembly. Wait until oil has cooled. Use Frying Basket...
... excess oil or oil film from Deep Fryer. 3. Before frying • Excess water or ice particles can take several hours. 2. General tips • DO NOT use plastic utensils in refrigerator or a cool, dark, dry place for up to completely cool. First, lower Frying Basket completely and then carefully place each use care when cleaning Heating Element Assembly. Wait until oil has cooled. Use Frying Basket...

Use and Care Manual
Page 10
... over the edge of oil is too much liquid. Use room-temperature oil. • Oil Pot has not been cleaned properly. See instructions in Deep Fryer. • Basket/food immersed too quickly. Make sure that oil does not exceed MAX fill mark. • Basket/food immersed too quickly. Oil film buildup on Oil Pot. • Use plastic scouring pad to Assemble" section. • Press RESET...
... over the edge of oil is too much liquid. Use room-temperature oil. • Oil Pot has not been cleaned properly. See instructions in Deep Fryer. • Basket/food immersed too quickly. Make sure that oil does not exceed MAX fill mark. • Basket/food immersed too quickly. Oil film buildup on Oil Pot. • Use plastic scouring pad to Assemble" section. • Press RESET...

Use and Care Manual
Page 11
...used in the U.S. Please write Hamilton Beach Brands, Inc., Consumer Affairs Department, 261 Yadkin Road, Southern Pines, NC 28387, or visit hamiltonbeach.com/customer-service in Canada. We exclude all costs associated with the printed directions, or damage to the product resulting from accident, alteration, abuse, or misuse. All liability is unavailable, we will replace...service, locate the model, type, and series numbers on the rating label (e.g., 120 V ~ 60 Hz). This is in lieu of any other than single-family household use...glass, filters, wear from normal use, use or subjected...
...used in the U.S. Please write Hamilton Beach Brands, Inc., Consumer Affairs Department, 261 Yadkin Road, Southern Pines, NC 28387, or visit hamiltonbeach.com/customer-service in Canada. We exclude all costs associated with the printed directions, or damage to the product resulting from accident, alteration, abuse, or misuse. All liability is unavailable, we will replace...service, locate the model, type, and series numbers on the rating label (e.g., 120 V ~ 60 Hz). This is in lieu of any other than single-family household use...glass, filters, wear from normal use, use or subjected...


