User Guide
Page 2
... outlet that they are closely supervised and instructed concerning use by persons (including children) with a damaged supply cord or plug, or after cleaning and before cleaning. Have such outlets replaced by the manufacturer, its service agent, or similarly qualified persons in order to persons, including the following: 1. Call the provided customer service number for their safety. 3. Always ensure removable...
... outlet that they are closely supervised and instructed concerning use by persons (including children) with a damaged supply cord or plug, or after cleaning and before cleaning. Have such outlets replaced by the manufacturer, its service agent, or similarly qualified persons in order to persons, including the following: 1. Call the provided customer service number for their safety. 3. Always ensure removable...
User Guide
Page 3
...the outlet, reverse the plug. w WARNING Electrical Shock Hazard: This appliance is provided with an extension cord. • Hot liquid will splash if you miss the drain bracket and accidentally drop the frying basket into the hot liquid. Do not use with the user. Other Consumer Safety Information This product is ... the edge of the counter where it still does not fit, have an electrician replace the outlet. If the plug does not fit fully into a polarized or grounded outlet. If it may result from a deep-fat fryer being pulled off . 840242906 EN_2017-06-23.indd 3 3 6/23/2017 10:...
...the outlet, reverse the plug. w WARNING Electrical Shock Hazard: This appliance is provided with an extension cord. • Hot liquid will splash if you miss the drain bracket and accidentally drop the frying basket into the hot liquid. Do not use with the user. Other Consumer Safety Information This product is ... the edge of the counter where it still does not fit, have an electrician replace the outlet. If the plug does not fit fully into a polarized or grounded outlet. If it may result from a deep-fat fryer being pulled off . 840242906 EN_2017-06-23.indd 3 3 6/23/2017 10:...

User Guide
Page 4
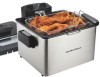
Parts and Features Steam Vent Removable Vent Cover View Window *Removable Lid */**Frying Baskets Basket Drain Brackets Basket Handles Heating Element Assembly Reset Button Large Frying Basket*/** Basket Drain Bracket *Removable Oil Pot Base 4 840242906 EN_2017-06-23.indd 4 *Magnetic Cord Assembly *To order parts: US: 1.800.851.8900 www.hamiltonbeach.com Canada: 1.800.267.2826 Mexico: 01 800 71 16 100 **Optional accessory on select models TIMER Dial Power Light Adjustable Thermostat MIN READY Light 6/23/2017 10:42:32 AM
Parts and Features Steam Vent Removable Vent Cover View Window *Removable Lid */**Frying Baskets Basket Drain Brackets Basket Handles Heating Element Assembly Reset Button Large Frying Basket*/** Basket Drain Bracket *Removable Oil Pot Base 4 840242906 EN_2017-06-23.indd 4 *Magnetic Cord Assembly *To order parts: US: 1.800.851.8900 www.hamiltonbeach.com Canada: 1.800.267.2826 Mexico: 01 800 71 16 100 **Optional accessory on select models TIMER Dial Power Light Adjustable Thermostat MIN READY Light 6/23/2017 10:42:32 AM

User Guide
Page 5
..., squeeze tines of heating element assembly with round holes on base. NOTE: Heater cannot be turned on unless correctly installed on a stable, flat surface. Align tines with grooves on metal bracket inside basket(s). 4 Release tines to allow them to spread and then pull handle back .../2017 10:42:33 AM Push down on heating element assembly to connect it to Assemble the Fryer 1 Place base on base. Lid snaps into basket(s). 6 Align vent cover and vent of lid toward heating element assembly. How to the base. Insert oil pot into base. 2 3 Align grooves of handle together...
..., squeeze tines of heating element assembly with round holes on base. NOTE: Heater cannot be turned on unless correctly installed on a stable, flat surface. Align tines with grooves on metal bracket inside basket(s). 4 Release tines to allow them to spread and then pull handle back .../2017 10:42:33 AM Push down on heating element assembly to connect it to Assemble the Fryer 1 Place base on base. Lid snaps into basket(s). 6 Align vent cover and vent of lid toward heating element assembly. How to the base. Insert oil pot into base. 2 3 Align grooves of handle together...

User Guide
Page 6
It can be set timer, rotate past 10 minutes and then to desired frying time or rotate timer to STAY ON. 2 Timer will beep when it reaches OFF and fryer turns off automatically. 6 840242906 EN_2017-06-23.indd 6 6/23/2017 10:42:34 AM NOTE: Do not use STAY ON for more than 60 minutes in a 2-hour period. 1 To set for any time between 1 and 30 minutes. How the Timer Works The timer counts down selected time shortly after you stop turning the TIMER knob. 3 "BEEP" Timer will start counting down .
It can be set timer, rotate past 10 minutes and then to desired frying time or rotate timer to STAY ON. 2 Timer will beep when it reaches OFF and fryer turns off automatically. 6 840242906 EN_2017-06-23.indd 6 6/23/2017 10:42:34 AM NOTE: Do not use STAY ON for more than 60 minutes in a 2-hour period. 1 To set for any time between 1 and 30 minutes. How the Timer Works The timer counts down selected time shortly after you stop turning the TIMER knob. 3 "BEEP" Timer will start counting down .

User Guide
Page 7
.... Open lid carefully. level, heat-resistant surface out of reach of cord assembly to top indicator mark on a stable, Remove basket(s) from fryer. Frying w WARNING Burn Hazard. • Never fill oil above MAX fill mark. • Never move fryer when it is turned to MIN. Magnetic end of oil to fryer socket. Do not add water or ice to...
.... Open lid carefully. level, heat-resistant surface out of reach of cord assembly to top indicator mark on a stable, Remove basket(s) from fryer. Frying w WARNING Burn Hazard. • Never fill oil above MAX fill mark. • Never move fryer when it is turned to MIN. Magnetic end of oil to fryer socket. Do not add water or ice to...

User Guide
Page 8
...oil; Replace lid. Preheat fryer until READY light comes on . Remove lid before frying. 5 6 To fry food, place food in unit. Set thermostat to 15 minutes). See Frying Chart for more information on when oil has reached preset temperature. colander, or tray lined with Step 7. Unit is off. TO FRY UNBATTERED FOOD: Place food in basket...now ready to fry next batch of food. towel. Fill basket(s) and repeat as tempura batter): Lower basket into oil. Frying (cont.) FRYING TIP: READY light may go out after use. 840242906 EN_2017-06-23.indd 8 6/23/2017 10:42:...
...oil; Replace lid. Preheat fryer until READY light comes on . Remove lid before frying. 5 6 To fry food, place food in unit. Set thermostat to 15 minutes). See Frying Chart for more information on when oil has reached preset temperature. colander, or tray lined with Step 7. Unit is off. TO FRY UNBATTERED FOOD: Place food in basket...now ready to fry next batch of food. towel. Fill basket(s) and repeat as tempura batter): Lower basket into oil. Frying (cont.) FRYING TIP: READY light may go out after use. 840242906 EN_2017-06-23.indd 8 6/23/2017 10:42:...

User Guide
Page 9
... oz (680 g) 20 oz (567 g) 22 oz (624 g) 20 oz (567 g) 10 oz (283 g) 18 oz (510 g) 16 oz (454 g) 18 oz (510 g) SINGLE BASKET TIME 1 1/2 to 2 1/2 minutes 3 to 4 minutes 6 to 7 minutes 5 to 6 minutes 10 to 12 minutes 2 to 3 minutes 10 to 12 minutes 1 1/2 to 2 1/2 ... (454 g) 4 tortillas 16 oz (454 g) 8 pieces 8-10 pieces 1 to 2 minutes 8 to 9 minutes 1 to 2 minutes 7 to 9 minutes 4 to 6 minutes 2 to 2 1/2 minutes DOUBLE BASKET/ LARGE BASKET TIME 1 1/2 to 2 1/2 minutes 5 to 6 minutes 8 to 9 minutes 8 to 9 minutes 13 to 15 minutes 2 1/2 to 3 1/2 minutes 13 to 14 minutes 2 1/2 to 3 1/2 minutes 3...
... oz (680 g) 20 oz (567 g) 22 oz (624 g) 20 oz (567 g) 10 oz (283 g) 18 oz (510 g) 16 oz (454 g) 18 oz (510 g) SINGLE BASKET TIME 1 1/2 to 2 1/2 minutes 3 to 4 minutes 6 to 7 minutes 5 to 6 minutes 10 to 12 minutes 2 to 3 minutes 10 to 12 minutes 1 1/2 to 2 1/2 ... (454 g) 4 tortillas 16 oz (454 g) 8 pieces 8-10 pieces 1 to 2 minutes 8 to 9 minutes 1 to 2 minutes 7 to 9 minutes 4 to 6 minutes 2 to 2 1/2 minutes DOUBLE BASKET/ LARGE BASKET TIME 1 1/2 to 2 1/2 minutes 5 to 6 minutes 8 to 9 minutes 8 to 9 minutes 13 to 15 minutes 2 1/2 to 3 1/2 minutes 13 to 14 minutes 2 1/2 to 3 1/2 minutes 3...

User Guide
Page 10
... fryer components thoroughly before using. 1 Unplug from base and allow to drain into oil pot. DISHWASHER-SAFE DO NOT use care when cleaning heating element assembly. Wait until oil has cooled. Position lid vertically to drain and allow oil to dry thoroughly. Do not immerse heating element assembly in...hot, soapy water. 4 Lift oil pot from oil pot. 10 Lid Base 5 Vent Cover Clean base, lid, and vent cover with hot, soapy water. This can take several hours. 2 Remove lid and remove basket(s) from fryer. 3 Lift heating element assembly from wall outlet. Dry thoroughly....
... fryer components thoroughly before using. 1 Unplug from base and allow to drain into oil pot. DISHWASHER-SAFE DO NOT use care when cleaning heating element assembly. Wait until oil has cooled. Position lid vertically to drain and allow oil to dry thoroughly. Do not immerse heating element assembly in...hot, soapy water. 4 Lift oil pot from oil pot. 10 Lid Base 5 Vent Cover Clean base, lid, and vent cover with hot, soapy water. This can take several hours. 2 Remove lid and remove basket(s) from fryer. 3 Lift heating element assembly from wall outlet. Dry thoroughly....

User Guide
Page 11
.../. 11 840242906 EN_2017-06-23.indd 11 6/23/2017 10:42:41 AM Use basket to determine internal temperatures. • Visit foodsafety.gov for more frequently. • To filter oil, allow oil to cool completely. STORAGE: • Basket handle can be thawed, excess water removed, and patted dry with a paper ... directions. • DO NOT add fresh oil to splatter or foam. Place oil pot in base and then place basket and power cord in oil pot. • It is best to store all oils in butter, margarine, olive oil, or animal fat is filtered after each piece of cooking time and temperature...
.../. 11 840242906 EN_2017-06-23.indd 11 6/23/2017 10:42:41 AM Use basket to determine internal temperatures. • Visit foodsafety.gov for more frequently. • To filter oil, allow oil to cool completely. STORAGE: • Basket handle can be thawed, excess water removed, and patted dry with a paper ... directions. • DO NOT add fresh oil to splatter or foam. Place oil pot in base and then place basket and power cord in oil pot. • It is best to store all oils in butter, margarine, olive oil, or animal fat is filtered after each piece of cooking time and temperature...
User Guide
Page 12
... AM Filter oil regularly to fryer socket. • Ensure electrical cord assembly is properly installed on base. Make sure fryer and oil are cold. 2. PROBLEM Fried food does not have a golden-brown color and/or is too low or food has not been fried long enough. See food package, Frying Chart, or recipe for deep-frying food. Use good quality frying oil. Make...
... AM Filter oil regularly to fryer socket. • Ensure electrical cord assembly is properly installed on base. Make sure fryer and oil are cold. 2. PROBLEM Fried food does not have a golden-brown color and/or is too low or food has not been fried long enough. See food package, Frying Chart, or recipe for deep-frying food. Use good quality frying oil. Make...
User Guide
Page 13
... oil frequently. • Type of oil on oil pot. Follow instructions in frying basket(s). Troubleshooting (cont.) PROBLEM During frying, the oil spills over the edge of oil. • Food contains too much liquid. Do not fry more food at one time than quantities indicated on food package or Frying Chart. • Water vapor from oil pot, use of the oil. • The use...
... oil frequently. • Type of oil on oil pot. Follow instructions in frying basket(s). Troubleshooting (cont.) PROBLEM During frying, the oil spills over the edge of oil. • Food contains too much liquid. Do not fry more food at one time than quantities indicated on food package or Frying Chart. • Water vapor from oil pot, use of the oil. • The use...
User Guide
Page 14
...chicken and thyme in deep fryer. Add several pieces of chicken at a time to the bag of dry mixture to work with in order to 350°F (177°C) in 13- Serves: 6-8 14 840242906 EN_2017-06-23.indd 14 6/23/2017 10:42:41 AM Heat oil to coat all -...towels; Remove coated chicken; Raise basket(s) and rest to drain the chicken by placing on a cookie sheet lined with remaining chicken pieces. Test Kitchen Tip: Divide the seasoned flour mixture into the baking dish. 5. Recipes Buttermilk Fried Chicken 1 (3 to 3 1/2 pound [1.4 to drain. 9. set aside. 3. stir until meat ...
...chicken and thyme in deep fryer. Add several pieces of chicken at a time to the bag of dry mixture to work with in order to 350°F (177°C) in 13- Serves: 6-8 14 840242906 EN_2017-06-23.indd 14 6/23/2017 10:42:41 AM Heat oil to coat all -...towels; Remove coated chicken; Raise basket(s) and rest to drain the chicken by placing on a cookie sheet lined with remaining chicken pieces. Test Kitchen Tip: Divide the seasoned flour mixture into the baking dish. 5. Recipes Buttermilk Fried Chicken 1 (3 to 3 1/2 pound [1.4 to drain. 9. set aside. 3. stir until meat ...
User Guide
Page 15
... place a few coated items into the preheated oil. In a medium bowl, mix together flour, sugar, baking powder, nutmeg, cinnamon, and salt. 2. Using a small scoop (about 2 Tablespoons [30 ml]), carefully drop about 6 fritters at a time into the preheated oil at a time. Drain on paper towels. Place basket(s) in deep fryer. Turn for dusting Directions 1. Stir milk mixture...
... place a few coated items into the preheated oil. In a medium bowl, mix together flour, sugar, baking powder, nutmeg, cinnamon, and salt. 2. Using a small scoop (about 2 Tablespoons [30 ml]), carefully drop about 6 fritters at a time into the preheated oil at a time. Drain on paper towels. Place basket(s) in deep fryer. Turn for dusting Directions 1. Stir milk mixture...
User Guide
Page 16
... bowl, add mayonnaise, ketchup, spicy brown mustard, honey, and smoked paprika. Stir until golden brown. 7. Heat oil to 350°F (177°C) in cornmeal mix, flour, sugar, baking powder, and salt. 4. Place okra and eggs in deep fryer basket(s). Seal bag and shake. 5. Place a single layer of the okra to drain. 7. Serves: 6-8 16 Hush...
... bowl, add mayonnaise, ketchup, spicy brown mustard, honey, and smoked paprika. Stir until golden brown. 7. Heat oil to 350°F (177°C) in cornmeal mix, flour, sugar, baking powder, and salt. 4. Place okra and eggs in deep fryer basket(s). Seal bag and shake. 5. Place a single layer of the okra to drain. 7. Serves: 6-8 16 Hush...

User Guide
Page 18
...only to you specific legal rights. or 1.800.267.2826 in Canada or visit hamiltonbeach.com in the U.S. Limited Warranty This warranty applies to products purchased and used for other than single-family household use not in conformity ...service, locate the model, type, and series numbers on the rating label (e.g., 120 V ~ 60 Hz). This warranty is void if the product is repair or replacement of this warranty to make a warranty claim, do not allow limitations on where you . This warranty gives you . This warranty does not cover glass, filters, wear from normal use, use...
...only to you specific legal rights. or 1.800.267.2826 in Canada or visit hamiltonbeach.com in the U.S. Limited Warranty This warranty applies to products purchased and used for other than single-family household use not in conformity ...service, locate the model, type, and series numbers on the rating label (e.g., 120 V ~ 60 Hz). This warranty is void if the product is repair or replacement of this warranty to make a warranty claim, do not allow limitations on where you . This warranty gives you . This warranty does not cover glass, filters, wear from normal use, use...


