
Use & Care
Page 2
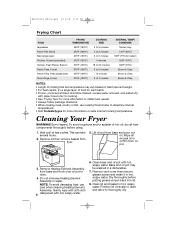
... against risk of injury, NEVER fill oil above MAX fill mark. 17. Always attach plug to cool, before cleaning. See detailed assembly instructions. 16. To reduce the risk of electric shock, do not immerse cord, plugs, or heating element assembly in water or other than intended purpose...cord in place. Call our toll-free customer service number for the preparation, cooking, and serving of steam emitting from a deep-fat fryer being pulled off a countertop. Do not use refrigerated oil. 23. Do not let cord hang over edge of electric shock. Extreme caution must be followed to basket...
... against risk of injury, NEVER fill oil above MAX fill mark. 17. Always attach plug to cool, before cleaning. See detailed assembly instructions. 16. To reduce the risk of electric shock, do not immerse cord, plugs, or heating element assembly in water or other than intended purpose...cord in place. Call our toll-free customer service number for the preparation, cooking, and serving of steam emitting from a deep-fat fryer being pulled off a countertop. Do not use refrigerated oil. 23. Do not let cord hang over edge of electric shock. Extreme caution must be followed to basket...
Use & Care
Page 3
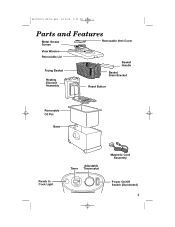
840150301 ENv04.qxd 3/11/08 3:12 PM Page 3 Parts and Features Metal Grease Screen Removable Vent Cover View Window Removable Lid Frying Basket Heating Element Assembly Basket Handle Basket Drain Bracket Reset Button Removable Oil Pot Base Ready to Cook Light Adjustable Timer Thermostat Magnetic Cord Assembly Power On/Off Switch (illuminated) 3
840150301 ENv04.qxd 3/11/08 3:12 PM Page 3 Parts and Features Metal Grease Screen Removable Vent Cover View Window Removable Lid Frying Basket Heating Element Assembly Basket Handle Basket Drain Bracket Reset Button Removable Oil Pot Base Ready to Cook Light Adjustable Timer Thermostat Magnetic Cord Assembly Power On/Off Switch (illuminated) 3
Use & Care
Page 4
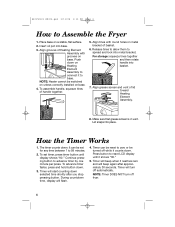
Insert oil pot into basket. 7. NOTE: Heater cannot be switched on unless correctly installed on a stable, flat surface. 2. How the Timer Works 1. To set for any time between 1 to 99 minutes. 2. Timer can be turned off while it reaches zero and will beep again after you stop ...4 How to advance timer by one minute per press. Align grooves of Heating Element Assembly with round holes on metal bracket of basket. 6. Make sure that grease screen is in vent. NOTE: Timer DOES NOT turn off fryer. 4 Release tines to allow them to base. Lid snaps into metal bracket. To...
Insert oil pot into basket. 7. NOTE: Heater cannot be switched on unless correctly installed on a stable, flat surface. 2. How the Timer Works 1. To set for any time between 1 to 99 minutes. 2. Timer can be turned off while it reaches zero and will beep again after you stop ...4 How to advance timer by one minute per press. Align grooves of Heating Element Assembly with round holes on metal bracket of basket. 6. Make sure that grease screen is in vent. NOTE: Timer DOES NOT turn off fryer. 4 Release tines to allow them to base. Lid snaps into metal bracket. To...
Use & Care
Page 5
... fryer. Set power switch to 15 minutes). When oil has reached selected temperature, Ready to "break away" which prevents unit from fryer. 4. BEFORE FIRST USE: Thoroughly clean and dry fryer. See "Cleaning Your Fryer" section. 1. Fill fryer with not less than 12 cups of cord will only go out after use . • Escaping steam may result in fryer. NOTE: The low magnetic force allows the cord...
... fryer. Set power switch to 15 minutes). When oil has reached selected temperature, Ready to "break away" which prevents unit from fryer. 4. BEFORE FIRST USE: Thoroughly clean and dry fryer. See "Cleaning Your Fryer" section. 1. Fill fryer with not less than 12 cups of cord will only go out after use . • Escaping steam may result in fryer. NOTE: The low magnetic force allows the cord...
Use & Care
Page 6
..., poultry or fish, use care when cleaning Heating Element Assembly. To avoid eruptions and/or splatter of hot oil, dry all excess oil or oil film from fryer. 5. Dry thoroughly before using. 1. This can take several hours. 2. Gently wipe with soft cloth 6 dampened with hot, soapy water. Clean lid and basket in hot, soapy water. Lift oil pot from base and...
..., poultry or fish, use care when cleaning Heating Element Assembly. To avoid eruptions and/or splatter of hot oil, dry all excess oil or oil film from fryer. 5. Dry thoroughly before using. 1. This can take several hours. 2. Gently wipe with soft cloth 6 dampened with hot, soapy water. Clean lid and basket in hot, soapy water. Lift oil pot from base and...
Use & Care
Page 7
... • DO NOT mix two types of oil. • Change oil regularly to maintain optimum frying and flavor quality. • Oil used for french fries can be used 10 to 12 times before changing if oil is filtered after each piece of Oil • Pour cool oil into its original (resealable) empty plastic bottle...be carefully placed directly into hot oil. Place oil pot in base and then place basket and power cord in oil pot. • It is high in protein (such as a filter to strain oil. • Always follow food package directions. • DO NOT add fresh oil to used for food that is best to...
... • DO NOT mix two types of oil. • Change oil regularly to maintain optimum frying and flavor quality. • Oil used for french fries can be used 10 to 12 times before changing if oil is filtered after each piece of Oil • Pour cool oil into its original (resealable) empty plastic bottle...be carefully placed directly into hot oil. Place oil pot in base and then place basket and power cord in oil pot. • It is high in protein (such as a filter to strain oil. • Always follow food package directions. • DO NOT add fresh oil to used for food that is best to...
Use & Care
Page 8
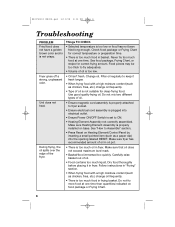
... electrical cord assembly is plugged into the opening labeled RESET. Never fry too much liquid. Food pieces may be too thick to fry adequately. • Volume of the fryer. • There is too much oil in fryer. Filter oil regularly to keep it in fryer. Make sure that oil does not exceed maximum level mark. • Basket/food immersed too quickly. Use...
... electrical cord assembly is plugged into the opening labeled RESET. Never fry too much liquid. Food pieces may be too thick to fry adequately. • Volume of the fryer. • There is too much oil in fryer. Filter oil regularly to keep it in fryer. Make sure that oil does not exceed maximum level mark. • Basket/food immersed too quickly. Use...
Use & Care
Page 9
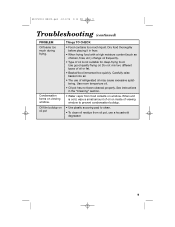
... PM Page 9 Troubleshooting (continued) PROBLEM Oil foams too much liquid. Carefully raise basket into air. • The use a household degreaser. 9 See instructions in fryer. • When frying food with a high moisture content (such as chicken, fries, etc.) change oil frequently. • Type of viewing window to prevent condensation buildup. • Use plastic scouring pad to clean. • To clean oil residue from...
... PM Page 9 Troubleshooting (continued) PROBLEM Oil foams too much liquid. Carefully raise basket into air. • The use a household degreaser. 9 See instructions in fryer. • When frying food with a high moisture content (such as chicken, fries, etc.) change oil frequently. • Type of viewing window to prevent condensation buildup. • Use plastic scouring pad to clean. • To clean oil residue from...
Use & Care
Page 10
... purchased in conformity with this product, including without limitation: glass parts, glass containers, cutter/strainers, blades, seals, gaskets, clutches,...specific legal rights, and you have other legal rights which may not apply to be supplied with the printed directions. During this period, we will repair or replace...SERVICE NUMBER. (For faster service please have model, series, and type numbers ready for a period of one (1) year from state to state, or province to clean product regularly in accordance with manufacturer's instructions, use for commercial purposes, or any use...
... purchased in conformity with this product, including without limitation: glass parts, glass containers, cutter/strainers, blades, seals, gaskets, clutches,...specific legal rights, and you have other legal rights which may not apply to be supplied with the printed directions. During this period, we will repair or replace...SERVICE NUMBER. (For faster service please have model, series, and type numbers ready for a period of one (1) year from state to state, or province to clean product regularly in accordance with manufacturer's instructions, use for commercial purposes, or any use...


