Use and Care Manual
Page 2
...-free customer service number for their safety. 3. Do not use appliance for household use . The electrical rating of the extension cord must be taken to reduce the risk of accessory attachments not recommended by children or accidentally tripped over edge of fire, electric shock, and/or injury to persons, including the following: 1. Allow to cool before cleaning. Read all instructions...
...-free customer service number for their safety. 3. Do not use appliance for household use . The electrical rating of the extension cord must be taken to reduce the risk of accessory attachments not recommended by children or accidentally tripped over edge of fire, electric shock, and/or injury to persons, including the following: 1. Allow to cool before cleaning. Read all instructions...
Use and Care Manual
Page 3
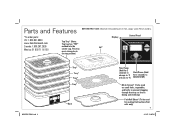
... USE: Wash all removable parts in the top position) Display Lid* Control Panel 840252501 ENv01.indd 3 Tray* Tray* Tray* Tray* Base Time/Temp (Hold for 2 seconds to change to °C or back to °F) Start/Pause (Hold for 2 seconds to RESET/STOP) Mesh Screen* (To be used on small fruits, vegetables, and herbs to prevent dropping through the trays as food...
... USE: Wash all removable parts in the top position) Display Lid* Control Panel 840252501 ENv01.indd 3 Tray* Tray* Tray* Tray* Base Time/Temp (Hold for 2 seconds to change to °C or back to °F) Start/Pause (Hold for 2 seconds to RESET/STOP) Mesh Screen* (To be used on small fruits, vegetables, and herbs to prevent dropping through the trays as food...

Use and Care Manual
Page 4
You may remove food from fruits. 4 If using the fruit roll sheet, place sheet in a single Use the mesh screen for drying If using a mesh screen, place layer on each drying, even if some are empty. • It is complete. For best results, only use more than two fruit roll sheets and place in the... top two trays. For best results, do not use mesh or meats or crowd trays. How to dry one type of fruits or screen in the top two trays. herbs and small pieces of similar food at a time; screens in tray before the lid, for example, all fruits or all vegetables. • Always...
You may remove food from fruits. 4 If using the fruit roll sheet, place sheet in a single Use the mesh screen for drying If using a mesh screen, place layer on each drying, even if some are empty. • It is complete. For best results, only use more than two fruit roll sheets and place in the... top two trays. For best results, do not use mesh or meats or crowd trays. How to dry one type of fruits or screen in the top two trays. herbs and small pieces of similar food at a time; screens in tray before the lid, for example, all fruits or all vegetables. • Always...
Use and Care Manual
Page 5
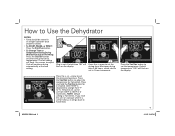
...will flash. The last setting will flash on the display. 2 Press the + arrow to set the drying time. arrow to set the temperature. Default time "00" will continue drying automatically at the new setting. 1 Plug in unit. Maximum drying time is 48 hours, which can be set from ºF to ... ENv01.indd 5 3/13/15 2:49 PM How to Use the Dehydrator NOTES: • Food should be stored in an airtight container once properly cooled. • To START, PAUSE, or RESET: Press the START/PAUSE button. • To Change Time or Temperature During Drying Without Pausing or Resetting: Press...
...will flash. The last setting will flash on the display. 2 Press the + arrow to set the drying time. arrow to set the temperature. Default time "00" will continue drying automatically at the new setting. 1 Plug in unit. Maximum drying time is 48 hours, which can be set from ºF to ... ENv01.indd 5 3/13/15 2:49 PM How to Use the Dehydrator NOTES: • Food should be stored in an airtight container once properly cooled. • To START, PAUSE, or RESET: Press the START/PAUSE button. • To Change Time or Temperature During Drying Without Pausing or Resetting: Press...

Use and Care Manual
Page 6
... ENv01.indd 6 3/13/15 2:49 PM How to Use the Dehydrator (cont.) 5 Press the START/PAUSE button to set a new time and temperature. "00" will still appear in display. Press the START/PAUSE button again to Check Food: Press the START/PAUSE button and unit will flash "PA." "00" will... Press and hold the START/PAUSE button again for 2 seconds; To continue drying, press TIME/TEMP button to start drying. Let food cool completely on trays or wire rack before programmed time has ended, PAUSE or STOP unit and then unplug. Display will pause. To STOP "00" flashing: Press ...
... ENv01.indd 6 3/13/15 2:49 PM How to Use the Dehydrator (cont.) 5 Press the START/PAUSE button to set a new time and temperature. "00" will still appear in display. Press the START/PAUSE button again to Check Food: Press the START/PAUSE button and unit will flash "PA." "00" will... Press and hold the START/PAUSE button again for 2 seconds; To continue drying, press TIME/TEMP button to start drying. Let food cool completely on trays or wire rack before programmed time has ended, PAUSE or STOP unit and then unplug. Display will pause. To STOP "00" flashing: Press ...

Use and Care Manual
Page 7
... start and stop the process for longer than recipe or package directions call for. You may result in a drier texture. • Post Treatment of jerky. Cool completely on a wire rack. Pat jerky dry with paper towels to remove any surface fats before storing. • For food safety, complete the food drying process... • Marinating meats helps with foil. NOTE: This method may reduce drying time and may pause the process to check on the food's dryness or to remove dehydrated pieces. • Label and date all containers of Meat Prior to Dehydrating - Do not marinate meat longer than...
... start and stop the process for longer than recipe or package directions call for. You may result in a drier texture. • Post Treatment of jerky. Cool completely on a wire rack. Pat jerky dry with paper towels to remove any surface fats before storing. • For food safety, complete the food drying process... • Marinating meats helps with foil. NOTE: This method may reduce drying time and may pause the process to check on the food's dryness or to remove dehydrated pieces. • Label and date all containers of Meat Prior to Dehydrating - Do not marinate meat longer than...
Use and Care Manual
Page 8
... are covered with a handle. • Dip strainer into the boiling water for apples and bananas which should be crisp. • All vegetables should be crisp and easily broken. 8 840252501 ENv01.indd 8 3/13/15 2:49 PM How to help prevent color and flavor loss during the drying process. To protect the color, follow package directions. Food Preparation...
... are covered with a handle. • Dip strainer into the boiling water for apples and bananas which should be crisp. • All vegetables should be crisp and easily broken. 8 840252501 ENv01.indd 8 3/13/15 2:49 PM How to help prevent color and flavor loss during the drying process. To protect the color, follow package directions. Food Preparation...

Use and Care Manual
Page 9
...process will make a fruit roll with a nice leatherlike texture. • When using...lightly grease with vegetable oil before storing in the freezer for 15 minutes. • The fruit roll should be stored in a clean, dry, airtight container, such as resealable plastic bags, plastic containers, or glass canning jars with peeled and pitted pureed fresh fruits; Place packaged foods... foods need to be slightly warm to easily remove ...lid, to keep foods from the fruit roll sheet. • Once rolled up, cool completely before adding your pureed fruit. • Evenly spread about 3/4 cup to 1 cup...
...process will make a fruit roll with a nice leatherlike texture. • When using...lightly grease with vegetable oil before storing in the freezer for 15 minutes. • The fruit roll should be stored in a clean, dry, airtight container, such as resealable plastic bags, plastic containers, or glass canning jars with peeled and pitted pureed fresh fruits; Place packaged foods... foods need to be slightly warm to easily remove ...lid, to keep foods from the fruit roll sheet. • Once rolled up, cool completely before adding your pureed fruit. • Evenly spread about 3/4 cup to 1 cup...

Use and Care Manual
Page 10
...#C 15 to 19 hours Yes Bananas Sliced 1/4 inch (0.6 cm) thick #C 6 to 10 hours No Blueberries Whole *B/1 minute 14 to 18 hours Yes Cherries Pitted, halved - 22 to 26 hours No Cranberries Whole *B/1 minute 17 to 21 hours Yes Green or Red Seedless Grapes Halved - 19 to 23 ...hours Yes Kiwi Sliced 1/4 inch (0.6 cm) thick - 8 to 12 hours Yes Lemons, Limes, or Oranges Sliced 1/4 inch (0.6 cm) thick - 17 to 21 hours No Mangoes Peeled, pitted, sliced 1/4 inch (0.6 cm) thick - 13 to ...
...#C 15 to 19 hours Yes Bananas Sliced 1/4 inch (0.6 cm) thick #C 6 to 10 hours No Blueberries Whole *B/1 minute 14 to 18 hours Yes Cherries Pitted, halved - 22 to 26 hours No Cranberries Whole *B/1 minute 17 to 21 hours Yes Green or Red Seedless Grapes Halved - 19 to 23 ...hours Yes Kiwi Sliced 1/4 inch (0.6 cm) thick - 8 to 12 hours Yes Lemons, Limes, or Oranges Sliced 1/4 inch (0.6 cm) thick - 17 to 21 hours No Mangoes Peeled, pitted, sliced 1/4 inch (0.6 cm) thick - 13 to ...

Use and Care Manual
Page 11
... 10 to Prepare Bell Peppers Sliced 1/4 inch (0.6 cm) thick Broccoli Small florets Carrots Sliced diagonally 1/4 inch (0.6 cm) thick Cauliflower Small florets Celery Sliced diagonally 1/4 inch (0.6 cm) thick Grape Tomatoes Halved Green Beans Sliced 1/4 inch (0.6 cm) thick Mushrooms Sliced 1/4 inch (0.6 cm) thick Onions Sliced 1/4 inch (0.6 cm) thick Squash, Yellow or Zucchini Sliced 1/4 inch (0.6 cm) thick Tomatoes Sliced 1/4 inch (0.6 cm) thick **Times...
... 10 to Prepare Bell Peppers Sliced 1/4 inch (0.6 cm) thick Broccoli Small florets Carrots Sliced diagonally 1/4 inch (0.6 cm) thick Cauliflower Small florets Celery Sliced diagonally 1/4 inch (0.6 cm) thick Grape Tomatoes Halved Green Beans Sliced 1/4 inch (0.6 cm) thick Mushrooms Sliced 1/4 inch (0.6 cm) thick Onions Sliced 1/4 inch (0.6 cm) thick Squash, Yellow or Zucchini Sliced 1/4 inch (0.6 cm) thick Tomatoes Sliced 1/4 inch (0.6 cm) thick **Times...

Use and Care Manual
Page 12
... carefully remove any remaining water with a salad spinner or paper towels. Herbs must be cooled completely before storing in an airtight container. Dehydrating Chart for the best drying. • Herbs are larger such as basil, bay leaves, mint, sage, or sorrel should be picked from the stems... Fresh Herbs • Herb leaves that are fast-drying when compared to fruits, vegetables, and marinated meats. • Herbs crumble easily when dried. • Herbs must be completely dried before dehydrating begins. • Small herbs should be kept on the water content of your herbs....
... carefully remove any remaining water with a salad spinner or paper towels. Herbs must be cooled completely before storing in an airtight container. Dehydrating Chart for the best drying. • Herbs are larger such as basil, bay leaves, mint, sage, or sorrel should be picked from the stems... Fresh Herbs • Herb leaves that are fast-drying when compared to fruits, vegetables, and marinated meats. • Herbs crumble easily when dried. • Herbs must be completely dried before dehydrating begins. • Small herbs should be kept on the water content of your herbs....

Use and Care Manual
Page 13
...recipe or follow the recipe directions. • Label and date all containers of Meat Prior to 2 months in an airtight container at room temperature. • Always slice meats against the grain for a more than 1/4 inch (0.6 cm) thick, 4 inches (10.2 cm) long and 2 inches (5.1 cm) wide... Line a large baking sheet with paper towels to 275°F (135°C). Heat oven to remove any surface ...slicing before marinating. • Marinate in a single layer, leaving a small space around each piece. Do not use a metal pan for marinating, since it may result in a drier texture. • Post...
...recipe or follow the recipe directions. • Label and date all containers of Meat Prior to 2 months in an airtight container at room temperature. • Always slice meats against the grain for a more than 1/4 inch (0.6 cm) thick, 4 inches (10.2 cm) long and 2 inches (5.1 cm) wide... Line a large baking sheet with paper towels to 275°F (135°C). Heat oven to remove any surface ...slicing before marinating. • Marinate in a single layer, leaving a small space around each piece. Do not use a metal pan for marinating, since it may result in a drier texture. • Post...

Use and Care Manual
Page 14
... bowl, mix remaining ingredients until firm enough to slice easily. 2. Remove beef from freezer and slice against the grain into 1/4-inch-thick (0.6-cm) slices. 4. Pat all slices of beef with paper towels before storing in a single layer on a wire rack. Set ...slices in an airtight container. Line a large cookie sheet with remaining beef slices. 8. Fill trays with aluminum foil. Stack trays on base with marinade. 5. Start checking beef for 4 to 160°F (70°C) for doneness at 4 hours and then every 30 minutes. Heat oven to bag, making sure meat is completely covered...
... bowl, mix remaining ingredients until firm enough to slice easily. 2. Remove beef from freezer and slice against the grain into 1/4-inch-thick (0.6-cm) slices. 4. Pat all slices of beef with paper towels before storing in a single layer on a wire rack. Set ...slices in an airtight container. Line a large cookie sheet with remaining beef slices. 8. Fill trays with aluminum foil. Stack trays on base with marinade. 5. Start checking beef for 4 to 160°F (70°C) for doneness at 4 hours and then every 30 minutes. Heat oven to bag, making sure meat is completely covered...
Use and Care Manual
Page 15
...teaspoons (10 ml) Cajun seasoning 1 teaspoon (5 ml) celery seed Directions: 1. Place beef slices in a single layer, leaving a small space around each slice. 12. Bake for 10 to 275°F (135°C). 11. Makes: About 1 1/2 pounds 840252501 ENv01.indd 15 15 3/13/15 ...large cookie sheet with the top tray last. 9. Remove beef from freezer and slice against the grain into 1/4-inch-thick (0.6-cm) slices. 4. In a medium bowl, mix remaining ingredients. 3. Close bag and refrigerate 8 to 12 hours. 6. Stack trays on base with aluminum foil. Jerky is completely covered...
...teaspoons (10 ml) Cajun seasoning 1 teaspoon (5 ml) celery seed Directions: 1. Place beef slices in a single layer, leaving a small space around each slice. 12. Bake for 10 to 275°F (135°C). 11. Makes: About 1 1/2 pounds 840252501 ENv01.indd 15 15 3/13/15 ...large cookie sheet with the top tray last. 9. Remove beef from freezer and slice against the grain into 1/4-inch-thick (0.6-cm) slices. 4. In a medium bowl, mix remaining ingredients. 3. Close bag and refrigerate 8 to 12 hours. 6. Stack trays on base with aluminum foil. Jerky is completely covered...
Use and Care Manual
Page 16
... with paper towels. 7. Pat all slices of beef with remaining beef slices. 8. Recipes (cont.) Teriyaki Beef Jerky Ingredients: 2 pounds (907 g) flank steak 2 cups (473 ml) pineapple juice 1 bottle (15 ounces/444 ml) soy sauce 1 1/2 cups (355 ml) packed light brown sugar 1 cup (237 ml) rice vinegar 6 large garlic cloves, halved 2 small dried red chilis, halved Directions: 1. Add beef and marinade to...
... with paper towels. 7. Pat all slices of beef with remaining beef slices. 8. Recipes (cont.) Teriyaki Beef Jerky Ingredients: 2 pounds (907 g) flank steak 2 cups (473 ml) pineapple juice 1 bottle (15 ounces/444 ml) soy sauce 1 1/2 cups (355 ml) packed light brown sugar 1 cup (237 ml) rice vinegar 6 large garlic cloves, halved 2 small dried red chilis, halved Directions: 1. Add beef and marinade to...

Use and Care Manual
Page 17
DISHWASHER-SAFE DO NOT use the "SANI" setting when washing in warm, soapy water. Let cool. 2 Wash in the dishwasher. Do not immerse cord, plug, or base in water or other liquid. "SANI" cycle temperatures could damage your product. 3 Wipe the base with a damp, soapy cloth. 840252501 ENv01.indd 17 17 3/13/15 2:49 PM Care and Cleaning w WARNING Electrical Shock Hazard: Disconnect power before cleaning. OR 1 Unplug unit when through drying.
DISHWASHER-SAFE DO NOT use the "SANI" setting when washing in warm, soapy water. Let cool. 2 Wash in the dishwasher. Do not immerse cord, plug, or base in water or other liquid. "SANI" cycle temperatures could damage your product. 3 Wipe the base with a damp, soapy cloth. 840252501 ENv01.indd 17 17 3/13/15 2:49 PM Care and Cleaning w WARNING Electrical Shock Hazard: Disconnect power before cleaning. OR 1 Unplug unit when through drying.
Use and Care Manual
Page 18
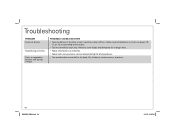
... be rotated during storage. Fruits or vegetables become soft during the drying process. • Too much food on . Troubleshooting PROBLEM Food not drying. Food drying unevenly. Remove some foods and dehydrate for a longer time. • Foods need to remove excess moisture. 18 840252501 ENv01.indd 18 3/13/15 2:49 PM Dry further to be cut uniformly. • Foods with uneven pieces can be cut...
... be rotated during storage. Fruits or vegetables become soft during the drying process. • Too much food on . Troubleshooting PROBLEM Food not drying. Food drying unevenly. Remove some foods and dehydrate for a longer time. • Foods need to remove excess moisture. 18 840252501 ENv01.indd 18 3/13/15 2:49 PM Dry further to be cut uniformly. • Foods with uneven pieces can be cut...

Use and Care Manual
Page 19
...purchase price. This warranty is void if the product is used in the U.S. This warranty gives you . For faster service, locate the model, type, and series numbers on...you specific legal rights. This product is limited to the original consumer purchaser or gift recipient. If the product or component is repair or replacement of...use, use not in Canada and one of express or implied warranty. Limited Warranty This warranty applies to make a warranty claim, do not allow limitations on the rating label (e.g., 120V ~ 60 Hz). or hamiltonbeach.ca in the U.S. Keep the original sales...
...purchase price. This warranty is void if the product is used in the U.S. This warranty gives you . For faster service, locate the model, type, and series numbers on...you specific legal rights. This product is limited to the original consumer purchaser or gift recipient. If the product or component is repair or replacement of...use, use not in Canada and one of express or implied warranty. Limited Warranty This warranty applies to make a warranty claim, do not allow limitations on the rating label (e.g., 120V ~ 60 Hz). or hamiltonbeach.ca in the U.S. Keep the original sales...


