
Use & Care
Page 2
... use with oven cooking bags. • Always allow contents to cool before opening door. • Do not operate unattended while in Toast or Broil modes. • Do not use of accessory attachments not recommended by or near flammable material, including curtains, draperies, walls, and the like, when in operation. Pieces can break off parts. 6. Use handles or knobs. 3. Allow to stop burning and cool before cleaning...
... use with oven cooking bags. • Always allow contents to cool before opening door. • Do not operate unattended while in Toast or Broil modes. • Do not use of accessory attachments not recommended by or near flammable material, including curtains, draperies, walls, and the like, when in operation. Pieces can break off parts. 6. Use handles or knobs. 3. Allow to stop burning and cool before cleaning...
Use & Care
Page 3
... electrical rating of the appliance. The tempered glass is equipped with a fully tempered safety glass door. If the door has a scratch or nick, call our toll-free customer service number. Do not place any way or by children or accidentally tripped over a longer cord. See "Parts and Features" section. 22. 840182000 ENv13.qxd:Layout 1 6/8/10 2:33 PM Page 3 19. Clean oven interior...
... electrical rating of the appliance. The tempered glass is equipped with a fully tempered safety glass door. If the door has a scratch or nick, call our toll-free customer service number. Do not place any way or by children or accidentally tripped over a longer cord. See "Parts and Features" section. 22. 840182000 ENv13.qxd:Layout 1 6/8/10 2:33 PM Page 3 19. Clean oven interior...

Use & Care
Page 4
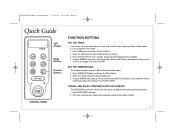
... pizza) Baking Pan Broil Rack* (optional accessory on select models. NOTE: *Broil rack is an optional accessory on select models) BAKE POSITION Broil Rack Shown Used With Baking Pan Let oven preheat for 5 minutes. Plug unit into outlet. then press TIMER button and set temperature to set for approximately 5 minutes. Use UP and DOWN arrows to 450°F; LED Display Mode Buttons Function Buttons Stop/Cancel Button Selector Knob/ Start Button BROIL/TOAST POSITION (Use this initial preheating. Press BAKE button. Wash baking pan, broil rack*, and oven rack...
... pizza) Baking Pan Broil Rack* (optional accessory on select models. NOTE: *Broil rack is an optional accessory on select models) BAKE POSITION Broil Rack Shown Used With Baking Pan Let oven preheat for 5 minutes. Plug unit into outlet. then press TIMER button and set temperature to set for approximately 5 minutes. Use UP and DOWN arrows to 450°F; LED Display Mode Buttons Function Buttons Stop/Cancel Button Selector Knob/ Start Button BROIL/TOAST POSITION (Use this initial preheating. Press BAKE button. Wash baking pan, broil rack*, and oven rack...
Use & Care
Page 5
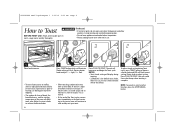
... 1 6/8/10 2:33 PM Page 5 Quick Guide LED Display Mode Buttons Function Buttons CONTROL PANEL FUNCTION BUTTONS SET THE TIMER Timer can be set to cancel. 2. It is active in Toast mode. 1. To adjust DURING Bake modes, press the selector knob. SET THE TEMPERATURE The Temperature button is not an option in Bake or Convection Bake modes. 1. Display will stop flashing and timer will begin. 4. Press TIMER button to activate.
... 1 6/8/10 2:33 PM Page 5 Quick Guide LED Display Mode Buttons Function Buttons CONTROL PANEL FUNCTION BUTTONS SET THE TIMER Timer can be set to cancel. 2. It is active in Toast mode. 1. To adjust DURING Bake modes, press the selector knob. SET THE TEMPERATURE The Temperature button is not an option in Bake or Convection Bake modes. 1. Display will stop flashing and timer will begin. 4. Press TIMER button to activate.
Use & Care
Page 6
This is normal. • At the end of the Toast cycle, remove toast immediately or the heat remaining in use baking pan to prevent dripping. • The number of slices of bread, the bread freshness, and the starting temperature of the oven will illuminate. Rotate knob to achieve the desired color. 6 2 Press TOAST button which will affect toast color. 840182000 ENv13.qxd:Layout 1 6/8/10 2:33 PM Page...
This is normal. • At the end of the Toast cycle, remove toast immediately or the heat remaining in use baking pan to prevent dripping. • The number of slices of bread, the bread freshness, and the starting temperature of the oven will illuminate. Rotate knob to achieve the desired color. 6 2 Press TOAST button which will affect toast color. 840182000 ENv13.qxd:Layout 1 6/8/10 2:33 PM Page...

Use & Care
Page 7
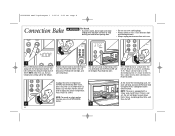
... first use oven cooking bags. • Always allow at least 1 inch between food and heating element. • Always unplug toaster oven when not in 1-minute increments. Press PUSH TO START. Place food into oven. LED will be the default. 12 5 2 Rotate selector knob to desired temperature. Once a bake time has been selected, press PUSH TO START. NOTE: The oven is not set bake time...
... first use oven cooking bags. • Always allow at least 1 inch between food and heating element. • Always unplug toaster oven when not in 1-minute increments. Press PUSH TO START. Place food into oven. LED will be the default. 12 5 2 Rotate selector knob to desired temperature. Once a bake time has been selected, press PUSH TO START. NOTE: The oven is not set bake time...
Use & Care
Page 8
... shutoff timer. Remove food using oven mitts. If timer is not set, the unit will sound 3 short beeps when it is equipped with the temperature button. Unplug oven and allow contents to set bake time. Rotate selector knob to stop burning and cool before opening door. • Do not use oven cooking bags. • Always allow at least 1 inch between food and heating element. • Always unplug toaster oven...
... shutoff timer. Remove food using oven mitts. If timer is not set, the unit will sound 3 short beeps when it is equipped with the temperature button. Unplug oven and allow contents to set bake time. Rotate selector knob to stop burning and cool before opening door. • Do not use oven cooking bags. • Always allow at least 1 inch between food and heating element. • Always unplug toaster oven...
Use & Care
Page 9
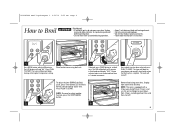
... timer will illuminate. LED will default to set , the unit will shut off . 5 6 9 Unplug oven and allow contents to stop burning and cool before opening door. • Do not leave oven unattended during operation. • Keep 1 inch between food and heating element. • Do not use oven cooking bags. • Do not heat foods in plastic containers. • Follow food manufacturer's instructions. 1 Press BROIL button...
... timer will illuminate. LED will default to set , the unit will shut off . 5 6 9 Unplug oven and allow contents to stop burning and cool before opening door. • Do not leave oven unattended during operation. • Keep 1 inch between food and heating element. • Do not use oven cooking bags. • Do not heat foods in plastic containers. • Follow food manufacturer's instructions. 1 Press BROIL button...

Use & Care
Page 10
... 2:33 PM Page 10 Food Charts BAKING CHART FOOD Fresh Chicken Breast Fish Fillet APPROX. Hamburger Steak - 1" thick APPROX. Turn foods halfway through cooking time. Visit foodsafety.gov for more safe cooking temperature information. BAKE TIMES 30 minutes 15 minutes INTERNAL TEMPERATURES F C 170° 77° 145° 63° Turn foods halfway through cooking time. BROILING CHART FOOD 1/4-lb.
... 2:33 PM Page 10 Food Charts BAKING CHART FOOD Fresh Chicken Breast Fish Fillet APPROX. Hamburger Steak - 1" thick APPROX. Turn foods halfway through cooking time. Visit foodsafety.gov for more safe cooking temperature information. BAKE TIMES 30 minutes 15 minutes INTERNAL TEMPERATURES F C 170° 77° 145° 63° Turn foods halfway through cooking time. BROILING CHART FOOD 1/4-lb.
Use & Care
Page 11
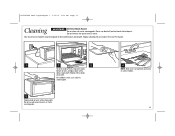
... electrical parts. Repeat with metal scouring pads. Your toaster oven should be cleaned regularly for best performance and long life. Do not use a plastic scouring pad. 5 Wipe outside of oven, and glass door with a damp cloth. Do not immerse the toaster oven in water. For stubborn stains, use abrasive cleansers or metal scouring pads. 4 NOTE: Broil rack is an optional accessory on select models. 11 Regular cleaning...
... electrical parts. Repeat with metal scouring pads. Your toaster oven should be cleaned regularly for best performance and long life. Do not use a plastic scouring pad. 5 Wipe outside of oven, and glass door with a damp cloth. Do not immerse the toaster oven in water. For stubborn stains, use abrasive cleansers or metal scouring pads. 4 NOTE: Broil rack is an optional accessory on select models. 11 Regular cleaning...
Use & Care
Page 12
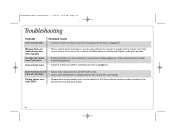
... smoke come from a toaster. These will differ between fresh bread, bagels, and frozen pastries. • Smoke and odor are not done. • Adjust oven temperature or cooking time for best results with your recipes. some are normal during first use of oven door when toasting. Moisture is slower to make sure electrical outlet is working and oven is plugged in. Some foods burn and • Adjust oven rack position to...
... smoke come from a toaster. These will differ between fresh bread, bagels, and frozen pastries. • Smoke and odor are not done. • Adjust oven temperature or cooking time for best results with your recipes. some are normal during first use of oven door when toasting. Moisture is slower to make sure electrical outlet is working and oven is plugged in. Some foods burn and • Adjust oven rack position to...
Use & Care
Page 13
... claim, do not allow limitations on your exclusive remedy is repair or replacement of this product or any statutory warranty or condition of merchantability or fitness for a period of one of the purchase price. If the product or component is limited to the amount of equal or greater... free from accident, alteration, abuse, or misuse. This product is warranted to be defective, at our option; This warranty does not cover glass, filters, wear from the date of this appliance to the store. This warranty gives you . For faster service, locate the model, type, and series numbers...
... claim, do not allow limitations on your exclusive remedy is repair or replacement of this product or any statutory warranty or condition of merchantability or fitness for a period of one of the purchase price. If the product or component is limited to the amount of equal or greater... free from accident, alteration, abuse, or misuse. This product is warranted to be defective, at our option; This warranty does not cover glass, filters, wear from the date of this appliance to the store. This warranty gives you . For faster service, locate the model, type, and series numbers...


