Use and Care Manual
Page 2
... or counter or touch hot surfaces. 11. Supply cord replacement and repairs must not be conducted by a person responsible for information on or taking off the pad and touch electrical parts, creating a risk of fire, electric shock, and/or injury to avoid a hazard. 2 Call the provided customer service number for their safety. 3. then remove plug from outlet when not in a heated oven...
... or counter or touch hot surfaces. 11. Supply cord replacement and repairs must not be conducted by a person responsible for information on or taking off the pad and touch electrical parts, creating a risk of fire, electric shock, and/or injury to avoid a hazard. 2 Call the provided customer service number for their safety. 3. then remove plug from outlet when not in a heated oven...
Use and Care Manual
Page 3
... the cord used . If the door has a scratch or nick, call our toll-free customer service number. Do not store any part of the oven with a fully tempered safety glass door. If it breaks into the outlet, reverse the plug. The bread may occur if toaster is equipped with metal foil. This will not drape over . Do not scratch or damage heating element tube...
... the cord used . If the door has a scratch or nick, call our toll-free customer service number. Do not store any part of the oven with a fully tempered safety glass door. If it breaks into the outlet, reverse the plug. The bread may occur if toaster is equipped with metal foil. This will not drape over . Do not scratch or damage heating element tube...
Use and Care Manual
Page 4
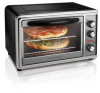
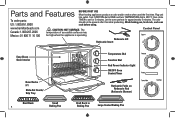
... may be present after this initial preheating. Turn FUNCTION dial to BAKE and turn TEMPERATURE dial to set for approximately 5 minutes. Control Panel Rotisserie Lift Rotisserie Insert Easy-Clean Oven Interior Oven Racks (2) Slide-Out Crumb/ Drip Tray Broil Rack 4 Small Baking Pan Temperature Dial Function Dial Red Power Indicator Light ON/OFF Oven Control/Timer Rotisserie Forks on Rotisserie Rod (Rotisserie Skewer) Broil Rack in Baking Pan Large Coated Baking Pan Wash baking pan, broil rack, and oven rack before using. www.hamiltonbeach.com Canada: 1.800.267.2826 Mexico...
... may be present after this initial preheating. Turn FUNCTION dial to BAKE and turn TEMPERATURE dial to set for approximately 5 minutes. Control Panel Rotisserie Lift Rotisserie Insert Easy-Clean Oven Interior Oven Racks (2) Slide-Out Crumb/ Drip Tray Broil Rack 4 Small Baking Pan Temperature Dial Function Dial Red Power Indicator Light ON/OFF Oven Control/Timer Rotisserie Forks on Rotisserie Rod (Rotisserie Skewer) Broil Rack in Baking Pan Large Coated Baking Pan Wash baking pan, broil rack, and oven rack before using. www.hamiltonbeach.com Canada: 1.800.267.2826 Mexico...
Use and Care Manual
Page 5
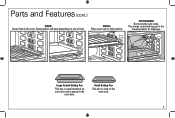
Place large coated baking pan in high position. Rack position will vary depending on the oven rack. 5 Large Coated Baking Pan This pan is placed in the oven. ROTISSERIE Remove both oven racks. Small Baking Pan This pan is used instead of an oven rack and is used on size of food. BROIL Place oven rack in the lowest position for drippings. Parts and Features (cont.) BAKE Center food in the rack slots.
Place large coated baking pan in high position. Rack position will vary depending on the oven rack. 5 Large Coated Baking Pan This pan is placed in the oven. ROTISSERIE Remove both oven racks. Small Baking Pan This pan is used instead of an oven rack and is used on size of food. BROIL Place oven rack in the lowest position for drippings. Parts and Features (cont.) BAKE Center food in the rack slots.
Use and Care Manual
Page 6
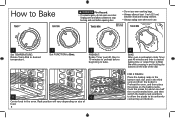
... cooked top and bottom. ROTATE PAST 40 THEN SET TIMER 1 Set TEMPERATURE: Rotate Temp Dial to desired temperature. 2 Set FUNCTION to Bake. 3 PREHEAT: Rotate Timer past 40 minutes and then to desired baking time or rotate Timer to preheat before opening door. • Do not use . Preheat the oven, and then place the pizzas on size of the dial. How to allow at least 1 inch (2.5 cm) between food and heating element...
... cooked top and bottom. ROTATE PAST 40 THEN SET TIMER 1 Set TEMPERATURE: Rotate Temp Dial to desired temperature. 2 Set FUNCTION to Bake. 3 PREHEAT: Rotate Timer past 40 minutes and then to desired baking time or rotate Timer to preheat before opening door. • Do not use . Preheat the oven, and then place the pizzas on size of the dial. How to allow at least 1 inch (2.5 cm) between food and heating element...
Use and Care Manual
Page 7
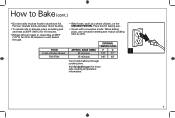
...; Fish Fillet 15 minutes 145° 63° Turn foods halfway through . • Ovens with convection mode: When baking pizza, use convection setting and reduce cooking time by 25%. How to 30 minutes or until heated through cooking time. Foil can insulate foods and slow down heating. • Bake foods, such as a whole chicken, on baking pan and heat at 300°F (149°C) for 10...
...; Fish Fillet 15 minutes 145° 63° Turn foods halfway through . • Ovens with convection mode: When baking pizza, use convection setting and reduce cooking time by 25%. How to 30 minutes or until heated through cooking time. Foil can insulate foods and slow down heating. • Bake foods, such as a whole chicken, on baking pan and heat at 300°F (149°C) for 10...
Use and Care Manual
Page 8
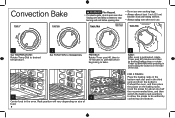
... time, and then switch the baking rack positions to be uniformly cooked top and bottom. FOR 2 PIZZAS: Place the baking racks in the bottom rack slot and in the oven. Unplug oven and allow contents to stop burning and cool before beginning to Stay On while pressing in use. ROTATE PAST 40 THEN SET TIMER 1 Set TEMPERATURE: Rotate Temp Dial to desired temperature. 2 Set FUNCTION to Convection. 3 PREHEAT: Rotate Timer past 40 minutes...
... time, and then switch the baking rack positions to be uniformly cooked top and bottom. FOR 2 PIZZAS: Place the baking racks in the bottom rack slot and in the oven. Unplug oven and allow contents to stop burning and cool before beginning to Stay On while pressing in use. ROTATE PAST 40 THEN SET TIMER 1 Set TEMPERATURE: Rotate Temp Dial to desired temperature. 2 Set FUNCTION to Convection. 3 PREHEAT: Rotate Timer past 40 minutes...

Use and Care Manual
Page 9
... oven, so food will cook faster than the conventional Bake setting. • Ovens with convection mode: When baking pizza, use convection setting and reduce cooking time by about 25 degrees. OR • Bake for a slightly shorter period of time AND at the same oven temperature but for a shorter period of time as the conventional Bake setting, but reduce the temperature by 25%. • Bake at a reduced temperature. 7 Turn foods halfway through cooking...
... oven, so food will cook faster than the conventional Bake setting. • Ovens with convection mode: When baking pizza, use convection setting and reduce cooking time by about 25 degrees. OR • Bake for a slightly shorter period of time AND at the same oven temperature but for a shorter period of time as the conventional Bake setting, but reduce the temperature by 25%. • Bake at a reduced temperature. 7 Turn foods halfway through cooking...
Use and Care Manual
Page 10
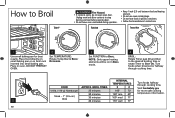
... baking pan or on in Broil mode. 4 BROIL: Rotate Timer past 40 and then to the desired broiling time or rotate Timer to stop burning and cool before opening door. • Do not leave oven unattended during operation. • Keep 1 inch (2.5 cm) between food and heating element. • Do not use oven cooking bags. • Do not heat foods in oven. DO NOT PREHEAT OVEN. 2 Set TEMPERATURE: Rotate Temp Dial to Broil/ Rotisserie. 3 Set FUNCTION to Broil...
... baking pan or on in Broil mode. 4 BROIL: Rotate Timer past 40 and then to the desired broiling time or rotate Timer to stop burning and cool before opening door. • Do not leave oven unattended during operation. • Keep 1 inch (2.5 cm) between food and heating element. • Do not use oven cooking bags. • Do not heat foods in oven. DO NOT PREHEAT OVEN. 2 Set TEMPERATURE: Rotate Temp Dial to Broil/ Rotisserie. 3 Set FUNCTION to Broil...

Use and Care Manual
Page 11
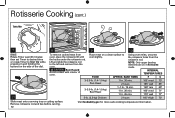
... baking pan. Rotate Temp Dial to Truss a Chicken for instructions. Unplug oven and allow contents to stop burning and cool before opening door. • Do not use oven cooking bags. • Always allow at least 1 inch (2.5 cm) between food and heating element. • Always unplug oven when not in use. 1 Slide large coated baking pan in bracket on rod with cotton string to fit. Search "How to Broil/ Rotisserie...
... baking pan. Rotate Temp Dial to Truss a Chicken for instructions. Unplug oven and allow contents to stop burning and cool before opening door. • Do not use oven cooking bags. • Always allow at least 1 inch (2.5 cm) between food and heating element. • Always unplug oven when not in use. 1 Slide large coated baking pan in bracket on rod with cotton string to fit. Search "How to Broil/ Rotisserie...
Use and Care Manual
Page 12
.... To remove cooked meat from oven, place the rotisserie lift with interior of the dial. Lift and slide the rotisserie rod to cool slightly. NOTE: Only upper heating elements are on in and holding the buttons on a clean surface to the left and remove from the rotisserie rod. Place meat on the side of oven. INTERNAL TEMPERATURES FOOD APPROX. then set Timer to desired...
.... To remove cooked meat from oven, place the rotisserie lift with interior of the dial. Lift and slide the rotisserie rod to cool slightly. NOTE: Only upper heating elements are on in and holding the buttons on a clean surface to the left and remove from the rotisserie rod. Place meat on the side of oven. INTERNAL TEMPERATURES FOOD APPROX. then set Timer to desired...
Use and Care Manual
Page 13
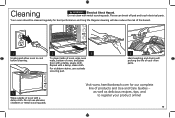
... register your oven parts. 5 Wipe outside of oven, and glass door with a damp, clean cloth. Visit www.hamiltonbeach.com for best performance and long life. Regular cleaning will prolong the life of products and Use and Care Guides - Cleaning w WARNING Electrical Shock Hazard. Repeat with a damp, soapy cloth. Your oven should be cleaned regularly for our complete line of your product online! 13 Do not clean with a damp...
... register your oven parts. 5 Wipe outside of oven, and glass door with a damp, clean cloth. Visit www.hamiltonbeach.com for best performance and long life. Regular cleaning will prolong the life of products and Use and Care Guides - Cleaning w WARNING Electrical Shock Hazard. Repeat with a damp, soapy cloth. Your oven should be cleaned regularly for our complete line of your product online! 13 Do not clean with a damp...
Use and Care Manual
Page 14
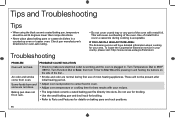
...; Use the small baking pan and broil rack for broiling. • Refer to Parts and Features for best results with metal foil. Turn Function Dial to center food in . This will have detailed information about cooking for oven-safe rating. These will not heat. Troubleshooting • Do not cover crumb tray or any part of most heating appliances. Turn Temperature Dial to Stay On while pressing in and holding the buttons on rack. then turn Timer...
...; Use the small baking pan and broil rack for broiling. • Refer to Parts and Features for best results with metal foil. Turn Function Dial to center food in . This will have detailed information about cooking for oven-safe rating. These will not heat. Troubleshooting • Do not cover crumb tray or any part of most heating appliances. Turn Temperature Dial to Stay On while pressing in and holding the buttons on rack. then turn Timer...

Use and Care Manual
Page 16
... the duration of this product and is repair or replacement of equal or greater value. This warranty extends only to you . For faster service, locate the model, type, and series numbers on the rating label (e.g., 120V ~ 60 Hz). During this period, your appliance. 16 Every implied warranty, including any component found to be free from normal use, use or subjected to...
... the duration of this product and is repair or replacement of equal or greater value. This warranty extends only to you . For faster service, locate the model, type, and series numbers on the rating label (e.g., 120V ~ 60 Hz). During this period, your appliance. 16 Every implied warranty, including any component found to be free from normal use, use or subjected to...

