Use and Care Manual
Page 2
...Supply cord replacement and repairs must be conducted by or near a hot gas or electric burner or in a heated oven. 12. Use handles or knobs. 5. wWARNING Fire Hazard. • If contents ignite, do not play with a damaged supply cord or plug, or after...customer service number for information on or taking off the pad and touch electrical parts, creating a risk of experience and knowledge, unless they are closely supervised and instructed concerning use with oven cooking bags. • Do not heat taco shells in toaster oven. Allow to cool before opening door. • Do not operate...
...Supply cord replacement and repairs must be conducted by or near a hot gas or electric burner or in a heated oven. 12. Use handles or knobs. 5. wWARNING Fire Hazard. • If contents ignite, do not play with a damaged supply cord or plug, or after...customer service number for information on or taking off the pad and touch electrical parts, creating a risk of experience and knowledge, unless they are closely supervised and instructed concerning use with oven cooking bags. • Do not heat taco shells in toaster oven. Allow to cool before opening door. • Do not operate...
Use and Care Manual
Page 3
... if toaster is provided with crumb tray securely in use. 20. Do not store any part of the oven. 22. Do not cover crumb tray or any materials, other than ordinary glass and more resistant to breakage. This will not drape over the countertop or tabletop where it can break; To turn oven off, turn Timer to or greater than manufacturer-recommended accessories...
... if toaster is provided with crumb tray securely in use. 20. Do not store any part of the oven. 22. Do not cover crumb tray or any materials, other than ordinary glass and more resistant to breakage. This will not drape over the countertop or tabletop where it can break; To turn oven off, turn Timer to or greater than manufacturer-recommended accessories...
Use and Care Manual
Page 4
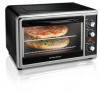
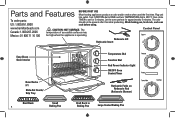
...Oven Interior Oven Racks (2) Slide-Out Crumb/ Drip Tray Broil Rack 4 Small Baking Pan Temperature Dial Function Dial Red Power Indicator Light ON/OFF Oven Control/Timer Rotisserie Forks on Rotisserie Rod (Rotisserie Skewer) Broil Rack in Baking Pan Large Coated Baking Pan www.hamiltonbeach.com Canada: 1.800.267.2826 Mexico: 01 800 71 16 100 CAUTION: HOT SURFACE. The odor should not be high when the appliance is operating. Let the oven preheat for 5 minutes. Wash baking pan, broil rack, and oven rack before using. Turn FUNCTION dial to BAKE and turn TEMPERATURE dial to set...
...Oven Interior Oven Racks (2) Slide-Out Crumb/ Drip Tray Broil Rack 4 Small Baking Pan Temperature Dial Function Dial Red Power Indicator Light ON/OFF Oven Control/Timer Rotisserie Forks on Rotisserie Rod (Rotisserie Skewer) Broil Rack in Baking Pan Large Coated Baking Pan www.hamiltonbeach.com Canada: 1.800.267.2826 Mexico: 01 800 71 16 100 CAUTION: HOT SURFACE. The odor should not be high when the appliance is operating. Let the oven preheat for 5 minutes. Wash baking pan, broil rack, and oven rack before using. Turn FUNCTION dial to BAKE and turn TEMPERATURE dial to set...
Use and Care Manual
Page 5
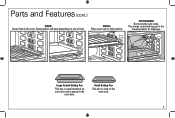
Place large coated baking pan in high position. Small Baking Pan This pan is placed in the oven. BROIL Place oven rack in the lowest position for drippings. Large Coated Baking Pan This pan is used on size of an oven rack and is used instead of food. Parts and Features (cont.) BAKE Center food in the rack slots. Rack position will vary depending on the oven rack. 5 ROTISSERIE Remove both oven racks.
Place large coated baking pan in high position. Small Baking Pan This pan is placed in the oven. BROIL Place oven rack in the lowest position for drippings. Large Coated Baking Pan This pan is used on size of an oven rack and is used instead of food. Parts and Features (cont.) BAKE Center food in the rack slots. Rack position will vary depending on the oven rack. 5 ROTISSERIE Remove both oven racks.
Use and Care Manual
Page 6
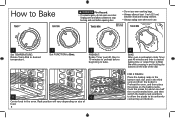
... before beginning to stop burning and cool before opening door. • Do not use oven cooking bags. • Always allow contents to bake. 5 6 Center food in and holding the buttons on the baking racks. ROTATE PAST 40 THEN SET TIMER 1 Set TEMPERATURE: Rotate Temp Dial to desired temperature. 2 Set FUNCTION to Bake. 3 PREHEAT: Rotate Timer past 40 minutes and then to desired baking time or rotate Timer to be uniformly...
... before beginning to stop burning and cool before opening door. • Do not use oven cooking bags. • Always allow contents to bake. 5 6 Center food in and holding the buttons on the baking racks. ROTATE PAST 40 THEN SET TIMER 1 Set TEMPERATURE: Rotate Temp Dial to desired temperature. 2 Set FUNCTION to Bake. 3 PREHEAT: Rotate Timer past 40 minutes and then to desired baking time or rotate Timer to be uniformly...
Use and Care Manual
Page 7
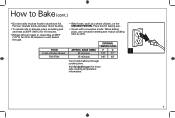
...° Turn foods halfway through . • Ovens with convection mode: When baking pizza, use convection setting and reduce cooking time by 25%. Visit foodsafety.gov for 20 to Bake (cont.) • Do not totally enclose foods in baking pan. • To reheat rolls or biscuits, place on the LOW RACK POSITION. INTERNAL TEMPERATURES FOOD APPROX. Foil can insulate foods and slow down heating. • Bake foods, such...
...° Turn foods halfway through . • Ovens with convection mode: When baking pizza, use convection setting and reduce cooking time by 25%. Visit foodsafety.gov for 20 to Bake (cont.) • Do not totally enclose foods in baking pan. • To reheat rolls or biscuits, place on the LOW RACK POSITION. INTERNAL TEMPERATURES FOOD APPROX. Foil can insulate foods and slow down heating. • Bake foods, such...
Use and Care Manual
Page 8
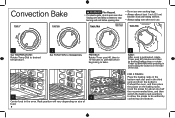
.... 8 4 BAKE: After oven is preheated, rotate Timer past 40, then to 10 minutes to preheat before opening door. • Do not use . FOR 2 PIZZAS: Place the baking racks in the bottom rack slot and in and holding the buttons on the side of the dial. Rack position will vary depending on the baking racks. ROTATE PAST 40 THEN SET TIMER 1 Set TEMPERATURE: Rotate Temp Dial to desired temperature. 2 Set FUNCTION to Convection. 3 PREHEAT...
.... 8 4 BAKE: After oven is preheated, rotate Timer past 40, then to 10 minutes to preheat before opening door. • Do not use . FOR 2 PIZZAS: Place the baking racks in the bottom rack slot and in and holding the buttons on the side of the dial. Rack position will vary depending on the baking racks. ROTATE PAST 40 THEN SET TIMER 1 Set TEMPERATURE: Rotate Temp Dial to desired temperature. 2 Set FUNCTION to Convection. 3 PREHEAT...

Use and Care Manual
Page 9
... for more air to circulate in the oven, so food will cook faster than the conventional Bake setting. • Ovens with convection mode: When baking pizza, use convection setting and reduce cooking time by about 25 degrees. Convection Bake (cont.) TIPS FOR USING CONVECTION BAKE NOTE: Convection Bake forces more safe cooking temperature information. 9 OR • Bake for the same length of time as the conventional Bake setting, but for a slightly shorter period of...
... for more air to circulate in the oven, so food will cook faster than the conventional Bake setting. • Ovens with convection mode: When baking pizza, use convection setting and reduce cooking time by about 25 degrees. Convection Bake (cont.) TIPS FOR USING CONVECTION BAKE NOTE: Convection Bake forces more safe cooking temperature information. 9 OR • Bake for the same length of time as the conventional Bake setting, but for a slightly shorter period of...
Use and Care Manual
Page 10
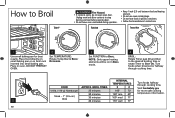
... best results. Place food directly on small baking pan or on in Broil mode. 4 BROIL: Rotate Timer past 40 and then to the desired broiling time or rotate Timer to stop burning and cool before opening door. • Do not leave oven unattended during operation. • Keep 1 inch (2.5 cm) between food and heating element. • Do not use oven cooking bags. • Do not heat foods in oven. Unplug oven and...
... best results. Place food directly on small baking pan or on in Broil mode. 4 BROIL: Rotate Timer past 40 and then to the desired broiling time or rotate Timer to stop burning and cool before opening door. • Do not leave oven unattended during operation. • Keep 1 inch (2.5 cm) between food and heating element. • Do not use oven cooking bags. • Do not heat foods in oven. Unplug oven and...

Use and Care Manual
Page 11
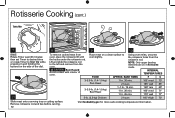
... allow contents to stop burning and cool before opening door. • Do not use oven cooking bags. • Always allow at least 1 inch (2.5 cm) between food and heating element. • Always unplug oven when not in use. 1 Slide large coated baking pan in bracket on the Internet for instructions. Rotate Temp Dial to Truss a Chicken for Rotisserie" on left side. 5 6 Set TEMPERATURE: Set FUNCTION to Rotisserie. Manually insert the pointed end...
... allow contents to stop burning and cool before opening door. • Do not use oven cooking bags. • Always allow at least 1 inch (2.5 cm) between food and heating element. • Always unplug oven when not in use. 1 Slide large coated baking pan in bracket on the Internet for instructions. Rotate Temp Dial to Truss a Chicken for Rotisserie" on left side. 5 6 Set TEMPERATURE: Set FUNCTION to Rotisserie. Manually insert the pointed end...
Use and Care Manual
Page 12
... cooking temperature information. NOTE: Only upper heating elements are on in and holding the buttons on a clean surface to the left and remove from the rotisserie rod. INTERNAL TEMPERATURES FOOD APPROX. Lift and slide the rotisserie rod to cool slightly. Place meat on the side of oven. Rotisserie Cooking (cont.) 7 8 9 10 BAKE: Rotate Timer past 40 minutes; Using oven mitts, unscrew the rotisserie forks from the oven...
... cooking temperature information. NOTE: Only upper heating elements are on in and holding the buttons on a clean surface to the left and remove from the rotisserie rod. INTERNAL TEMPERATURES FOOD APPROX. Lift and slide the rotisserie rod to cool slightly. Place meat on the side of oven. Rotisserie Cooking (cont.) 7 8 9 10 BAKE: Rotate Timer past 40 minutes; Using oven mitts, unscrew the rotisserie forks from the oven...
Use and Care Manual
Page 13
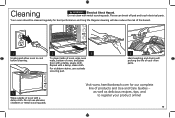
... life of your product online! 13 Visit www.hamiltonbeach.com for best performance and long life. Your oven should be cleaned regularly for our complete line of oven, and glass door with a damp cloth. as well as delicious recipes, tips, and to cool before cleaning. 2 3 To clean inside of oven, wipe oven walls, bottom of products and Use and Care Guides - For stubborn stains, use abrasive cleansers or...
... life of your product online! 13 Visit www.hamiltonbeach.com for best performance and long life. Your oven should be cleaned regularly for our complete line of oven, and glass door with a damp cloth. as well as delicious recipes, tips, and to cool before cleaning. 2 3 To clean inside of oven, wipe oven walls, bottom of products and Use and Care Guides - For stubborn stains, use abrasive cleansers or...
Use and Care Manual
Page 14
... on rack. Do not use of the dial. . • Smoke and odor are not done. IF YOU LIVE IN A HIGH-ALTITUDE AREA: The Extension service will not heat. Turn Temperature Dial to Bake; Turn Function Dial to 350°F (180°C). PROBLEM Oven will have detailed information about cooking for your area. These will cause overheating of the oven with your recipes. • The large black ceramic-coated baking pan fits directly...
... on rack. Do not use of the dial. . • Smoke and odor are not done. IF YOU LIVE IN A HIGH-ALTITUDE AREA: The Extension service will not heat. Turn Temperature Dial to Bake; Turn Function Dial to 350°F (180°C). PROBLEM Oven will have detailed information about cooking for your area. These will cause overheating of the oven with your recipes. • The large black ceramic-coated baking pan fits directly...

Use and Care Manual
Page 16
... the rating label (e.g., 120V ~ 60 Hz). Every implied warranty, including any statutory warranty or condition of merchantability or fitness for this warranty to you live. This warranty gives you . Some states or provinces do not return this written warranty. For faster service, locate the model, type, and series numbers on where you . During this product or...
... the rating label (e.g., 120V ~ 60 Hz). Every implied warranty, including any statutory warranty or condition of merchantability or fitness for this warranty to you live. This warranty gives you . Some states or provinces do not return this written warranty. For faster service, locate the model, type, and series numbers on where you . During this product or...

